Kavia Documentation v2.4
1.0 Introduction
1.1 What is Kavia?
Kavia is an innovative AI-powered Workflow Manager that revolutionizes the process of building software products, catering to everything from individual projects to large-scale enterprise applications. Whether you are part of a development team or working independently, Kavia optimizes the entire product lifecycle by speeding up delivery, fostering collaboration, and enhancing overall efficiency.
Kavia empowers anyone to create and launch fully functional web applications and mobile applications With just natural language prompts, using intuitive, AI-assisted tools. It supports a wide range of users, including individuals without technical backgrounds as well as product managers, project managers, architects, developers, testers, DevOps engineers, and engineering leaders. Kavia provides everything you need to design, build, and deploy professional-grade projects with ease.
From planning and design to development, testing, deployment, and monitoring, Kavia offers a unified platform that simplifies every stage of product creation—making software development more accessible and efficient for everyone.
1.2 Kavia Packages: Overview of Inspect, Plan & Build
Kavia provides a unified suite of AI-powered tools that span the entire software product development process. The platform is divided into three core packages—Inspect, Plan, and Build—each offering distinct capabilities tailored to specific stages of the lifecycle.
1.2.1 Inspect
Inspect empowers teams with deep visibility into codebases, offering actionable intelligence and quality enhancements. It includes three major modules: It supports the ingestion of projects and repositories in over 20 programming languages, generating comprehensive knowledge graphs that visualize code relationships and dependencies. This tool facilitates static code analysis, helping to identify potential issues and vulnerabilities while automatically generating detailed architectural documentation.
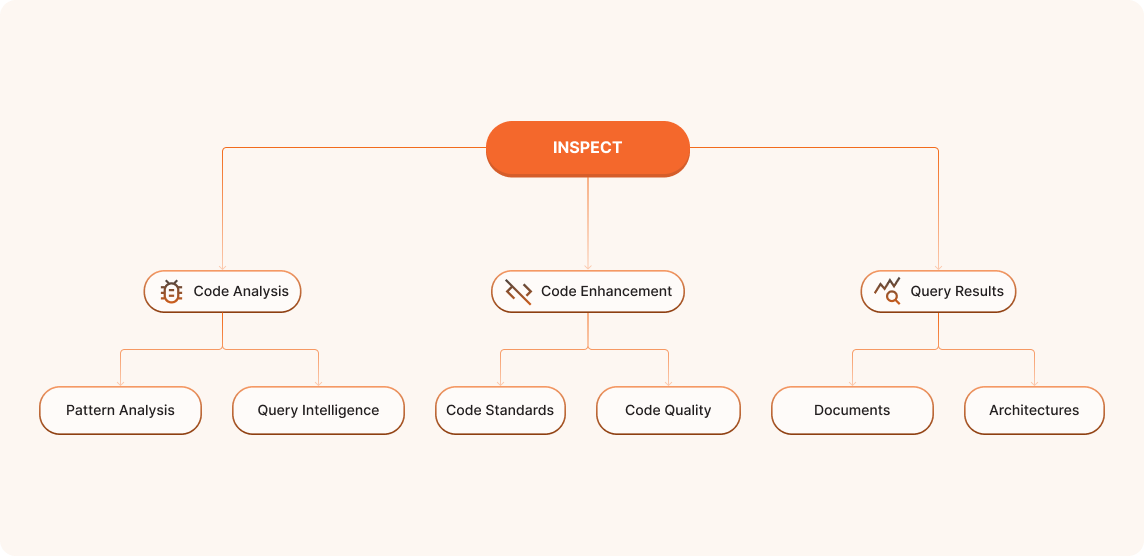
Features:
- Comprehensive Code Analysis: Enhances understanding and maintenance of existing enterprise knowledge bases and codebases.
- Visualizes Code Relationships and Dependencies: Improves collaboration among development teams and promotes a clearer system understanding.
- Identifies Potential Issues: Detects feature implementations, vulnerabilities, and gaps, ensuring enhanced code quality and security.
- Automated Architecture Documentation: Generates detailed documents, including interface descriptions, component interaction diagrams, class diagrams, sequence diagrams, and API documentation, saving time and improving system understanding.
- Natural Language Querying: Enables natural language queries to obtain immediate insights and answers about the system.
- Change Implementation Strategies: Assists in exploring and implementing strategies for changes within the existing system.
1.2.2 Plan
The Plan package takes software development to the next level by providing advanced tools for project planning, design, and architecture of both new features and entire systems. Building upon the Inspect package, it offers enhanced capabilities for impact analysis, requirements generation, and architecture visualization. The Plan package leverages AI-assisted planning and estimation to optimize feature prioritization and predict development timelines.
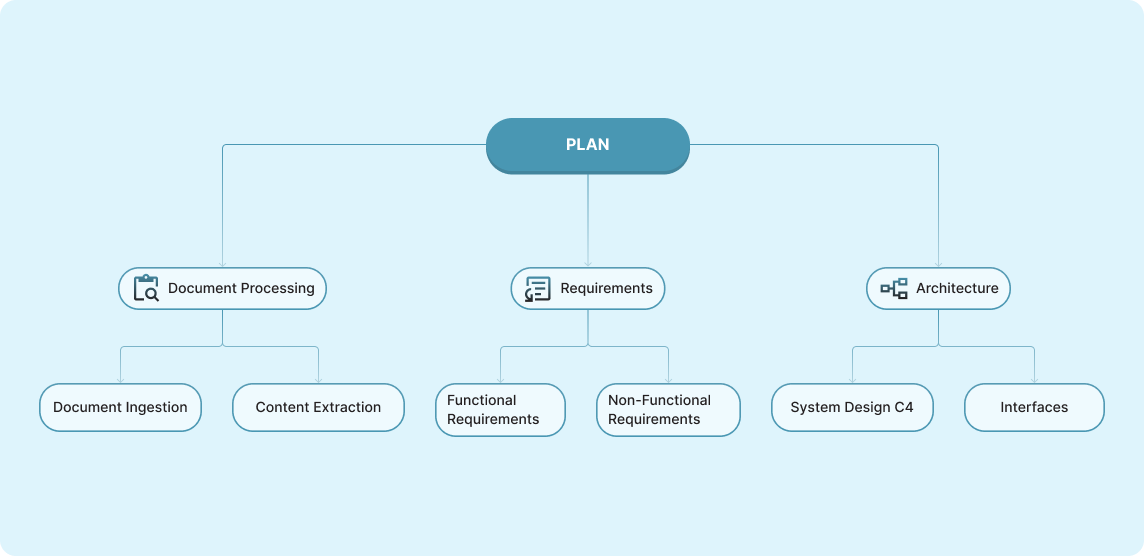
Features:
- Comprehensive Project Planning: Supports the planning of both new and existing projects, ensuring well-rounded development strategies.
- Automated Requirements Generation: Automatically generates and refines detailed requirements, ensuring consistency across documentation and optimizing feature development.
- Architecture Visualization: Creates clear, visual representations of system architecture, enhancing communication and promoting a deeper understanding of design.
- Efficient Resource Allocation: Utilizes AI to allocate resources effectively, balancing team workloads and maximizing productivity.
- End-to-End Project Plan Generation: Generates comprehensive project plans that translate requirements into actionable architecture and detailed specifications.
- Multi-Container Architecture Design: Supports the design of multi-container architectures for scalable and efficient systems.
- Automated Requirements Extraction: Extracts requirements from documents automatically, saving time and ensuring accuracy.
- Interface Definition and API Specification: Assists in defining interfaces and specifying APIs, ensuring seamless integration within the system.
1.2.3 Build
The Build package accelerates the software development process by automating code generation, testing, and maintenance, seamlessly integrating with the Inspect and Plan packages. By leveraging AI-powered code generation, it creates both boilerplate and complex code structures, significantly improving productivity and maintaining high-quality code. Additionally, the Build package automates test case creation for unit, integration, and system tests, helping to ensure the reliability and robustness of the software. With seamless CI/CD pipeline integration, it automates builds, tests, and deployments, enabling continuous delivery of high-quality software.
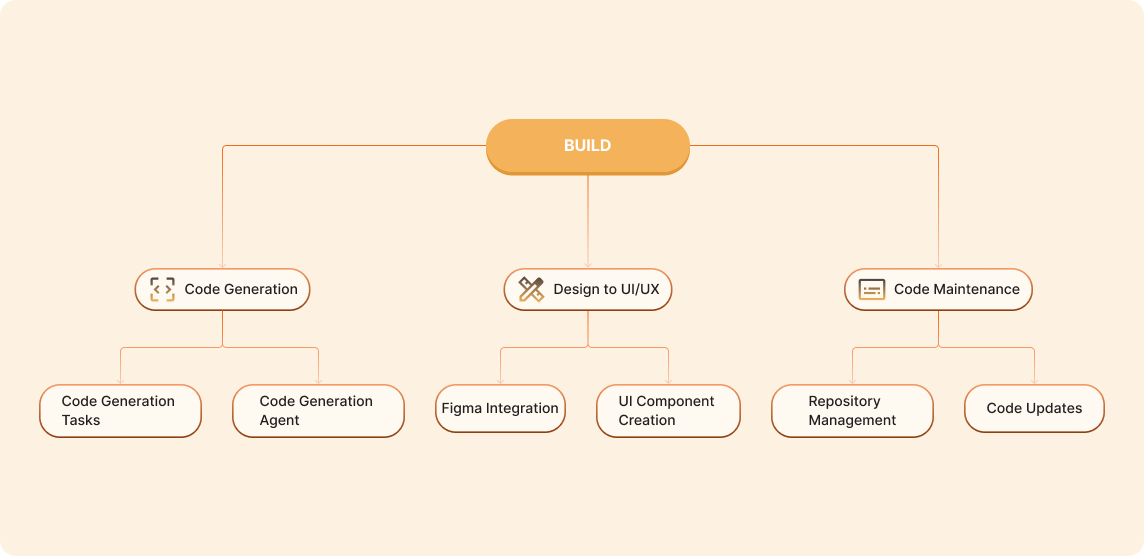
Features:
- AI-Powered Code Generation: Generates code from design specifications, both for boilerplate and complex code structures, improving development speed and ensuring consistency.
- Automated Test Case Creation: Automatically creates and executes unit, integration, and system tests, enhancing software quality and reliability.
- Figma to Production-Ready Code: Converts Figma designs directly into production-ready code, streamlining the transition from design to development.
- Interactive Code Maintenance: Facilitates easy code updates and maintenance, ensuring that the codebase remains current and functional.
- Seamless CI/CD Integration: Integrates with popular CI/CD pipelines to automate builds, tests, and deployments, ensuring continuous and reliable software delivery.
- Rapid Development Environment: Enhances team collaboration and efficiency by providing a fast and responsive development environment.
2.0 Getting Started with Kavia
2.1 Pre-requisites for Kavia
2.1.1 Creating a Kavia Account
Follow the steps below to create your Kavia account:
1. Navigate to Kavia Website:
- Open your web browser and go to kavia.ai.
2. Access the Get Started Page:
- On the homepage, look for the Get Started button, typically located at the top-right corner of the page.
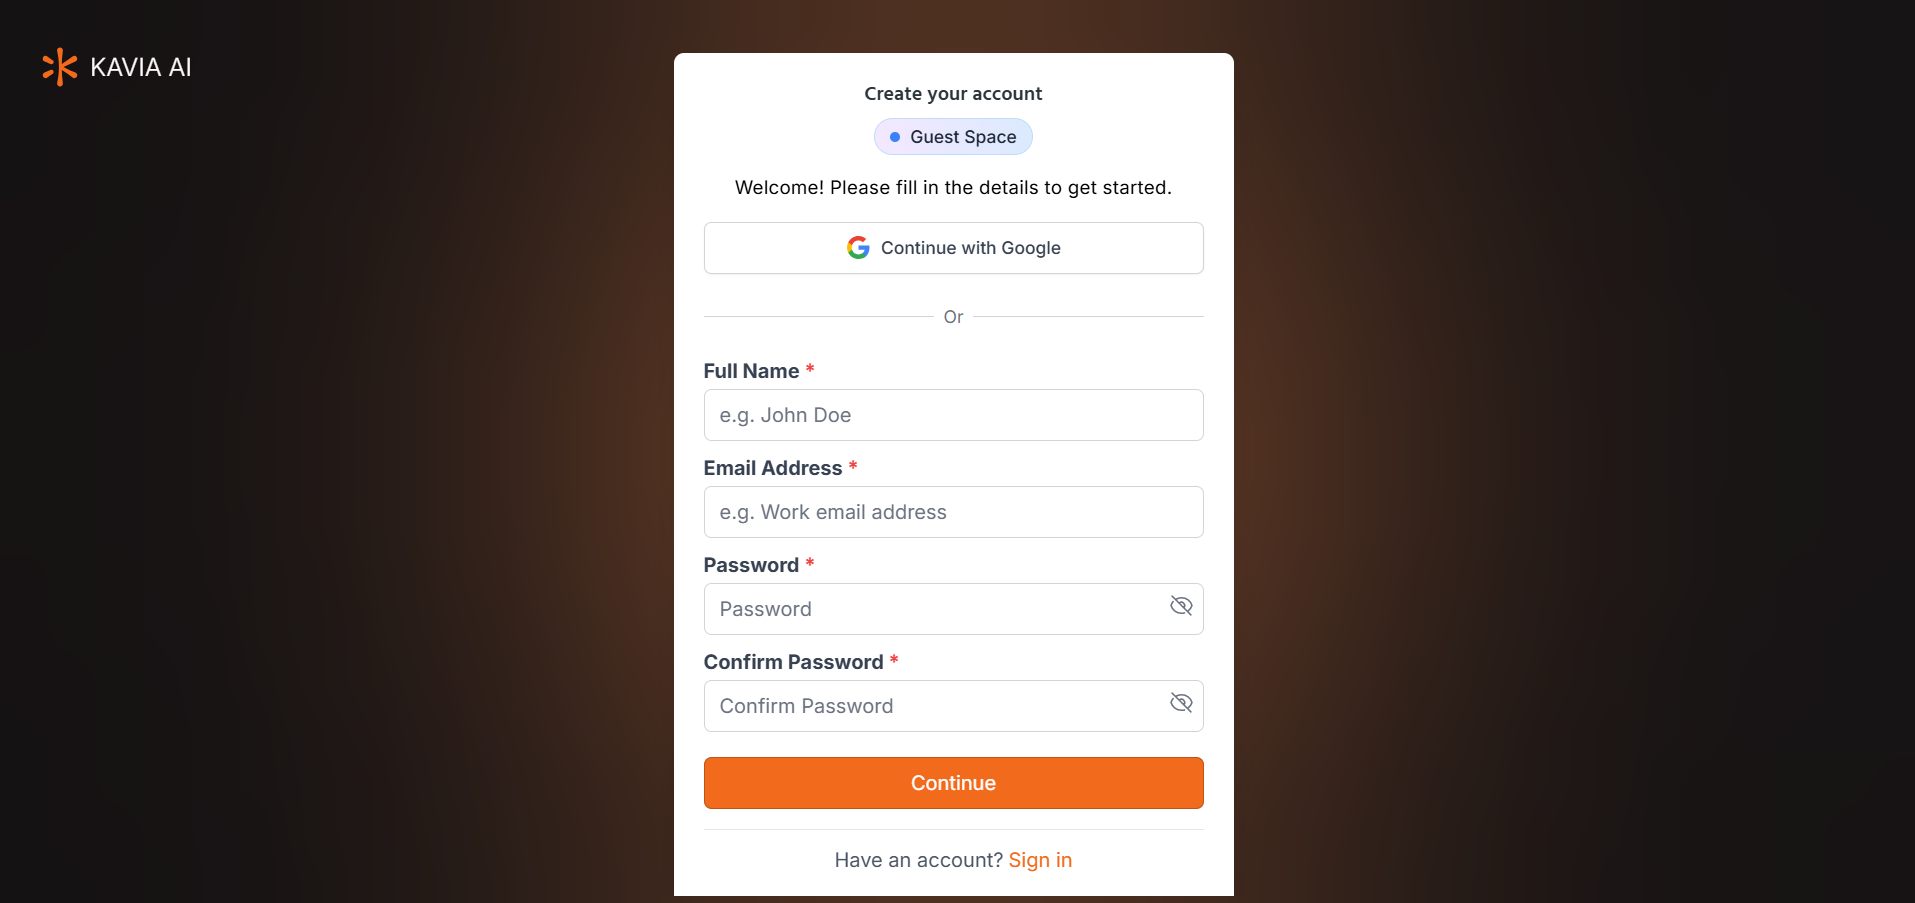
3. Enter Your Details or Use Google Account:
- Option 1: Create an Account with Your Email
- Fill in the required details, such as your name, email address, and password.
- Click Continue to complete the registration process.
- Option 2: Sign Up Using Google
- Click the Continue with Google button.
- You will be prompted to sign in with your Google account. Select your Google account or enter your login credentials.
- Once logged in, you will be redirected to complete the registration.
4. Confirm Your Email (if required):
- Check your email inbox for a confirmation message from Kavia.
- Click the link in the email to verify your account.
5. Log In:
- After completing the sign-up process, you can log in to your Kavia account using the credentials you provided or through your Google account.
2.1.2 How to Create a GitHub Account
Follow these steps to create your GitHub account:
1. Navigate to GitHub's Website:
- Open your web browser and go to github.com.
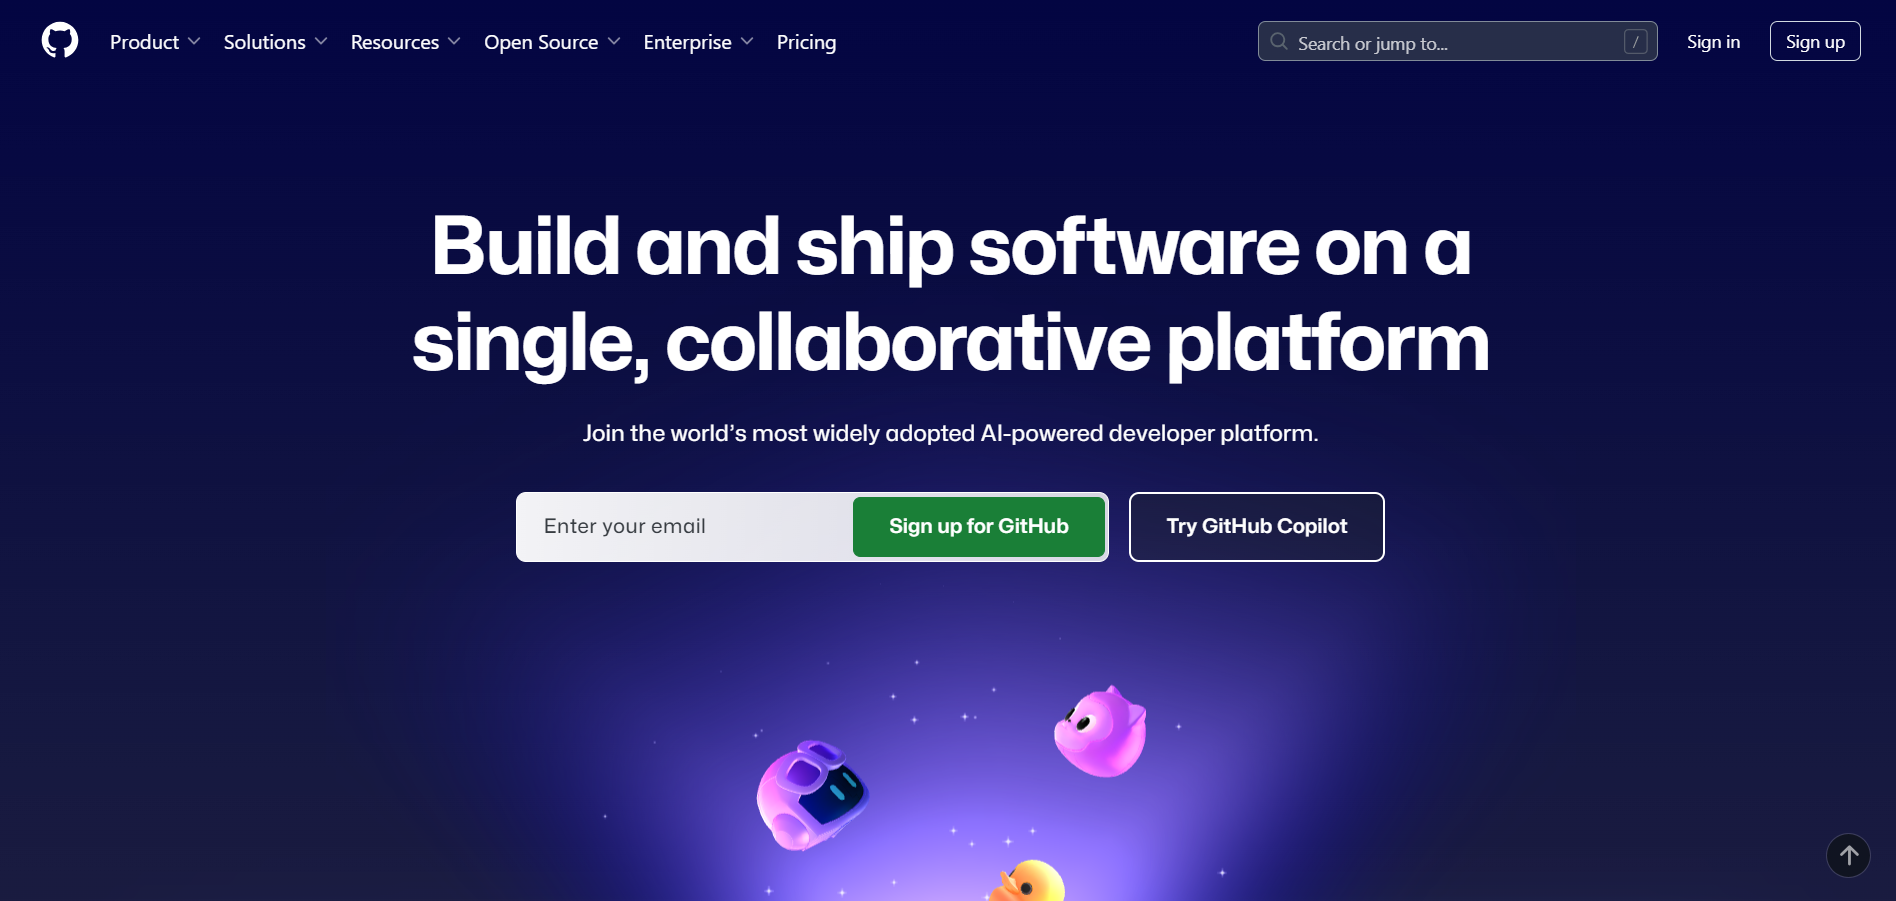
2. Start the Sign-Up Process:
- On the homepage, click on the Sign Up button, which is located in the top-right corner of the page.
3. Enter Your Details:
- Username: Choose a unique username for your GitHub account.
- Email Address: Enter your email address.
- Password: Choose a strong password for your account.
- After entering the information, click Create Account to proceed.
4. Complete the Verification:
- GitHub will ask you to complete a verification step, typically by solving a CAPTCHA (a simple puzzle to confirm you're not a robot).
- Complete the verification and click Verify.
5. Choose Your Plan:
- GitHub offers free and paid plans. You can start with the Free plan, which is sufficient for most users.
- Select your preferred plan and click Continue.
6. Customize Your Experience (optional):
- GitHub will ask a few questions about your experience with coding and how you plan to use GitHub. This step is optional, and you can skip it if you prefer.
7. Email Verification:
- Check your email inbox for a verification email from GitHub.
- Open the email and click the Verify Email Address link to confirm your email.
8. Set Up Your GitHub Profile (optional):
- Once verified, you'll be prompted to set up your GitHub profile, including adding a profile picture and bio. You can skip this step and complete it later.
9. Log In:
- After creating your account and verifying your email, return to GitHub and log in using your username and password.
2.1.3 How to Create a GitHub Repository
Follow these steps to create a new repository on GitHub:
1. Log in to Your GitHub Account:
- Go to github.com and log in using your username and password (or Google account, if you prefer).
2. Navigate to the Repositories Page:
- Once logged in, click on your profile icon in the top-right corner of the page.
- From the dropdown menu, select Your repositories.
3. Create a New Repository:
- On the repositories page, click the green New button located on the right side of the page.
4. Set Up Your Repository:
- Repository Name: Enter a unique name for your repository. This will be part of the URL for your project (e.g.,
https://github.com/your-username/repository-name). - Description (optional): Add a brief description of your repository. This helps others understand the purpose of your project.
- Public or Private: Choose whether your repository will be public (visible to everyone) or private (only accessible to you and those you invite).
- Initialize the Repository (optional):
- If you want to start with a README file, check the box that says Add a README file. This is useful for describing your project.
- You can also choose to add a
.gitignorefile (to ignore specific files) and select a license for your project.
5. Create the Repository:
- After filling in the necessary information, click the green Create repository button at the bottom of the page.
2.2 Logging In to the Dashboard
To access your Kavia dashboard, navigate to the Kavia Login Page and sign in using your registered credentials. Once logged in, you'll be directed to your personalized workspace, where you can manage projects, track progress, and collaborate with your team.
2.2.1 Navigating the Kavia Interface
The Kavia interface is built for clarity and ease of use, providing intuitive navigation across key areas of the platform. The main navigation menu includes the following sections:
- Home: Your primary dashboard, offering quick access to active projects and a starting point for new ones.
- Projects: A centralized view of all your projects, allowing you to track progress, switch contexts, and manage details efficiently.
- Notifications: A dedicated space for real-time updates related to your projects, tasks, and system alerts.
- Settings: Customize your account preferences and configure platform-level settings to suit your workflow.
Each section is designed to help you stay organized and work efficiently, whether you're managing multiple teams or developing a personal project.
2.2.1.1 Apps Vs Projects
In Kavia, Projects and Apps serve distinct roles within the development workflow:
- Projects are comprehensive environments designed to manage complex software development. They can include multiple applications, services, components, documentation, testing frameworks, and deployment configurations. Projects are ideal for teams or individuals managing full-scale solutions.
- Apps are standalone software units focused on delivering specific functionality. While simpler in scope, they can be part of a larger project, especially in modular or microservices-based architectures.
2.2.1 Configuring basic settings
To update your basic organization or personal profile settings in Kavia, follow these steps:
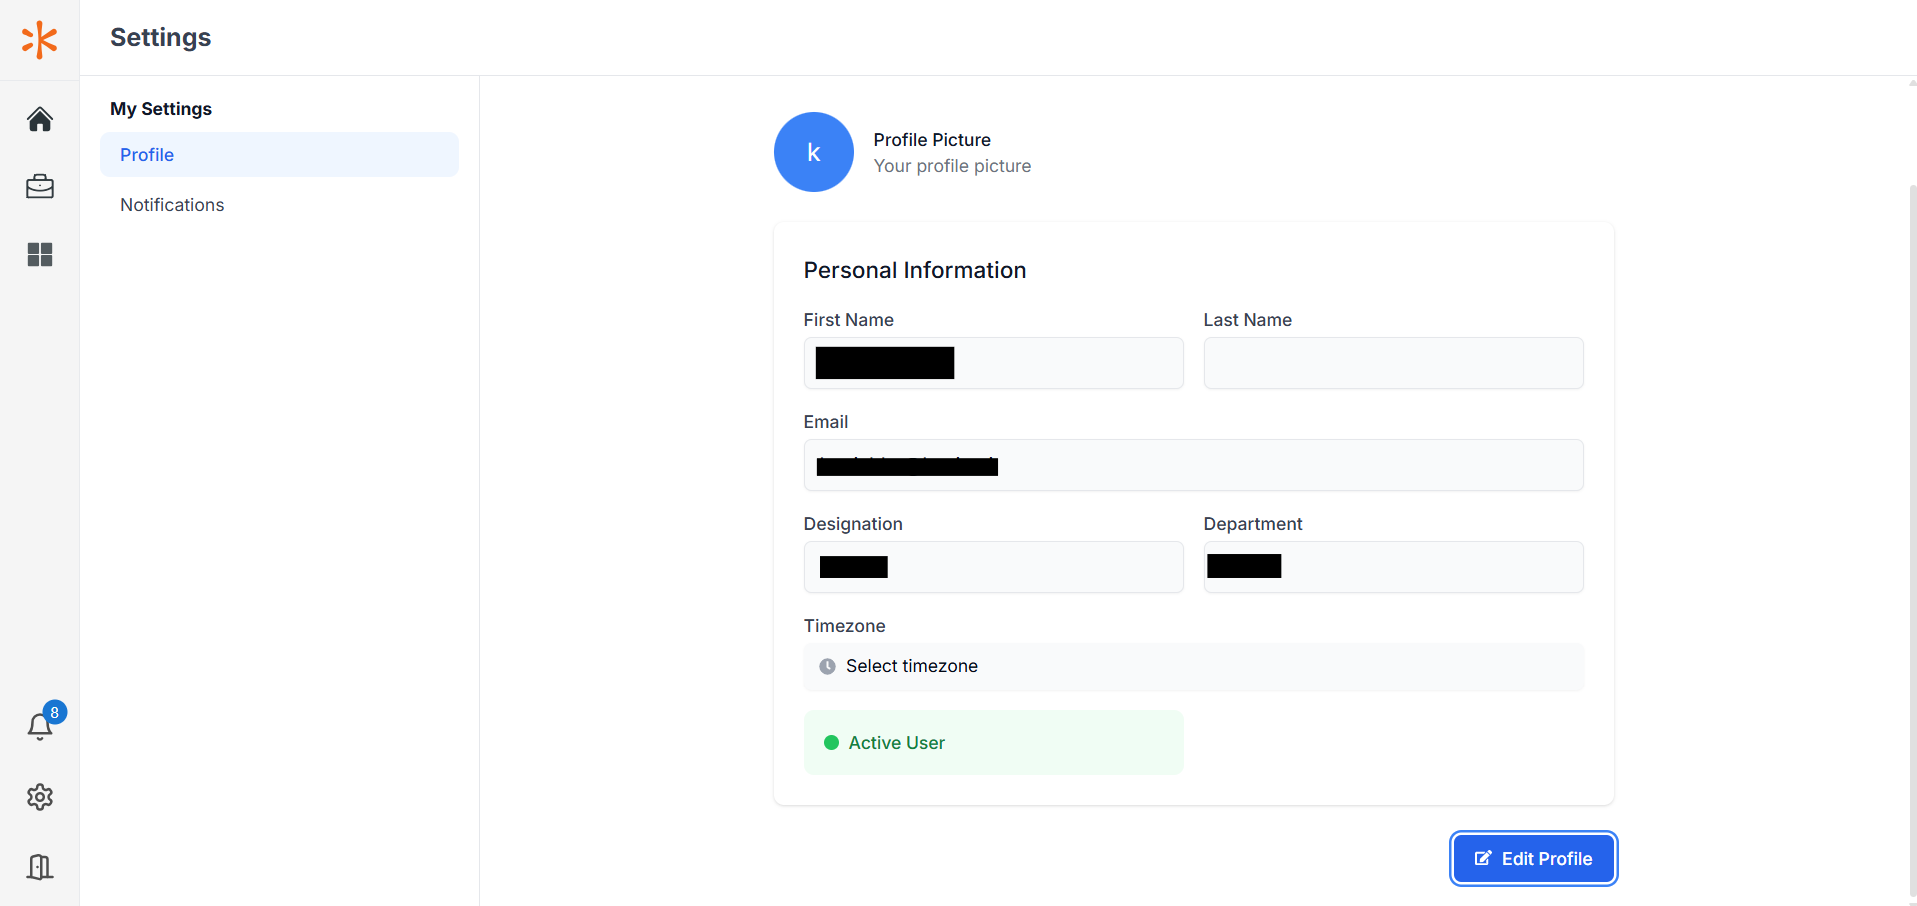
1. Click the Settings icon located in the left-side panel to open the settings window.
2. You'll be directed to the Profile section by default.
3. Click Edit Profile to modify your information.
4. Update the desired fields:
- Name
- Designation
- Department
- Time Zone
5. Once you've made the necessary changes, click Save Changes to apply your updates.
These settings help personalize your Kavia workspace and ensure accurate information across your organization's account.
2.3 Ways you can use Kavia (Examples Use Cases)
Kavia offers a broad suite of features that support the entire software development lifecycle—from code analysis and implementation to deployment, performance optimization, and maintenance. Below is a breakdown of key capabilities, each illustrated with real-world use cases.
Code Analysis and Development Services
Automated Code Analysis
Kavia provides advanced code analysis tools to help developers maintain, improve, and secure their codebases:
- Static Code Analysis
- Detects bugs, security vulnerabilities, and code smells
- Ensures compliance with coding standards and best practices
- Use Case: A fintech company uses Kavia to scan their payment system for vulnerabilities and regulatory compliance before deployment.
- Architecture Analysis
- Evaluates system architecture and component relationships
- Recommends improvements and detects dependency issues
- Use Case: An e-commerce platform leverages Kavia to optimize their microservices architecture and eliminate communication bottlenecks.
Testing Services
2.1 Automated Testing Solutions
Kavia enables comprehensive testing across multiple levels:
- Unit Testing
- Automatically generates unit tests
- Tracks coverage and edge cases
- Use Case: A healthcare provider uses Kavia to validate data processing functions in isolation.
- Integration Testing
- Verifies component interactions and API contracts
- Tests databases and external services
- Use Case: A banking system uses Kavia to test integrations between transaction processing and notifications.
- End-to-End Testing
- Simulates full user workflows across the application
- Validates business logic and user interactions
- Use Case: An online retail platform tests the entire checkout flow from cart to payment confirmation.
Development and Implementation Services
Code Generation and Implementation
- Feature Implementation
- Generates functional code from requirement specs
- Creates APIs, database models, and documentation
- Use Case: A fintech startup rapidly develops a secure, scalable user authentication system leveraging Kavia's automated code generation—cutting development time in half and accelerating their product launch.
- Code Refactoring
- Identifies outdated patterns and improves code maintainability
- Enhances readability and structure
- Use Case: A modernization team uses Kavia to refactor legacy systems into modern architecture.
- API Development
- Builds RESTful APIs with built-in security and documentation
- Use Case: A SaaS company uses Kavia to design, build, and publish their public APIs.
Project Management and Documentation
Documentation Generation
- Technical Documentation
- Automatically produces API references, architecture diagrams, and code comments
- Use Case: A development team maintains up-to-date API documentation with minimal manual effort.
- User Documentation
- Generates user guides, tutorials, and troubleshooting resources
- Use Case: A product team uses Kavia to generate end-user documentation for a customer-facing web app.
Performance Optimization
Performance Enhancement Services
- Performance Analysis
- Detects bottlenecks and resource inefficiencies
- Provides actionable insights
- Use Case: A video streaming company optimizes content delivery using Kavia's performance metrics.
- Load Testing
- Simulates real-world traffic and stress tests the system
- Use Case: An e-commerce platform evaluates its infrastructure for holiday season traffic.
Deployment and Infrastructure
Deployment Services
- Deployment Automation
- Supports CI/CD pipeline automation and environment-specific configurations
- Use Case: A development team automates releases using Kavia's deployment tools.
Maintenance and Support
Ongoing Maintenance Services
- Code Maintenance
- Identifies technical debt and tracks long-term code health
- Use Case: A legacy modernization team uses Kavia to manage technical debt across projects.
- System Monitoring
- Provides live system health monitoring and alerts
- Use Case: An operations team uses Kavia to proactively monitor production systems and receive incident alerts.
Kavia's robust feature set makes it a comprehensive solution for managing all aspects of software development, testing, and maintenance—scaling seamlessly from individual developers to enterprise teams.
3.0 Integrations
3.1 Introduction to Integrations
Kavia offers seamless integration with a range of industry-standard tools to optimize and streamline your development workflow. These integrations support key activities such as:
- Version Control Management
- Design Collaboration
- Continuous Integration and Deployment (CI/CD)
- Team Communication
- Project Tracking
3.2 GitHub Integration
To integrate GitHub with Kavia:
1. Navigate to the Kavia Admin Dashboard panel and navigate to SCM.
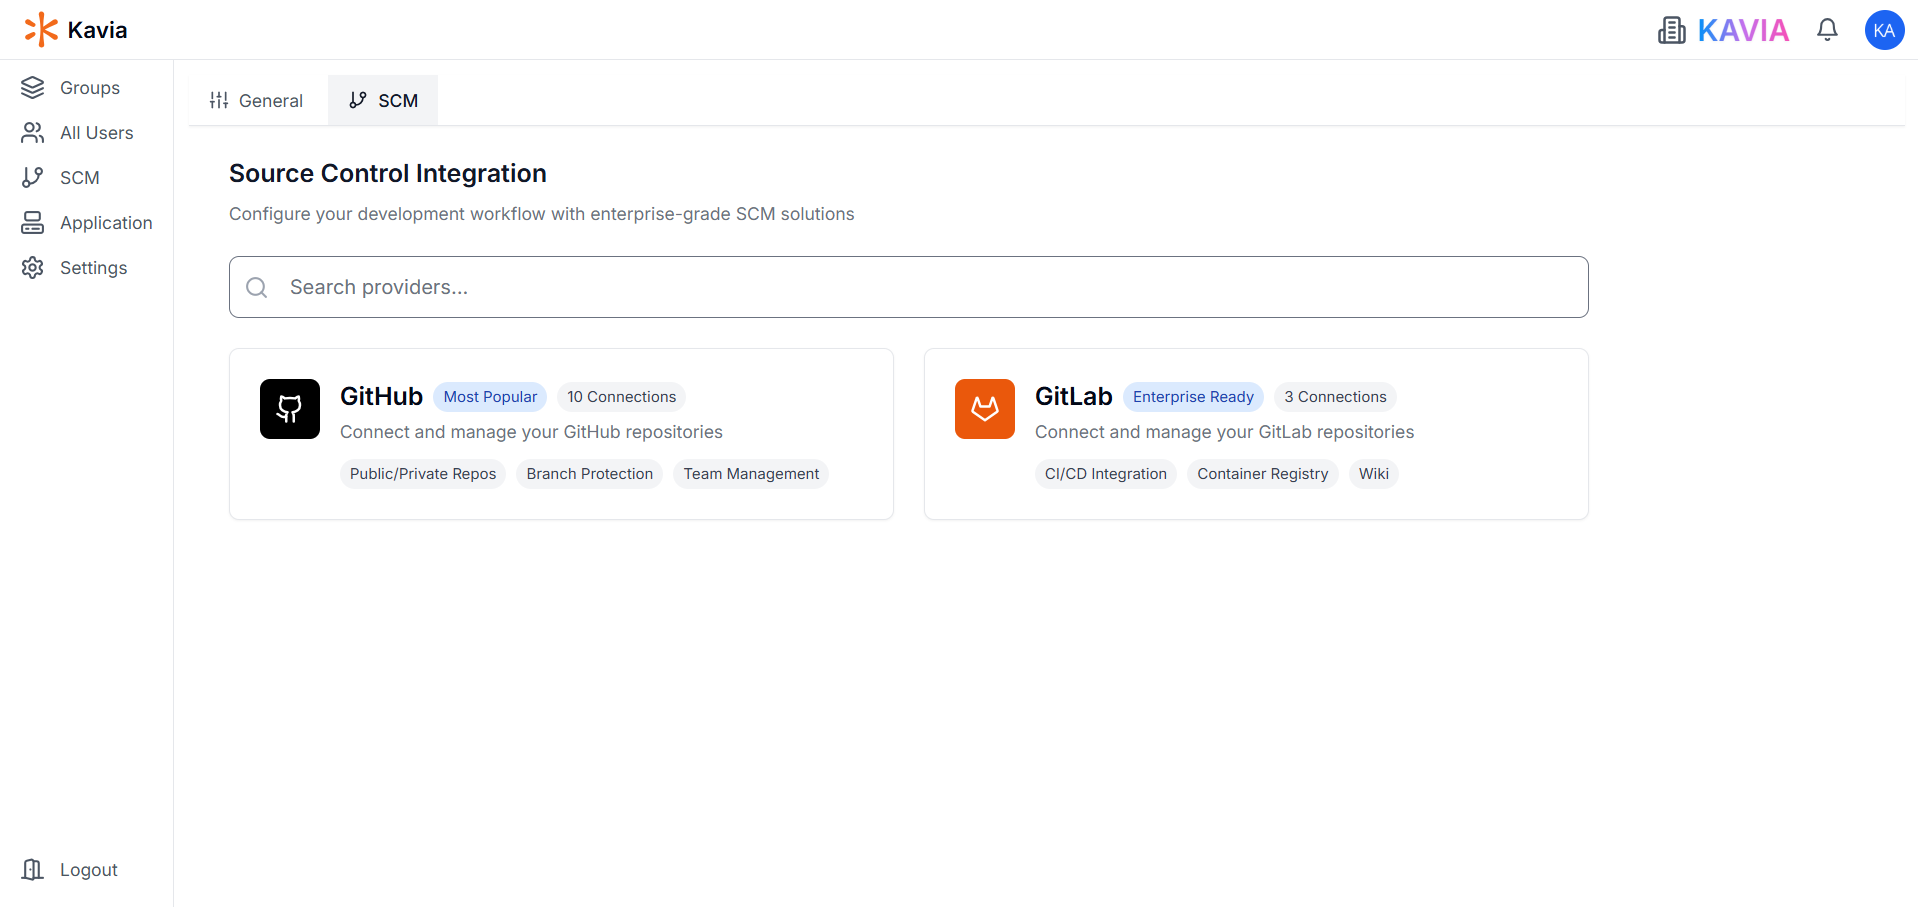
2. Select GitHub from the list of available integrations.
3. Click Connect to GitHub Button.
- Click Connect with GitHub.
- Authorize Kavia to access your GitHub account.
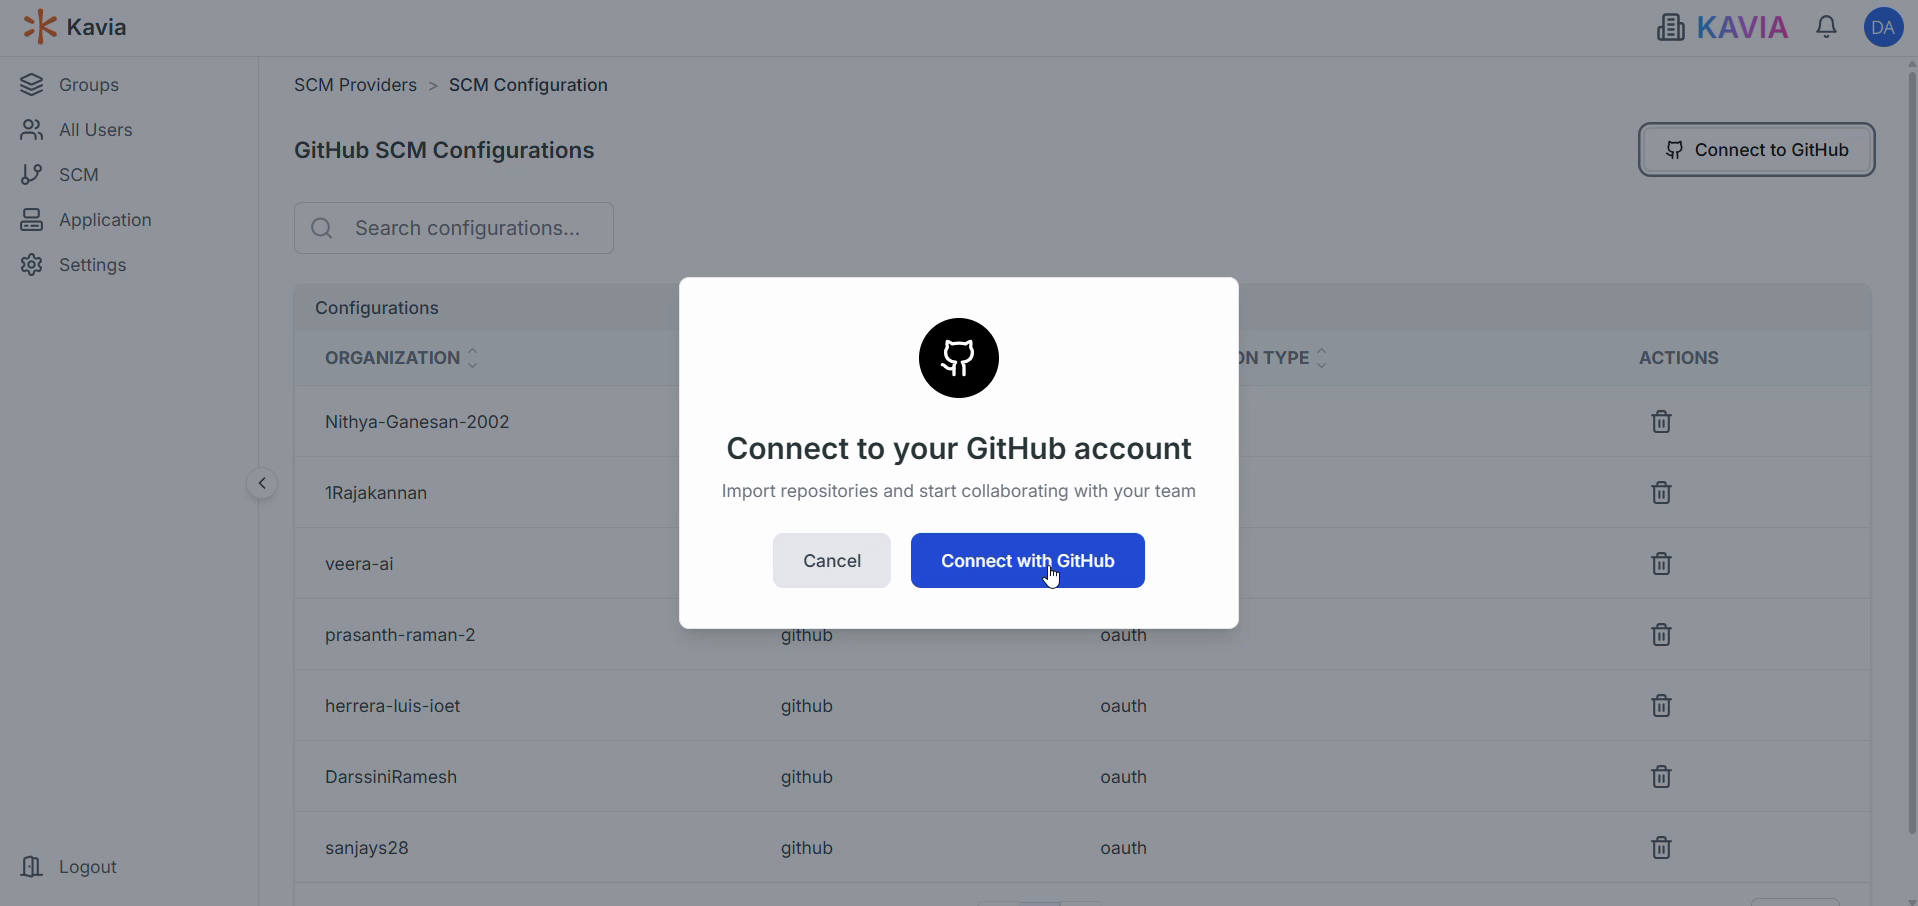
After authorizing, you'll see the complete flow of GitHub being connected. You're also able to check the repositories available within the particular user.
4.0 Analyzing Your Existing Project
Kavia enables in-depth analysis of existing software projects by providing powerful insights into code quality, architecture, performance, security, and documentation. These tools help development teams optimize their projects, identify areas for improvement, and align with best practices.
4.1 How Kavia Supports Existing Projects
Kavia's query engine supports deep, multi-dimensional analysis across your project:
Code Base Analysis
- Reviews the entire repository structure and organization
- Detects programming languages and architectural patterns
- Maps dependencies between components and modules
- Evaluates complexity and maintainability
- Identifies reusable components and shared libraries
Documentation Analysis
- Analyzes README files, inline code comments, and documentation structure
- Evaluates the completeness and quality of API documentation
- Identifies missing, outdated, or poorly structured documentation
- Reviews configuration instructions and setup guides
Security Analysis
- Identifies security vulnerabilities and exposed sensitive data
- Analyzes authentication and authorization mechanisms
- Reviews API security practices
- Flags outdated dependencies with known risks
- Checks for secure coding practices
Performance Analysis
- Detects performance bottlenecks in code
- Analyzes database query efficiency and resource usage
- Evaluates API response times and memory management
- Reviews caching and optimization strategies
4.2 Step-by-Step: Analyzing Your Project
Creating a New Project
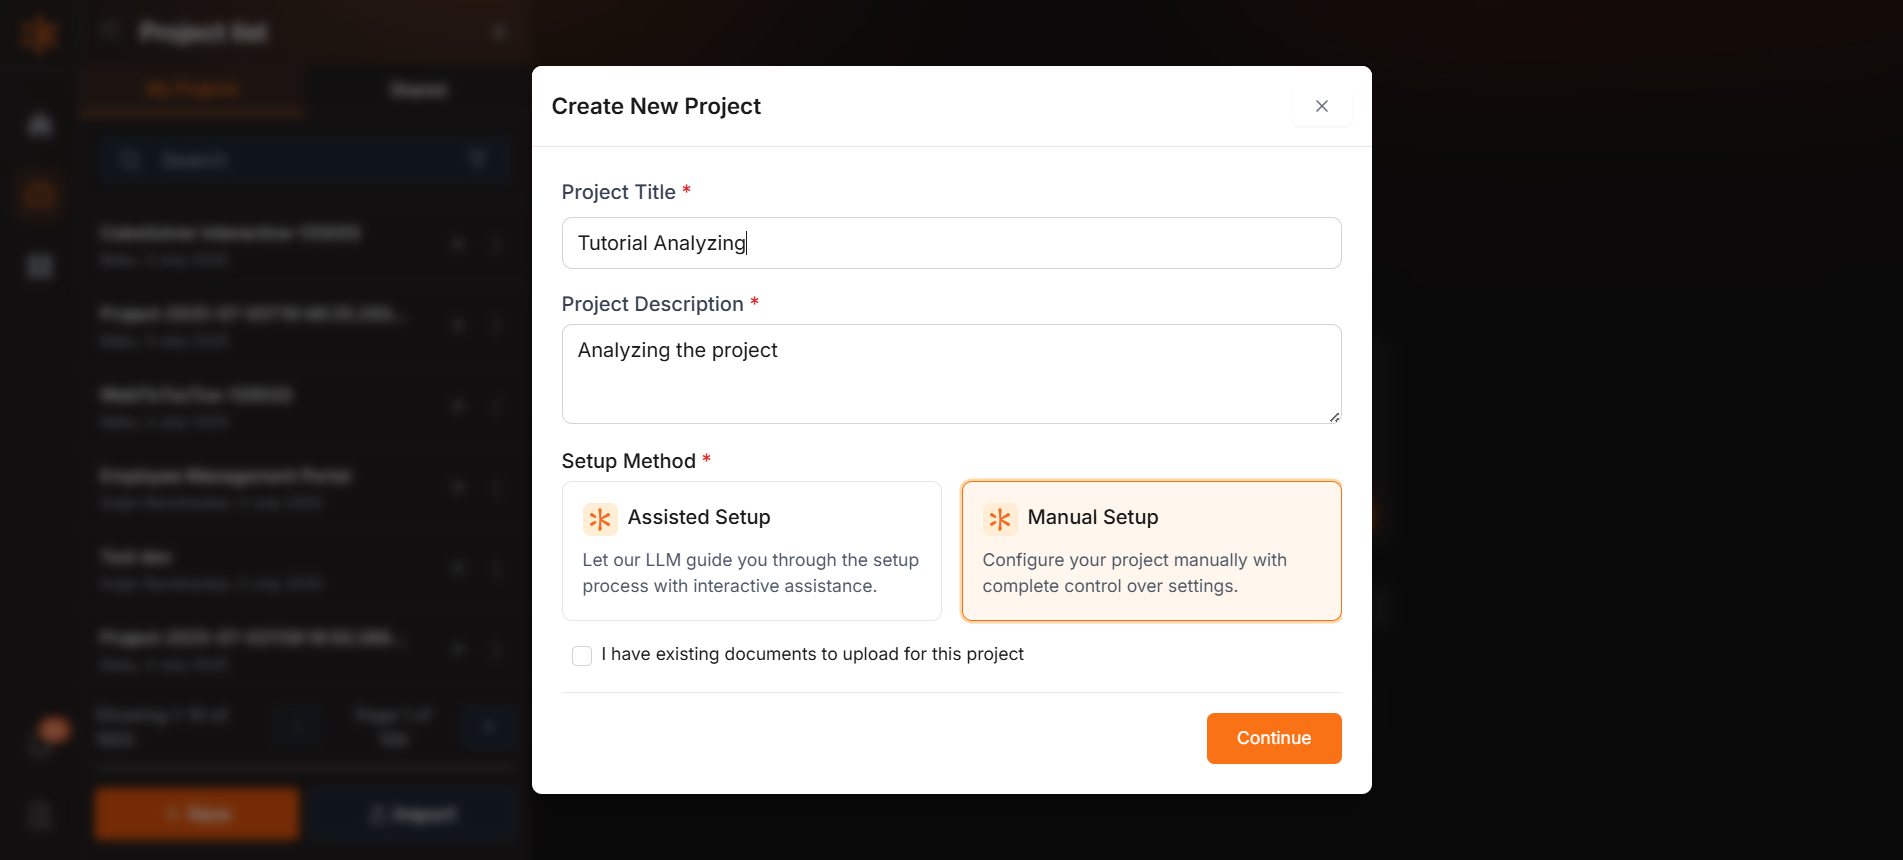
1. Navigate to the Project List screen.
2. Click New to start a new project.
3. Fill in the required Project Details (e.g., name, description, tech stack).
4. Select Setup Method as Manual Setup.
5. Click Create to initialize the project.
6. You will be automatically redirected to your Project Dashboard.
Creating a Query
1. From the Project Dashboard, go to the Query tab.
2. Click Add Repository → Connect GitHub.
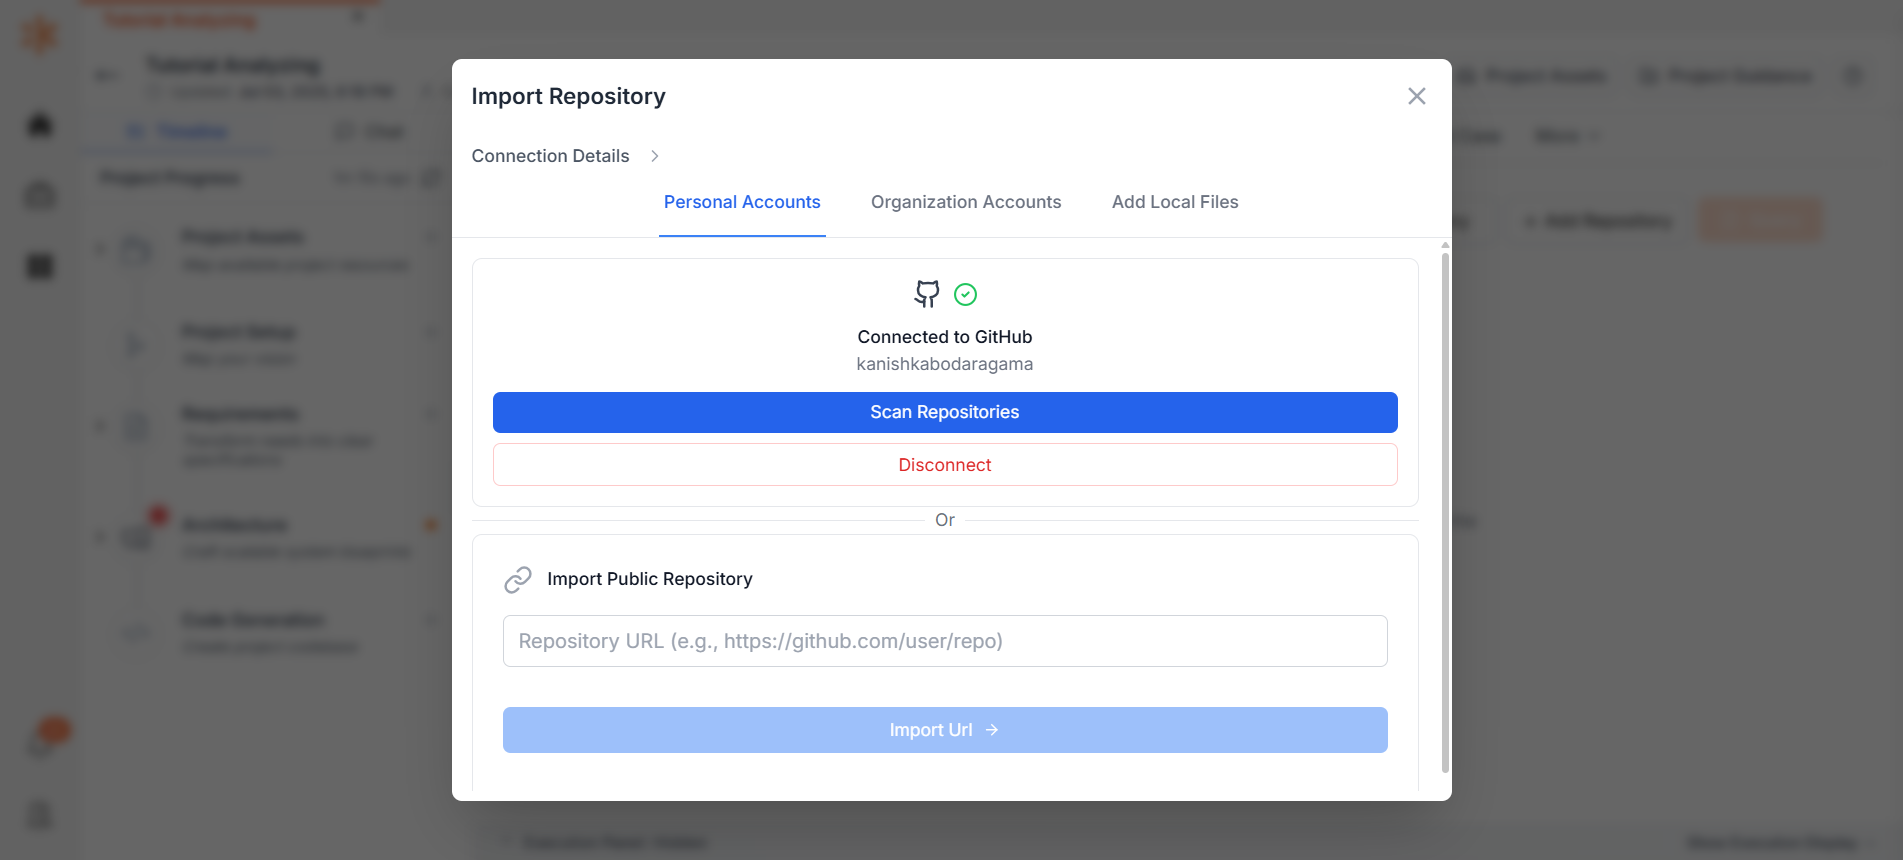
3. Click Scan Repositories and wait till kavia list down your Repositories or else you can add a link of a public repository directly by pasting the link in " Import Public Repository" and clicking Import URL.
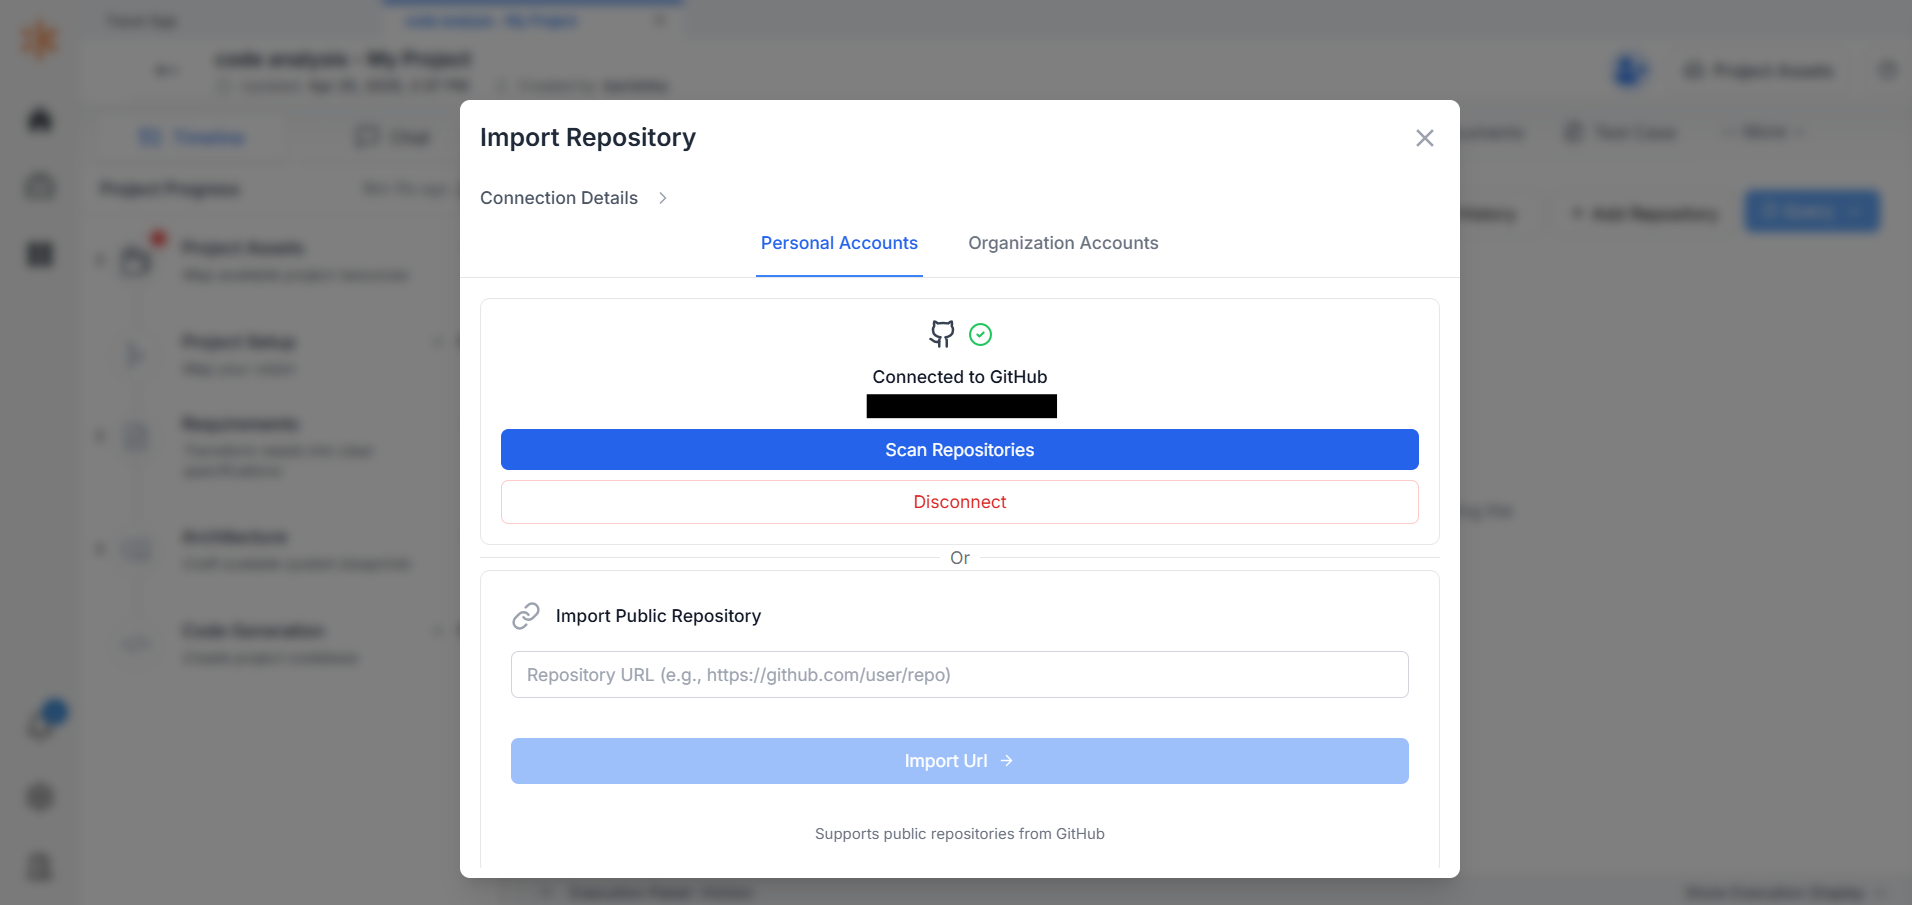
4. Select the repository containing the codebase of your existing application.
5. Click Import Selected to begin scanning the repository.
Note: The import process may take several minutes depending on the size and number of files.

6. Wait until the progress bar reaches 100%. Once complete, the status will change to Completed.

7. Select the imported repository by checking the box next to it.
8. Click Query, then select Basic Query to initiate your first analysis.
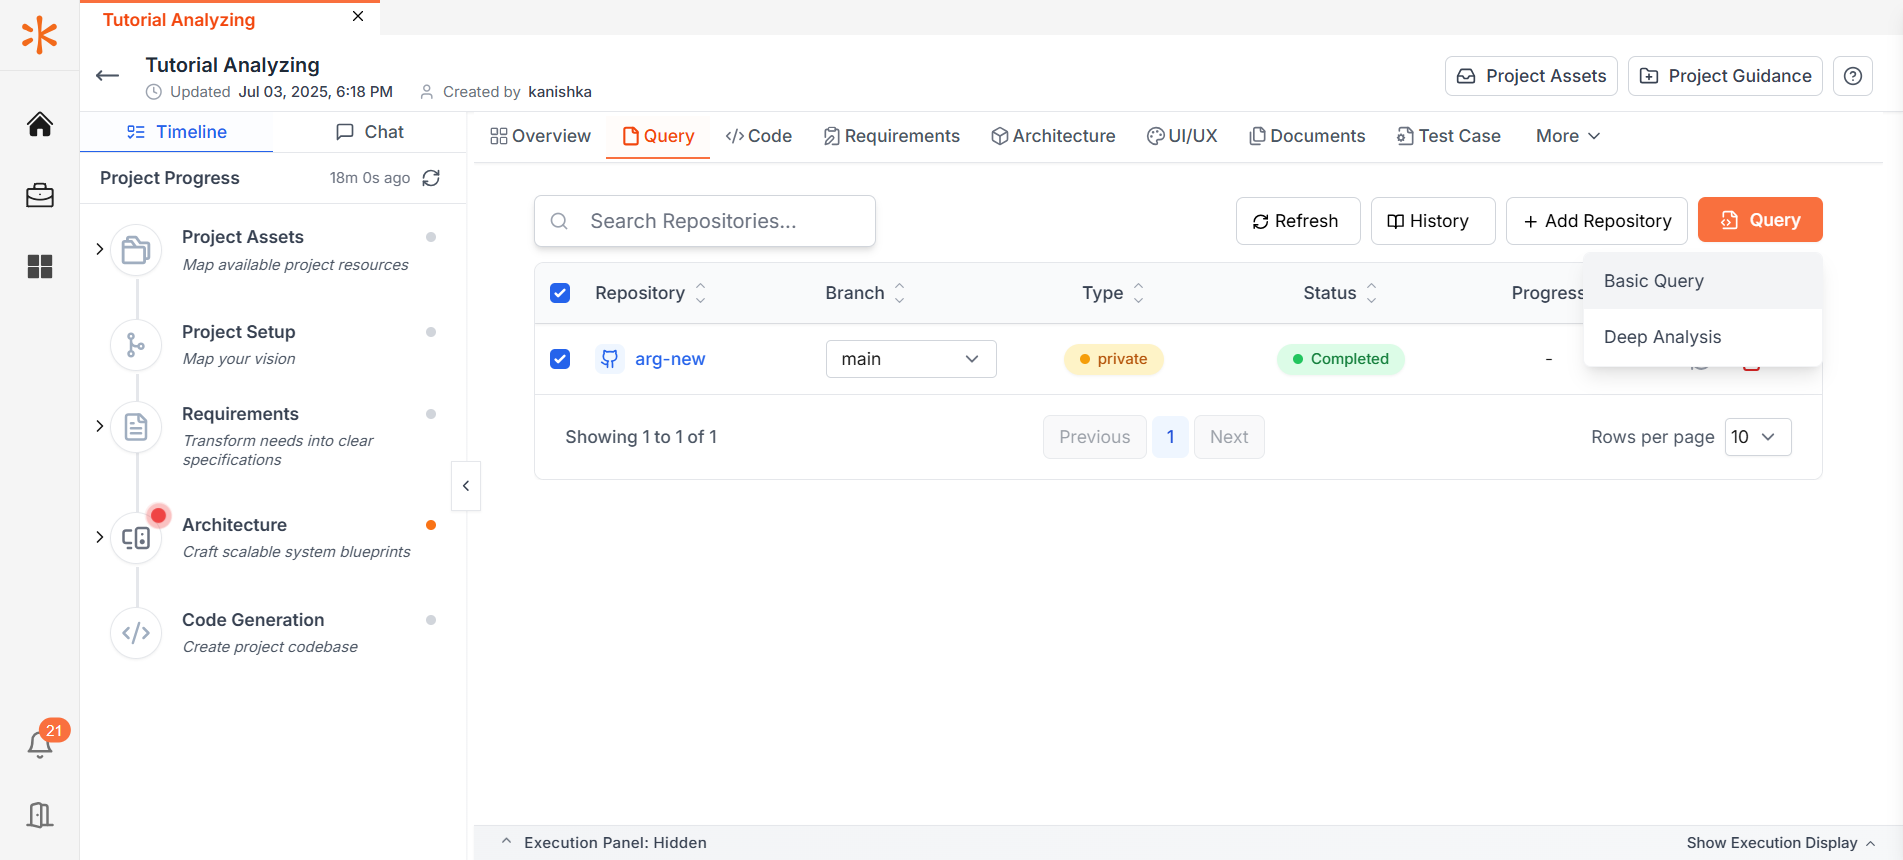
Note: Once selected, Kavia will load the query interface. This typically takes just a few seconds.
9. You can now ask questions in natural language about your repository. Kavia will analyze the content and provide intelligent responses based on the imported files.
10. You may also upload additional documents to the repository (such as technical specifications, user stories, or design references). Kavia will include them in its analysis automatically.
Note: After uploading or making changes to the repository, click the Refresh button in the top-right corner of the query interface before running a new query to ensure the latest files are included.
5.0 Building Your First App
5.1 Web Based App
Let's walk through the process of creating a simple website using Kavia. For this example, we'll build a basic web-based app.
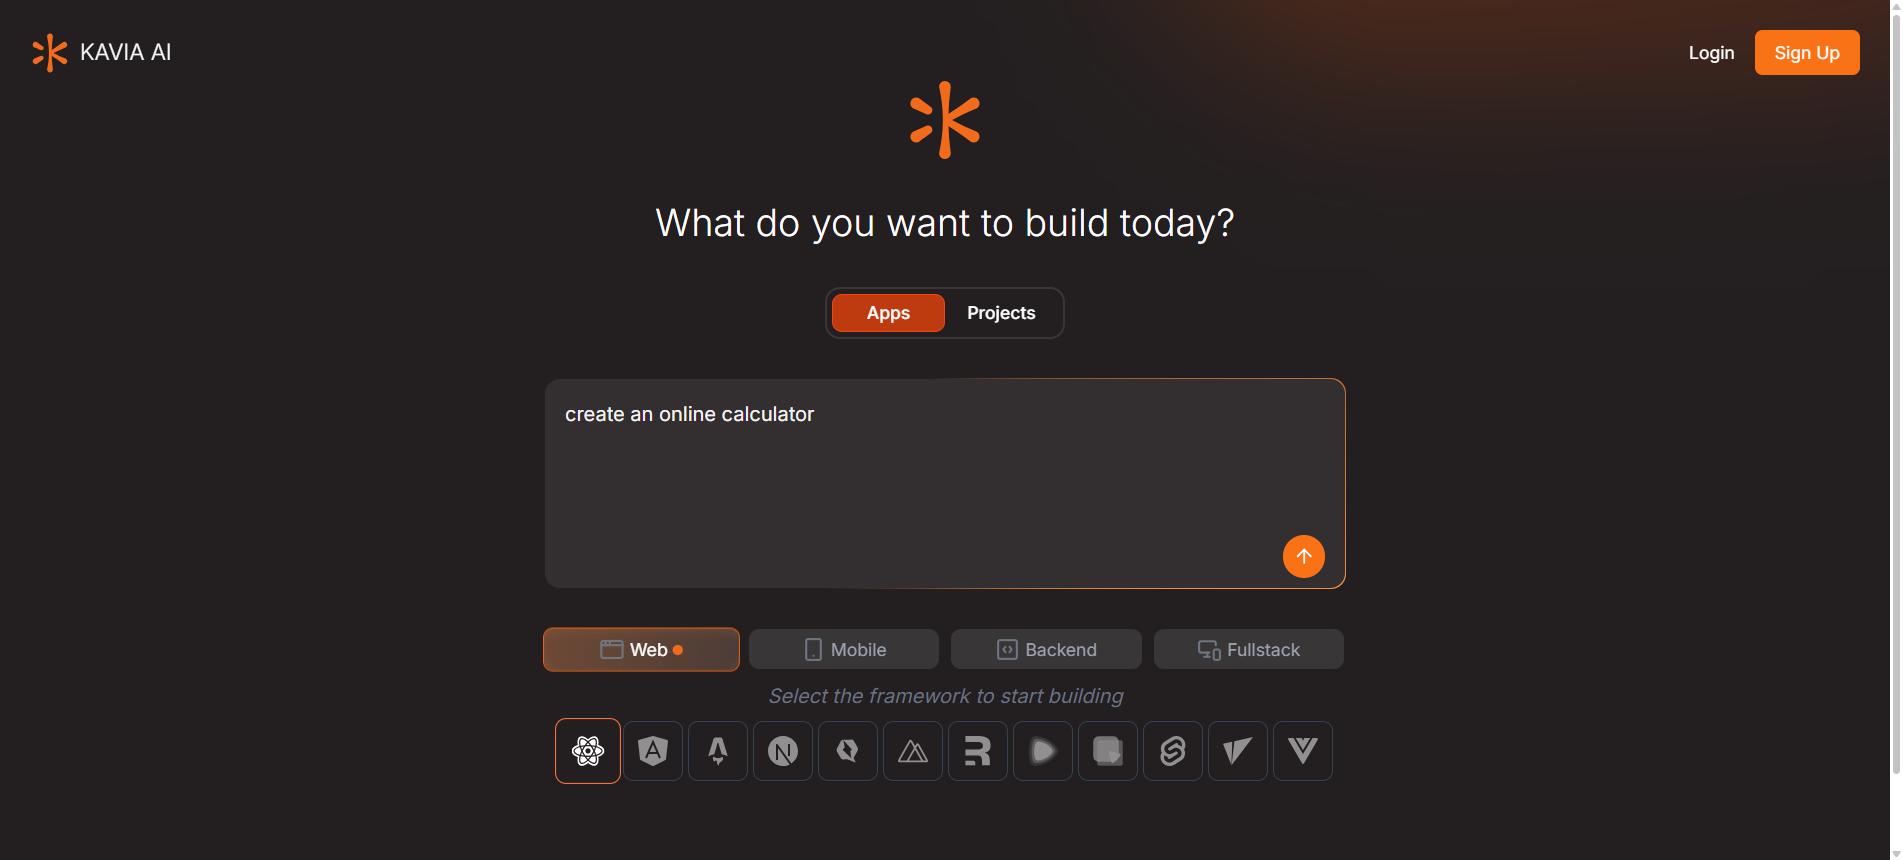
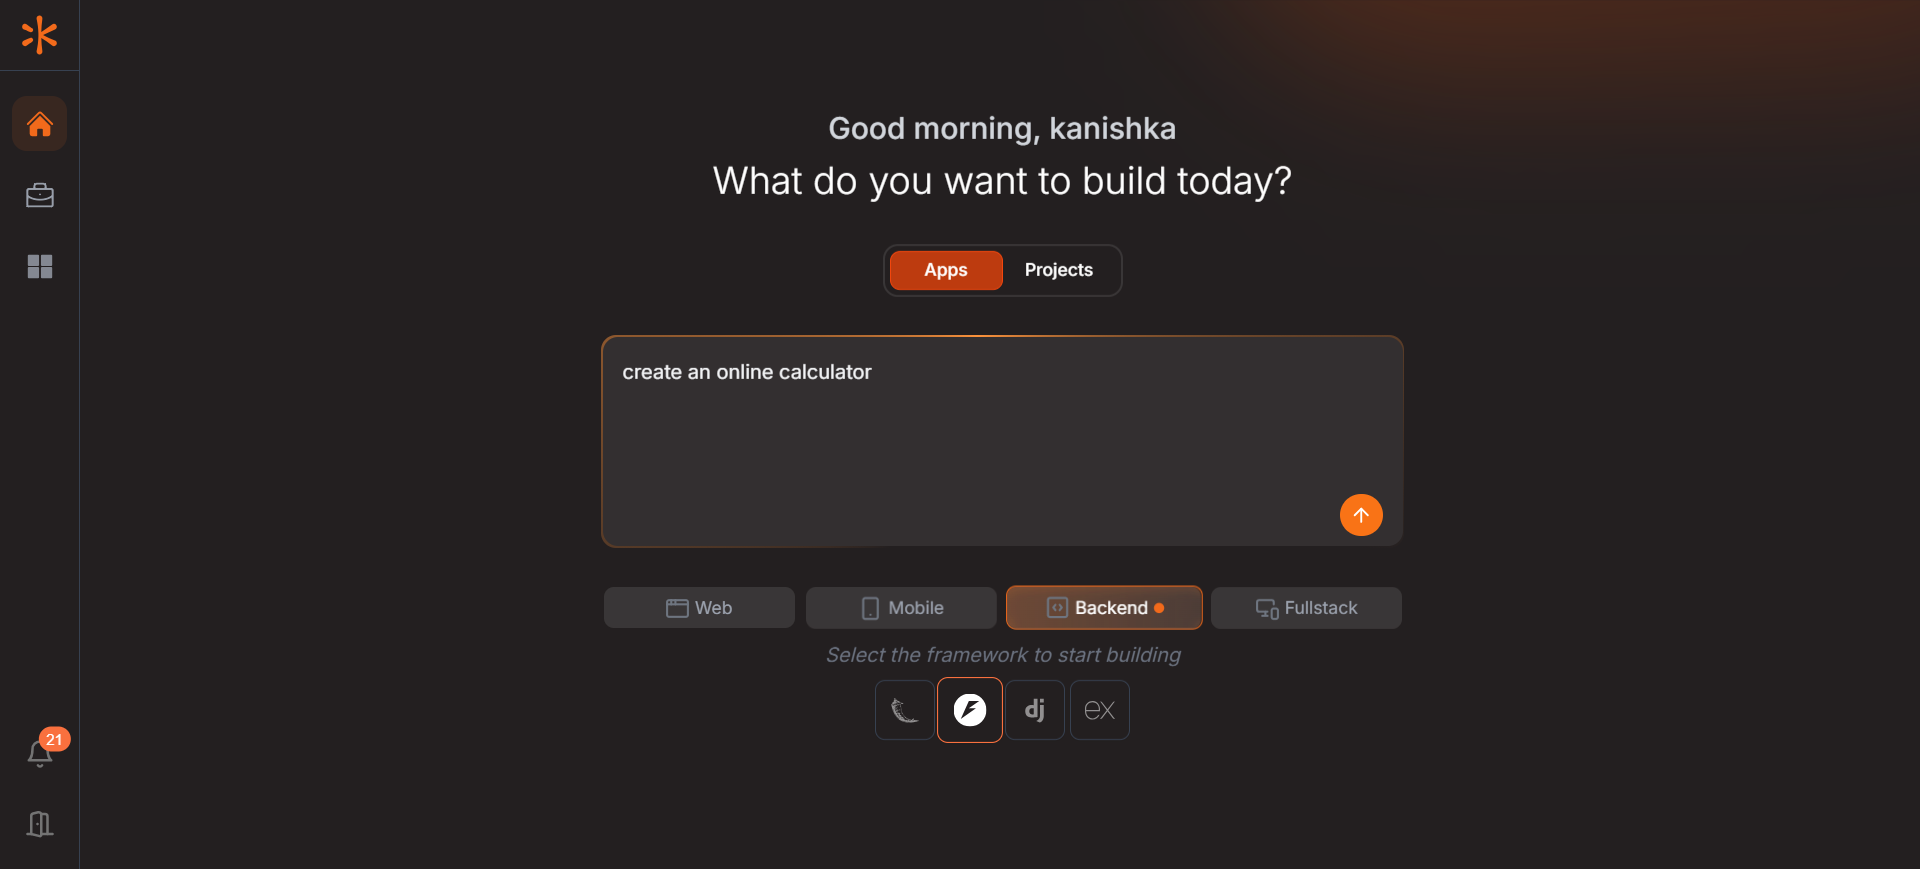
Step 1: Start from the Home Screen
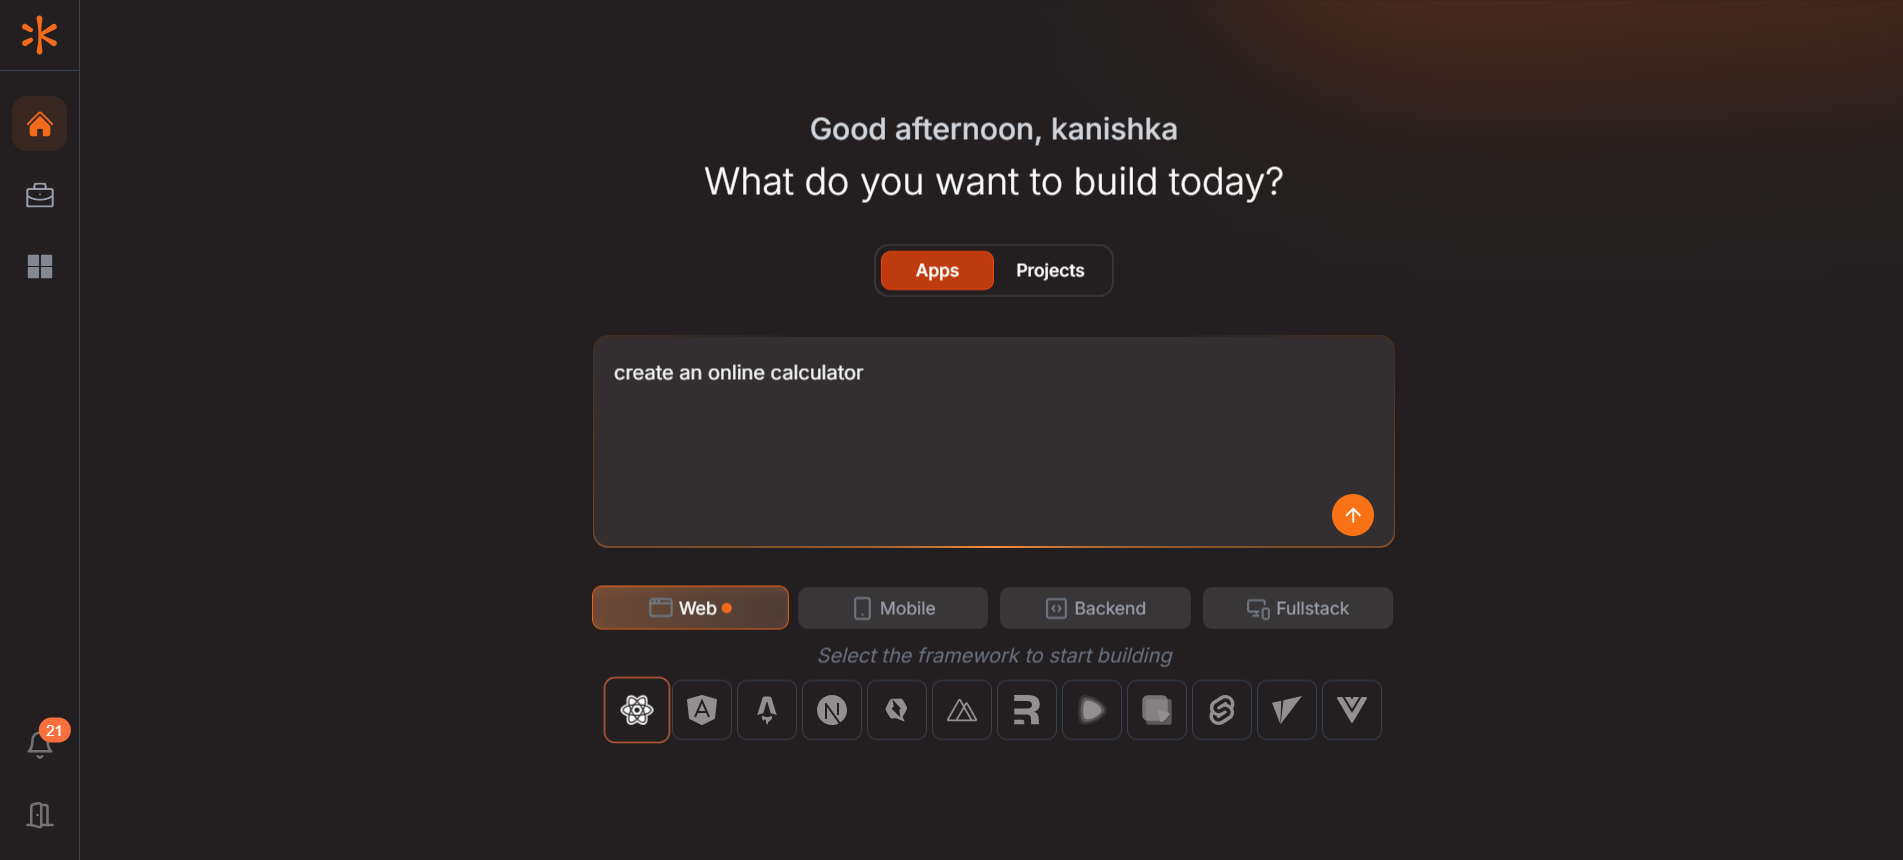
1. Navigate to the Home section on the left sidebar.
2. At the center of the screen, you'll see a prompt that asks:
"What do you want to build today?"
3. Below that, you'll see two options: Apps and Projects.
Make sure Apps is selected.
4. At the bottom you will be able to select what type of an application that you are going to build. So for this tutorial we need to select Web and as for the framework we need to select React.

5. If you are building a mobile app you need to select Mobile and then framework.
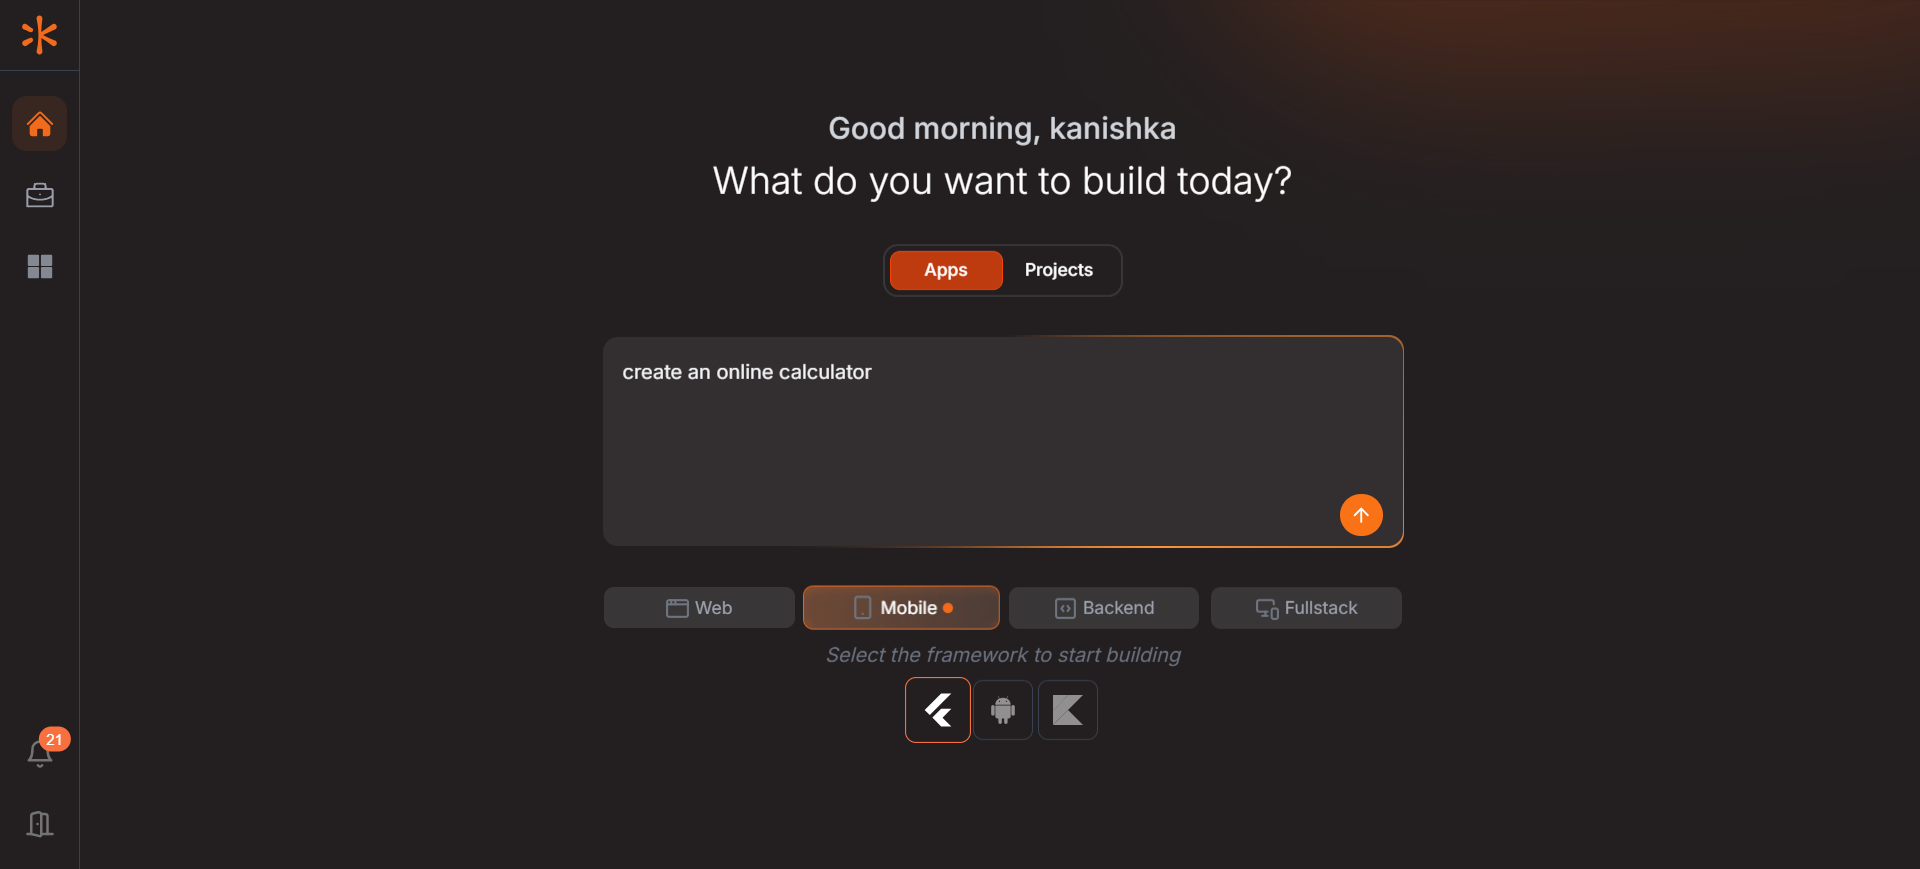
6. If you are building a backend for an application you need to select Backend and then framework.
7. If you are building a full stack application, You need to select Full stack and the relevant Frameworks for the project. Please follow this link for the tutorial or scroll down to topic 5.2.

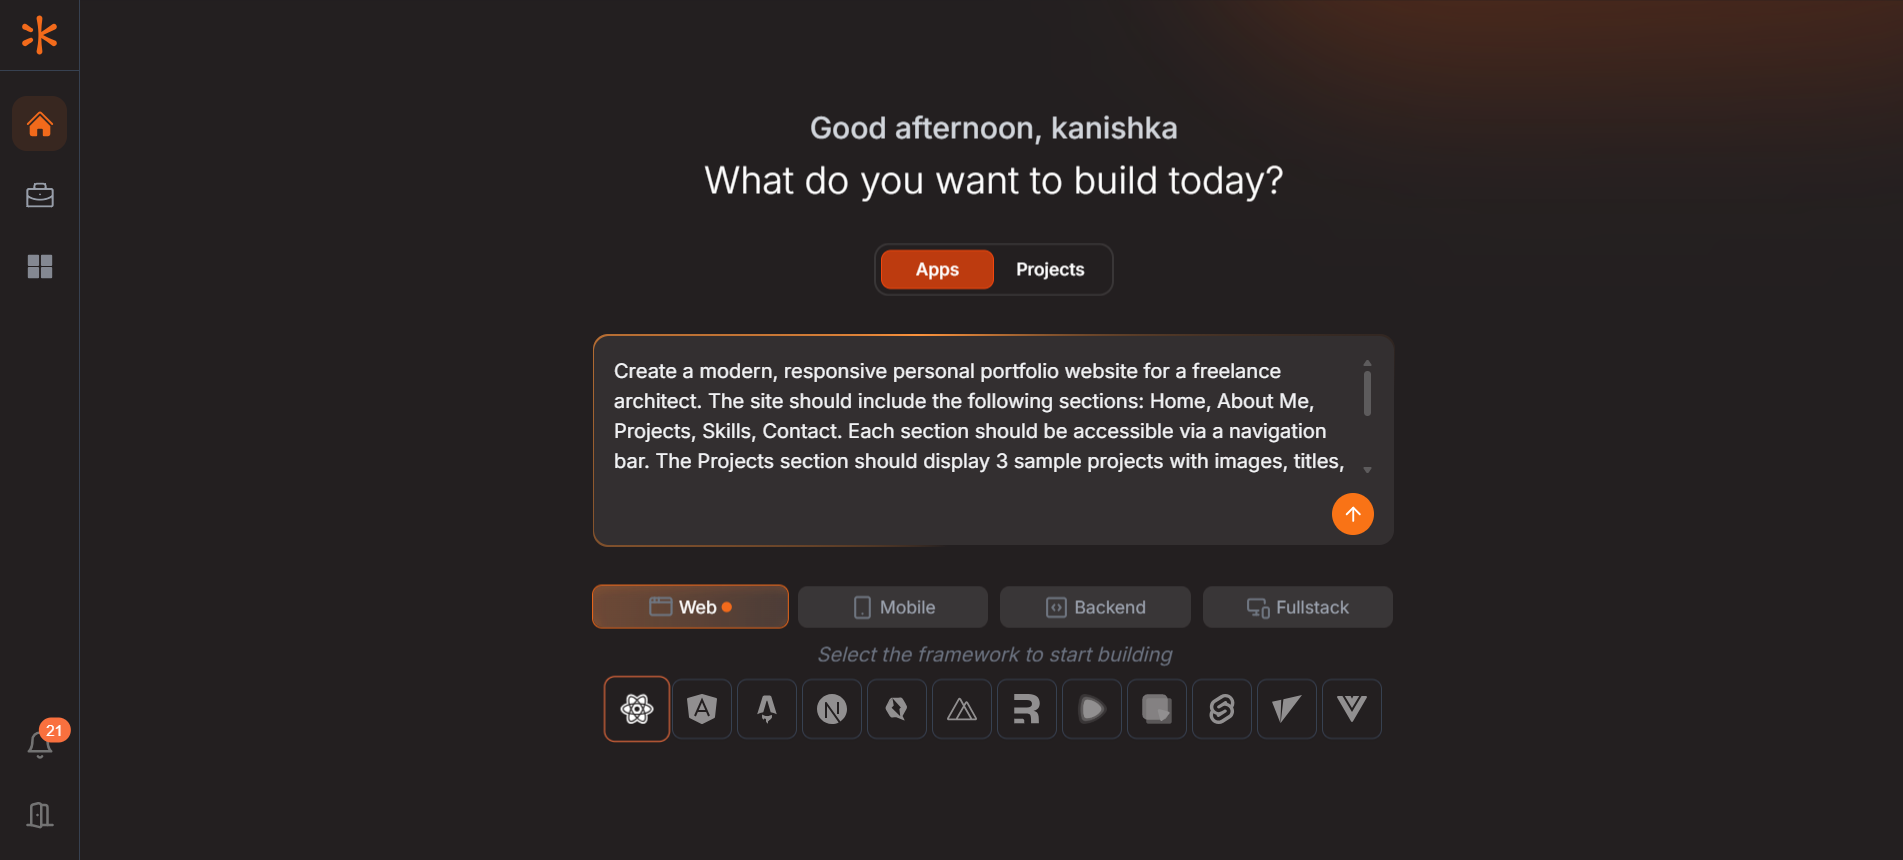
Step 2: Enter Your Prompt
In the input box, describe the app you want to create. In this tutorial, I will enter the following prompt and Select Web because i am going to make a web application and select React as the stack and Click the Arrow Icon :
"Create a modern, responsive personal portfolio website for a freelance architect. The site should include the following sections: Home, About Me, Projects, Skills, Contact. Each section should be accessible via a navigation bar. The Projects section should display 3 sample projects with images, titles, and short descriptions. The Contact section should include a form with fields for Name, Email, Subject, and Message. Style the site with a clean, minimal design using modern fonts and subtle animations. Make it mobile-friendly and accessible."
Kavia will process your request and begin building the application automatically, complete with frontend and backend code (if required), UI layout, and logic.
Hint: Prompt Writing Tips for Best Results
To get the most accurate and complete applications from Kavia, follow these best practices when writing prompts:
- Be clear and specific: Describe the core functionality, design preferences, and behavior of the app.
- Include user interactions: Mention what the user should be able to do (e.g., "User should be able to submit a form and receive a confirmation.").
- Mention design or UI requirements: If you want a particular layout or style, include it in the prompt.
- State desired technologies (optional): If you prefer specific frameworks or stacks (e.g., React, Flask), add them to your prompt.
- Use complete sentences: Natural language helps Kavia interpret your intentions better than keyword-only instructions.
Step 3: Confirm Project Overview and Core features.
Once you've submitted your app prompt, Kavia will generate a project overview page containing all the details it extracted from your input. Review each feature carefully—you can add, edit, or delete features as needed. You can also modify your tech stack, apply custom styles, and integrate third-party services like Supabase, Stripe & GitHub. You have to select the relevant GitHub account for the project. Once you're satisfied with all the settings and configurations, click Start Implementation to begin building your app.
1. Review the Project Overview
In the Project Overview section, Kavia provides a brief summary of the project, automatically extracted from your initial prompt.
- Carefully review this summary to ensure it aligns with your goals.
- If any information is missing or needs correction, use the Edit option to make changes.
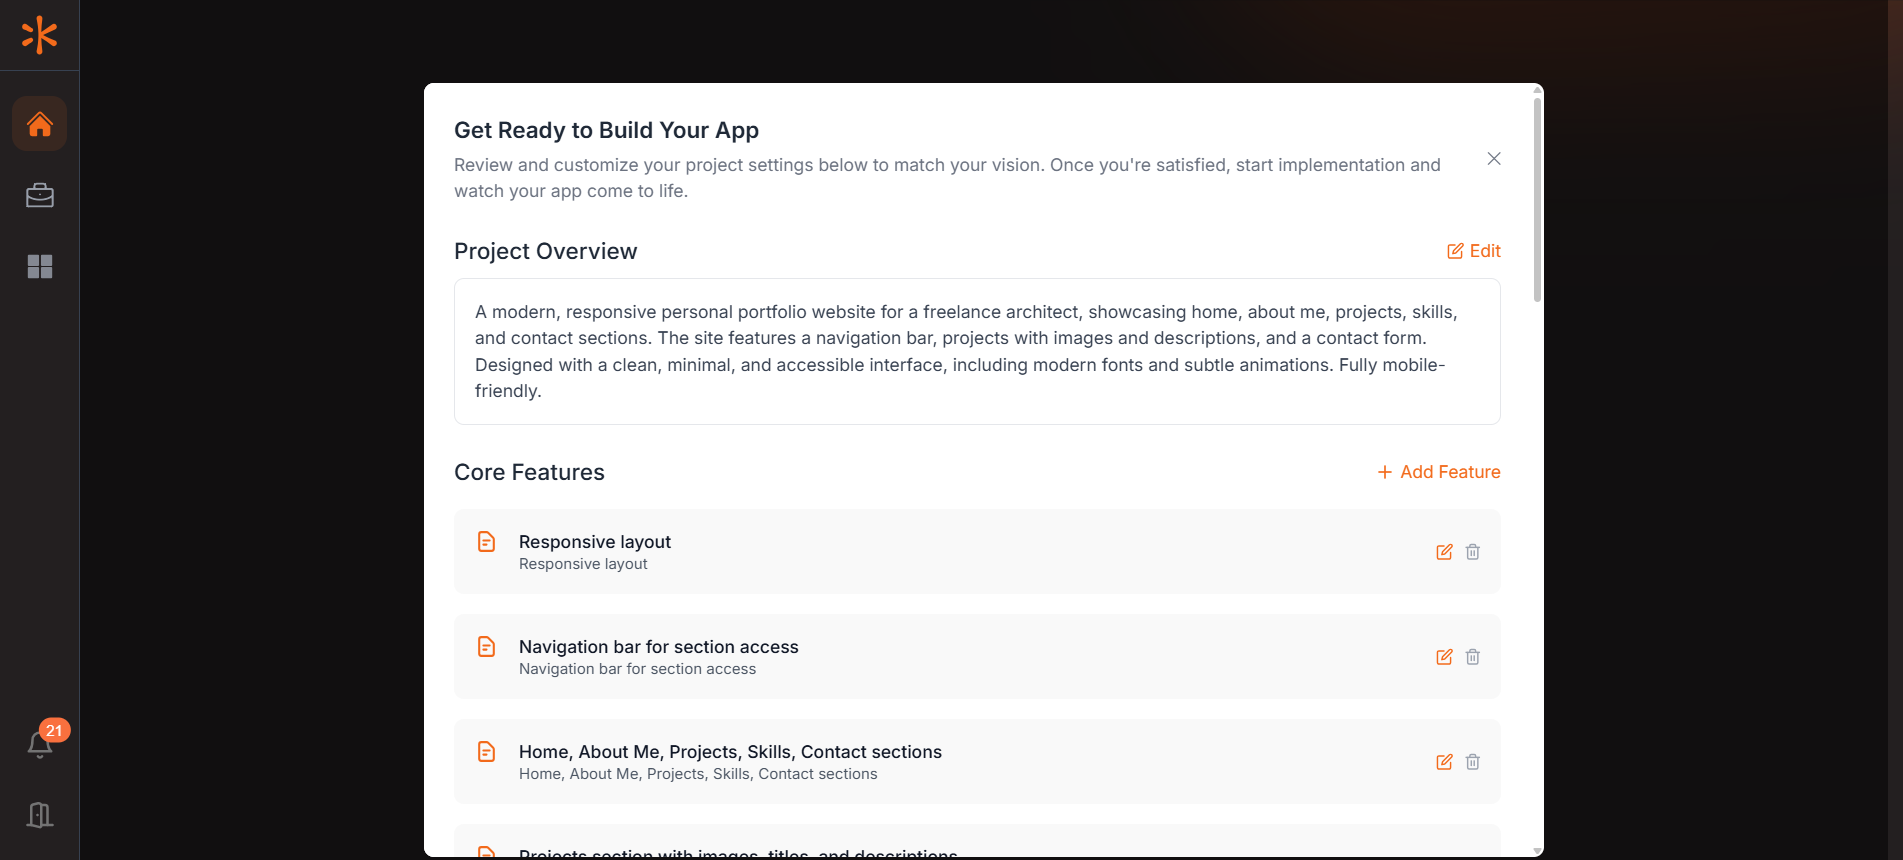
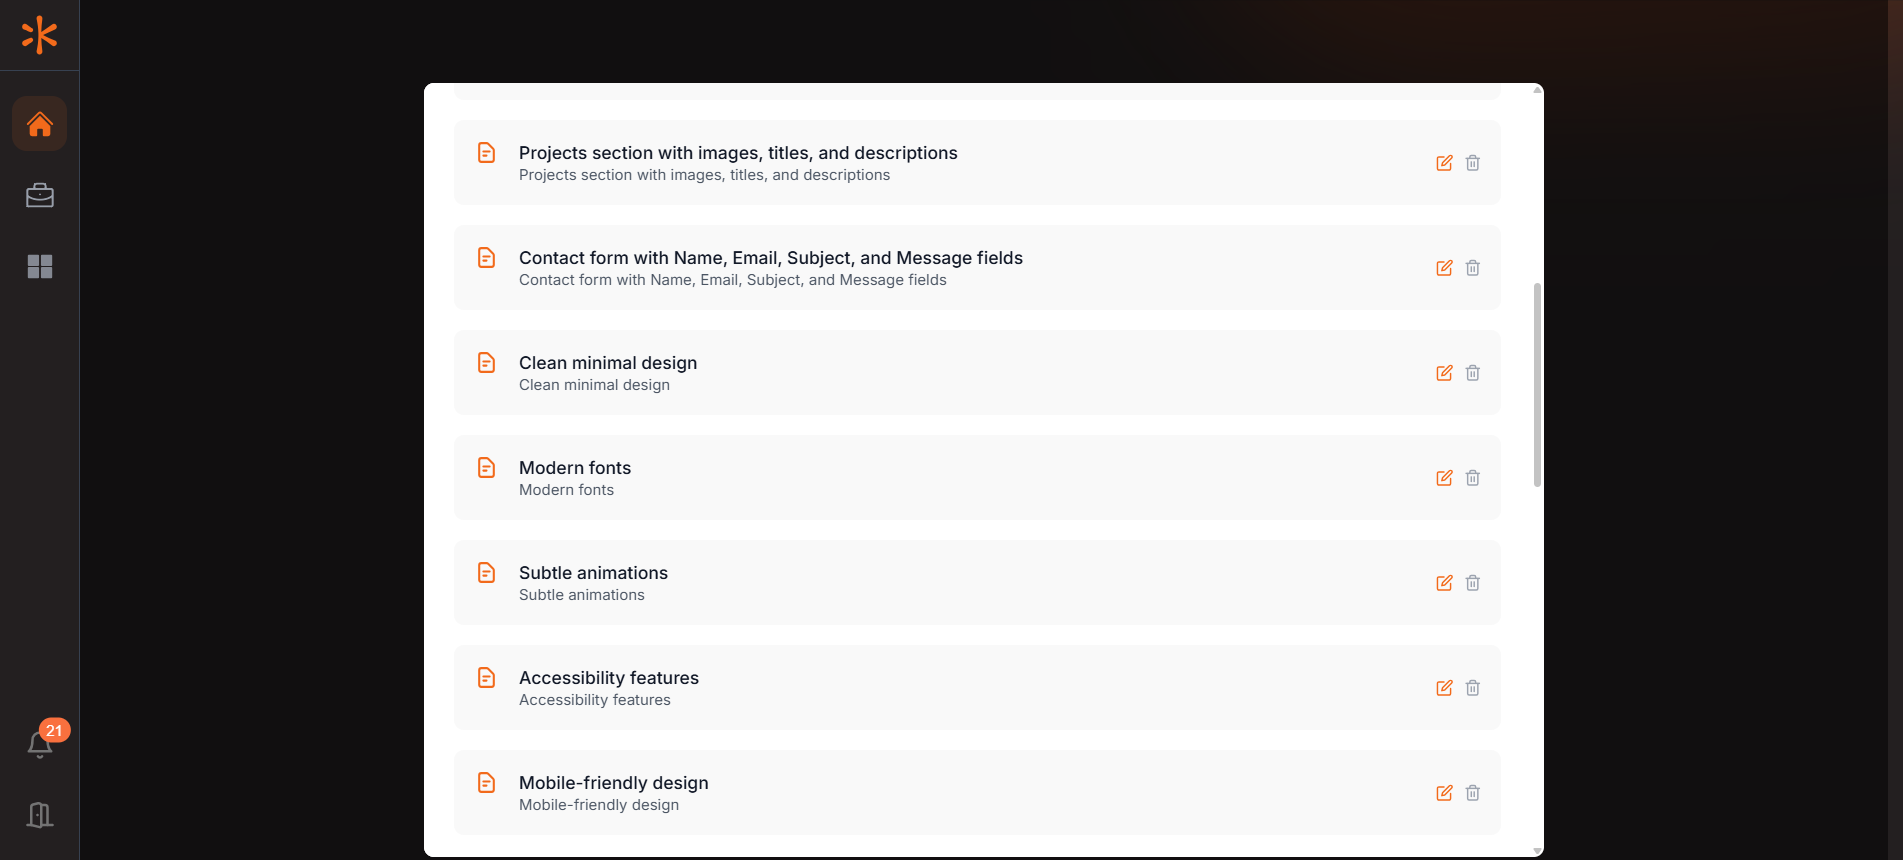
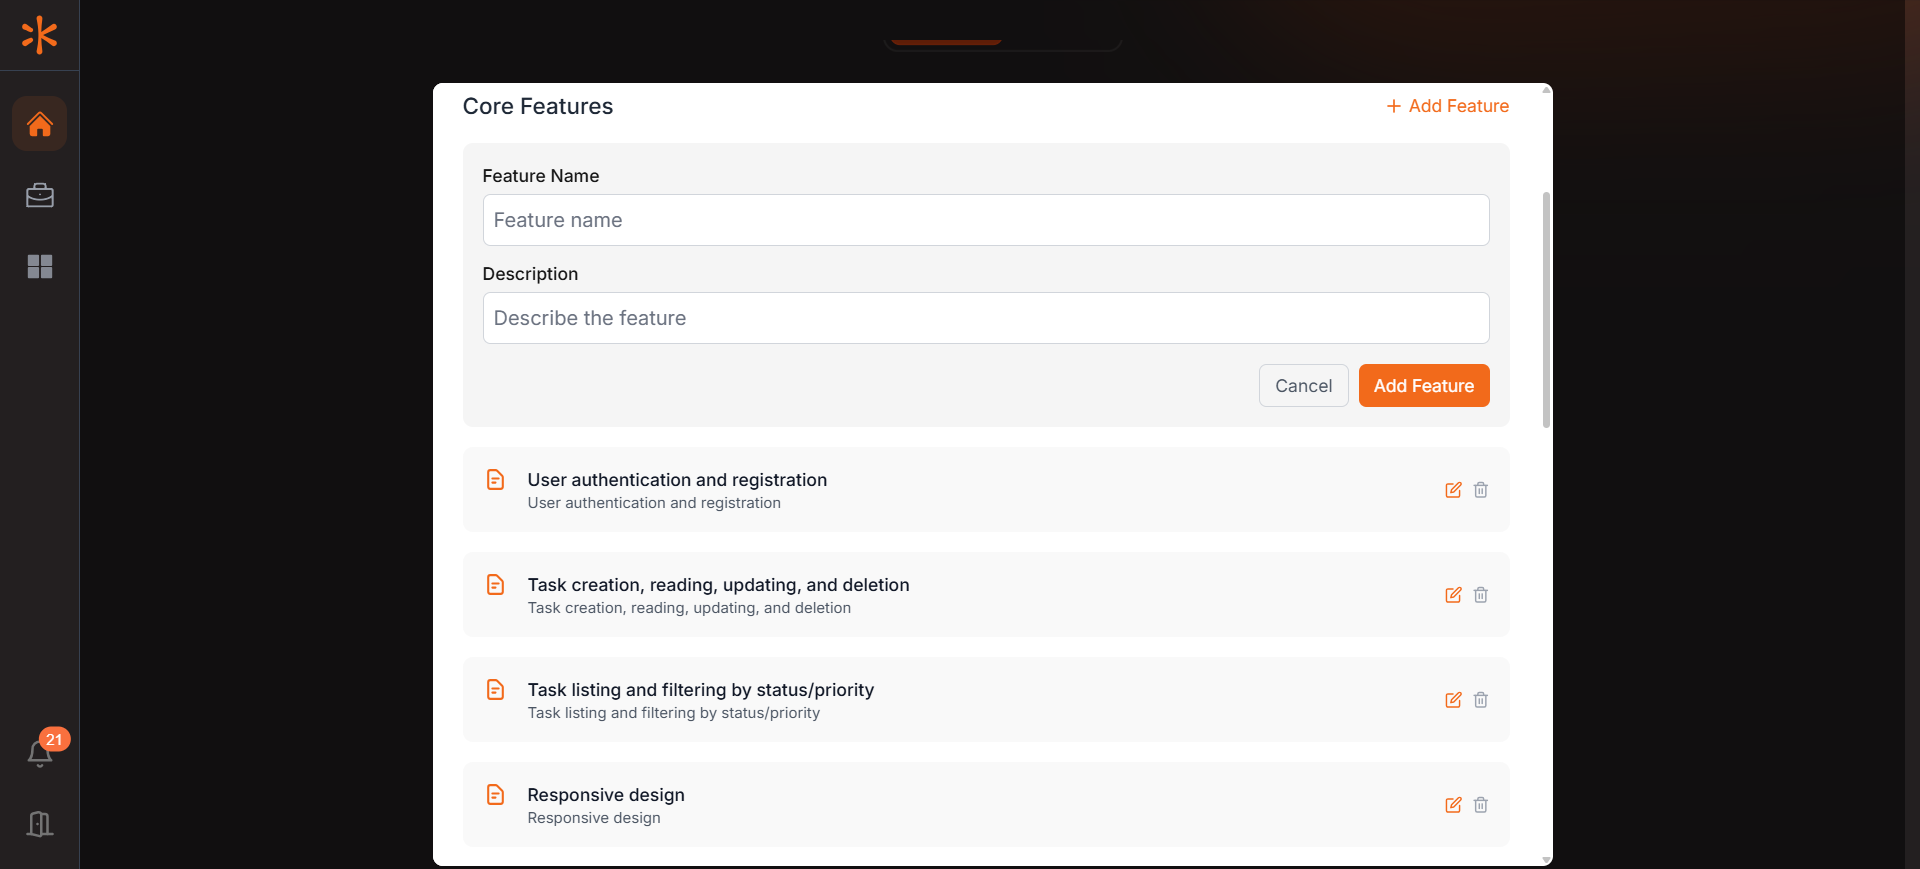
2. Configure Core Features
In the Core Features section, Kavia breaks down your requirements into individual features.
- Review all the listed features thoroughly.
- You can edit, delete, or add new features using the provided controls.
Note: It is highly recommended to validate and finalize your feature list at this stage. Later development relies on prompt-based commands. Ensuring your requirements are clear now helps Kavia build a more accurate and complete application.
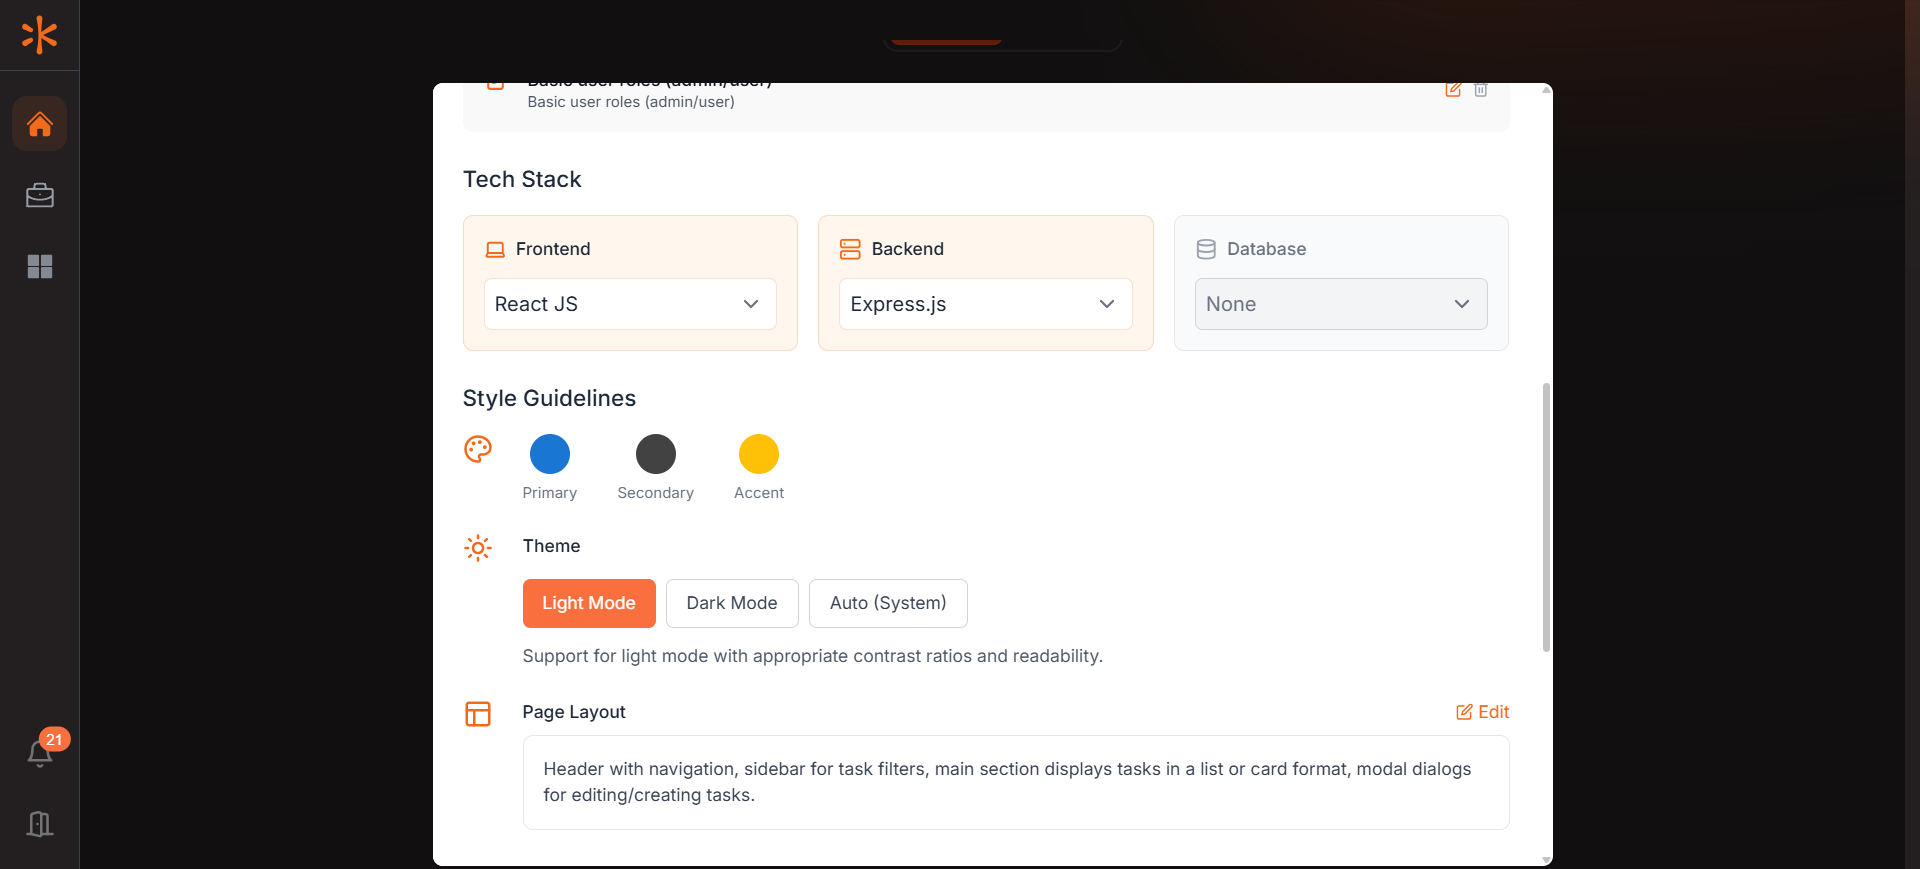
3. Select Your Tech Stack and Style
In the Tech Stack section, you can customize the technologies Kavia will use to build your app.
- Choose your preferred frameworks and libraries.
- Under Style Guidelines, define your app's primary colors, theme, and page layout to match your brand or design preferences.
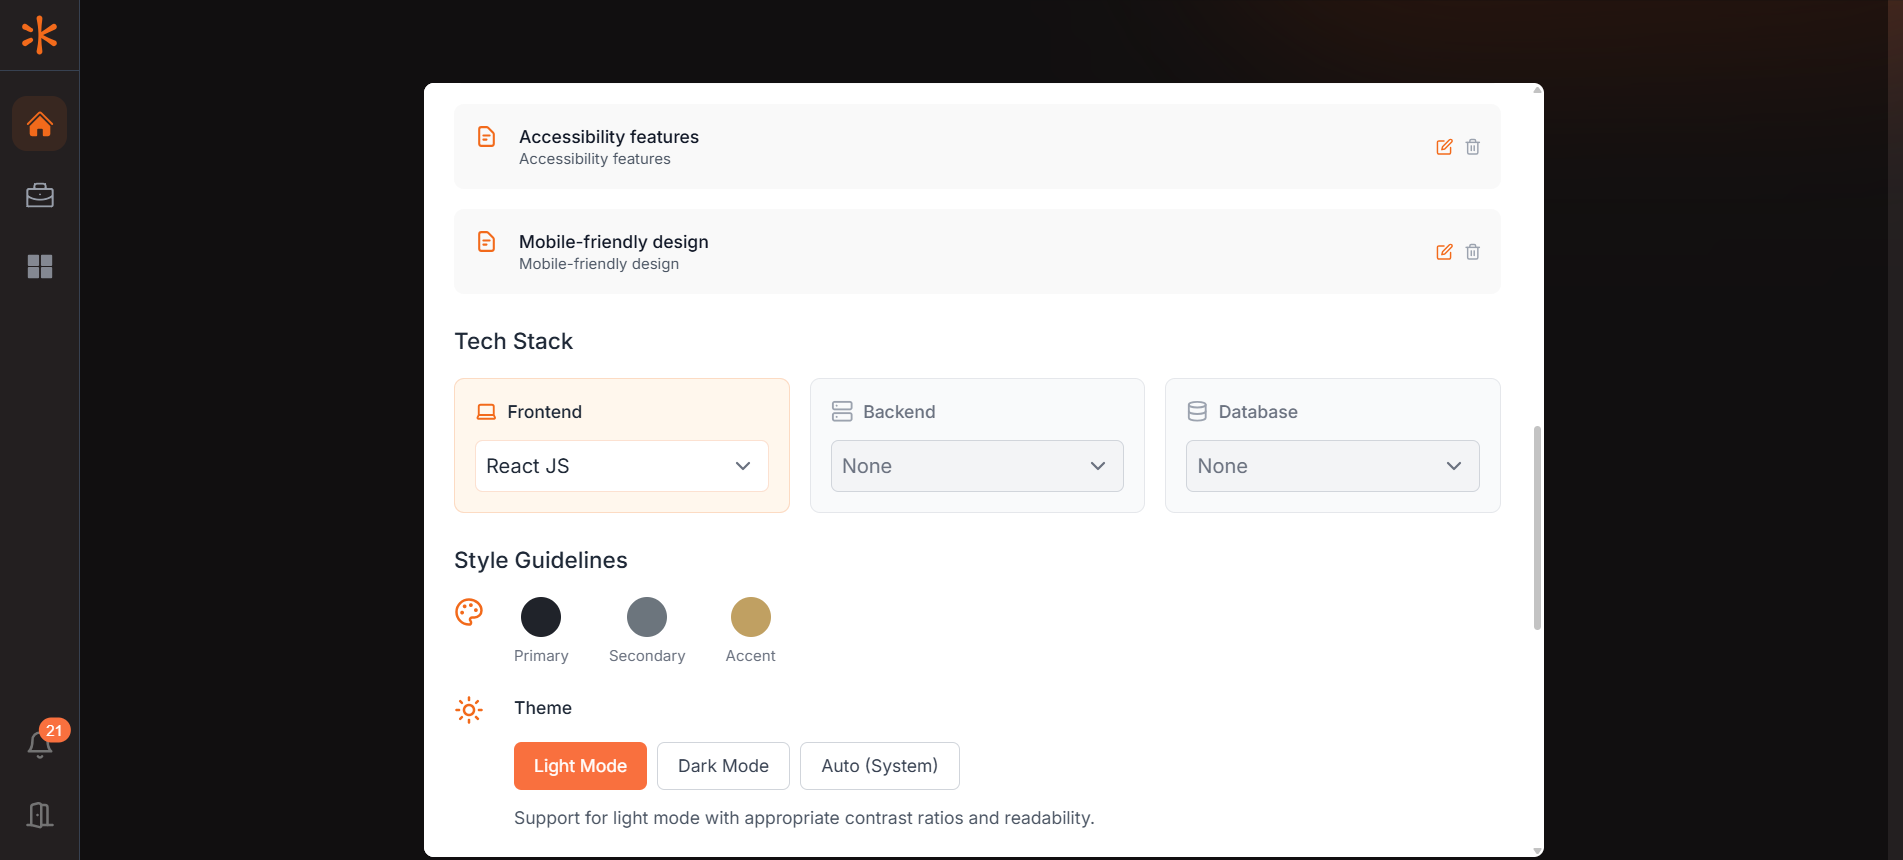
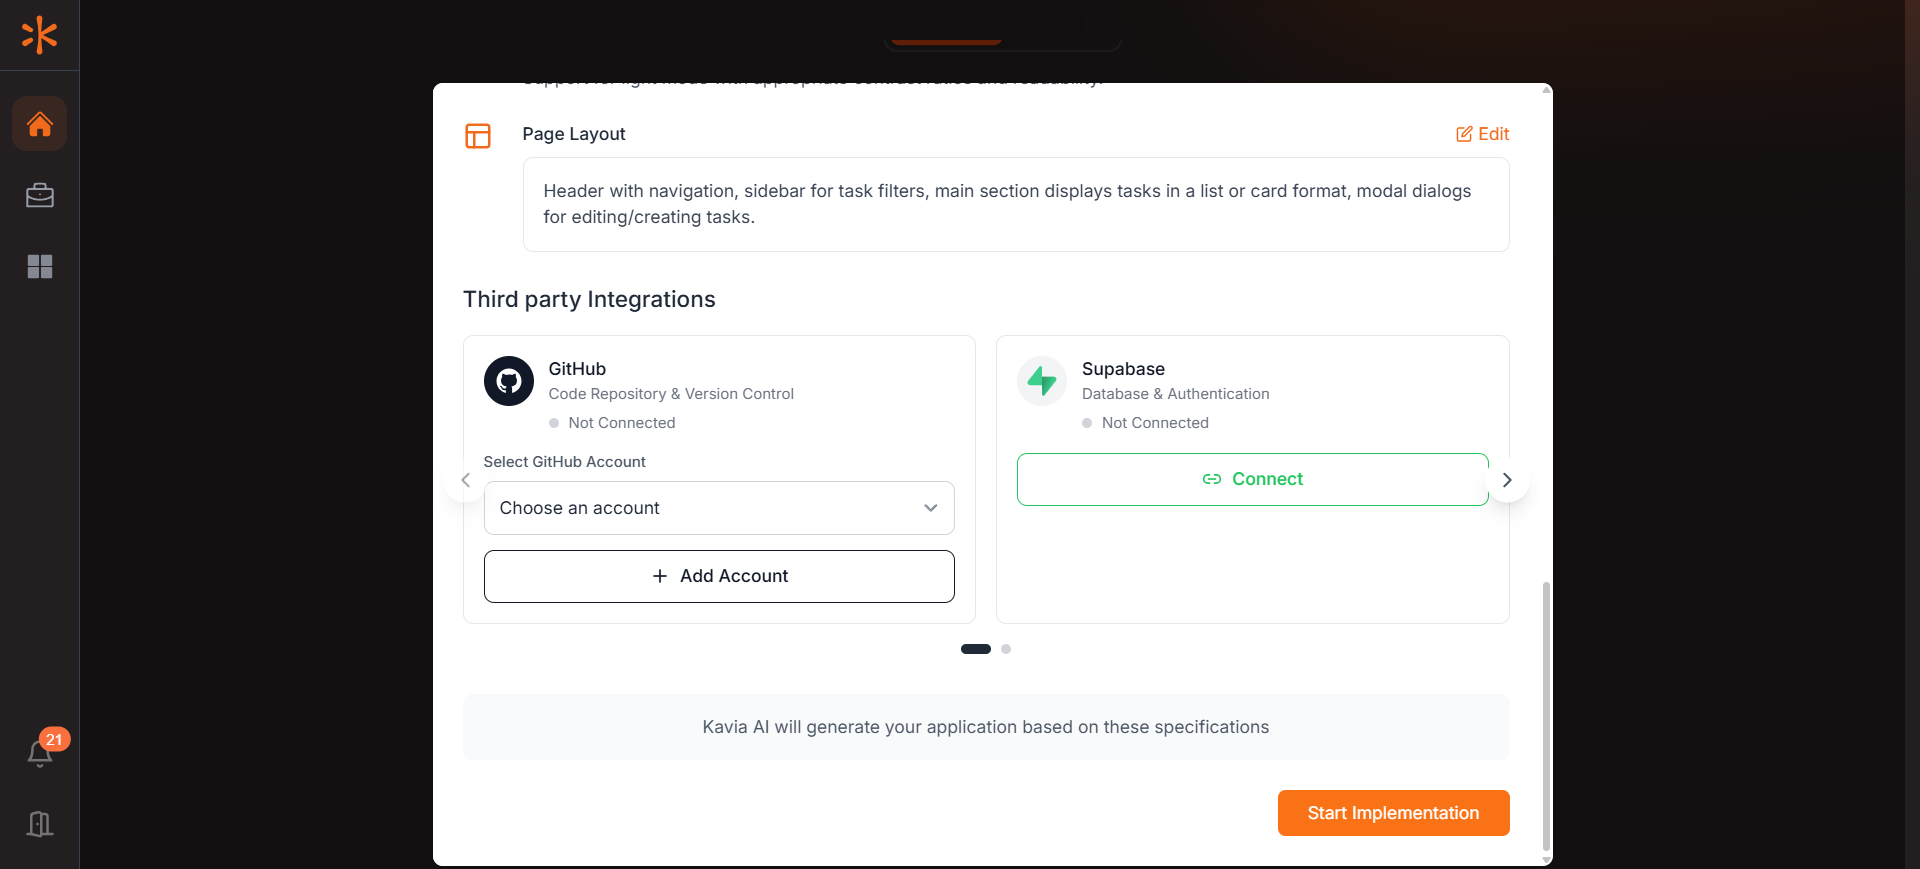
4. Connect Your GitHub Account
In the Third-Party Integrations section:
- Select your GitHub account from the dropdown.
- If your account is not listed, click "Add Account" to connect it.
- Once connected, select the account before proceeding with project implementation.
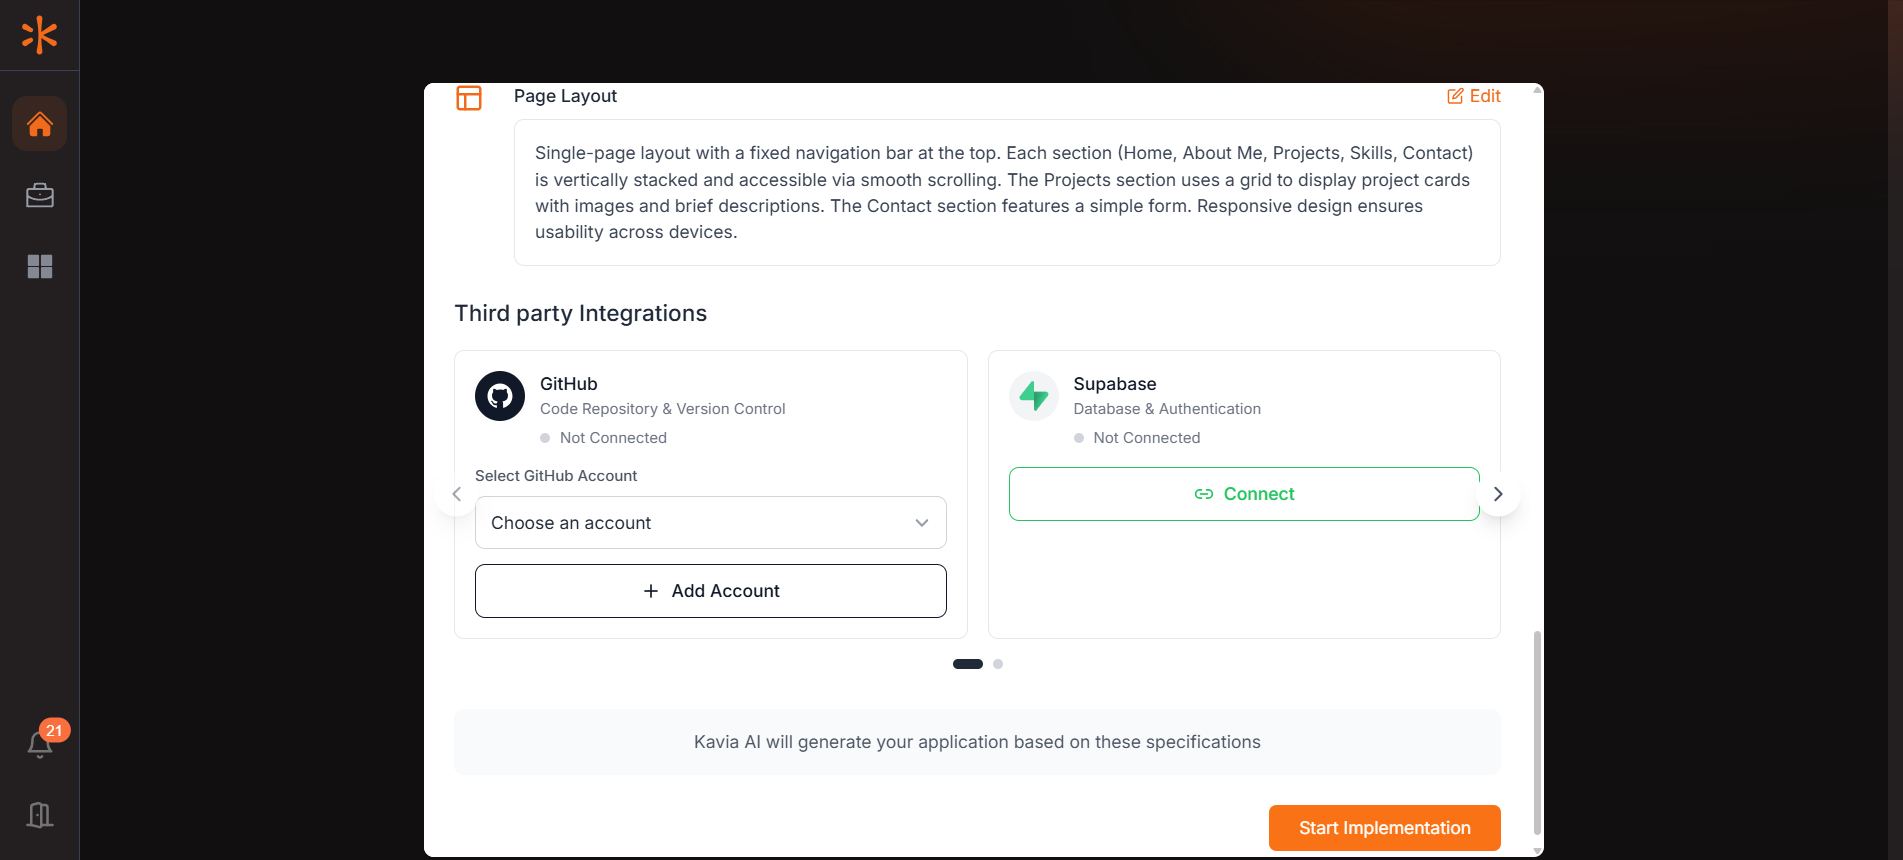
5. Connect Your Supabase Account
Supabase will be used to provision the database for your application.
To connect Supabase:
- Click "Connect" in the Supabase section.
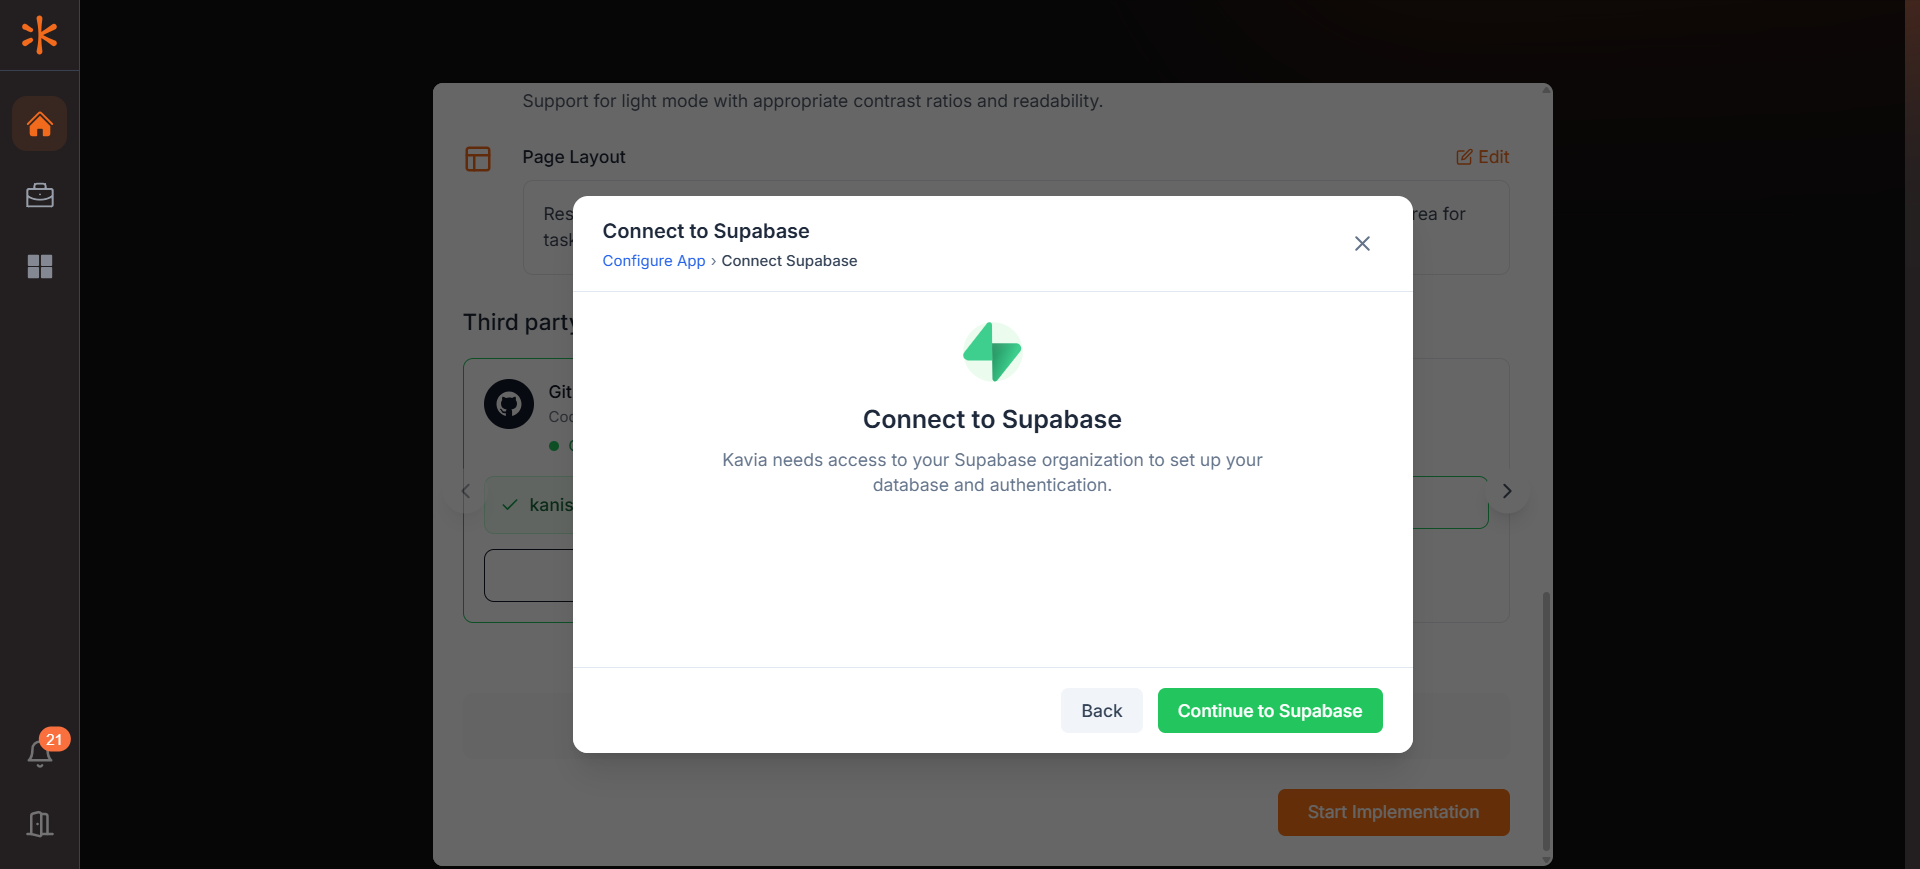
- A popup will appear—click "Continue to Supabase" and complete the authentication process. Completing the process will Open another popup from kavia to select a project from Supabase.
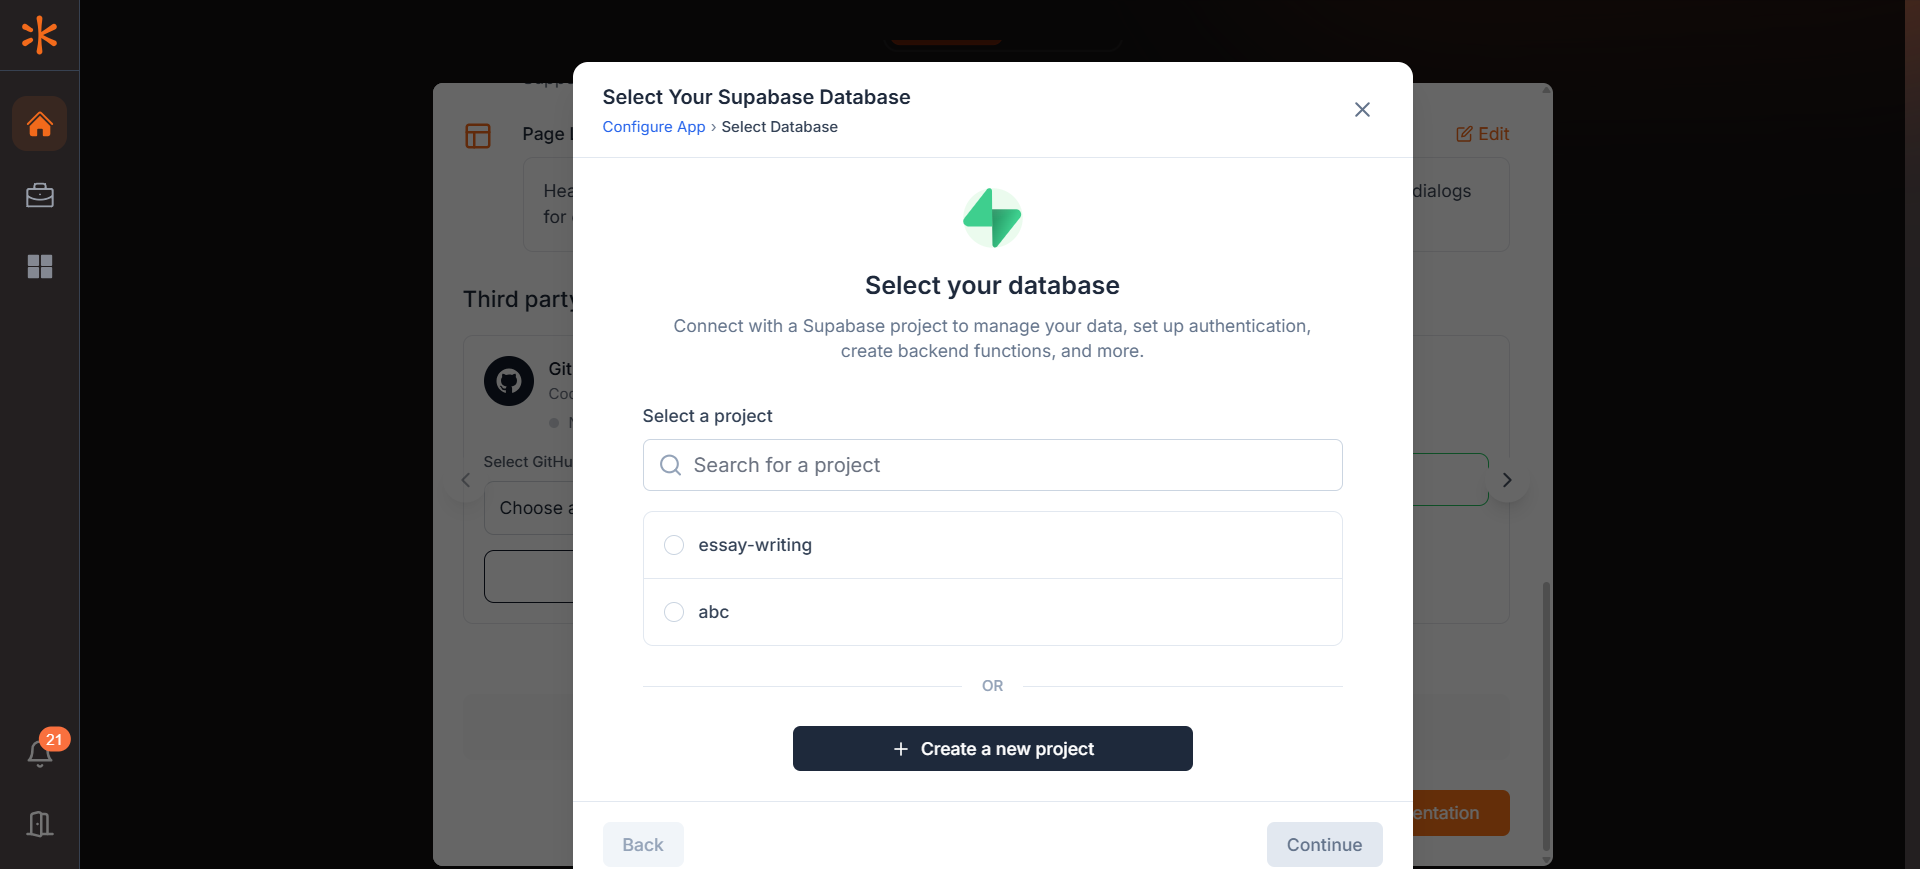
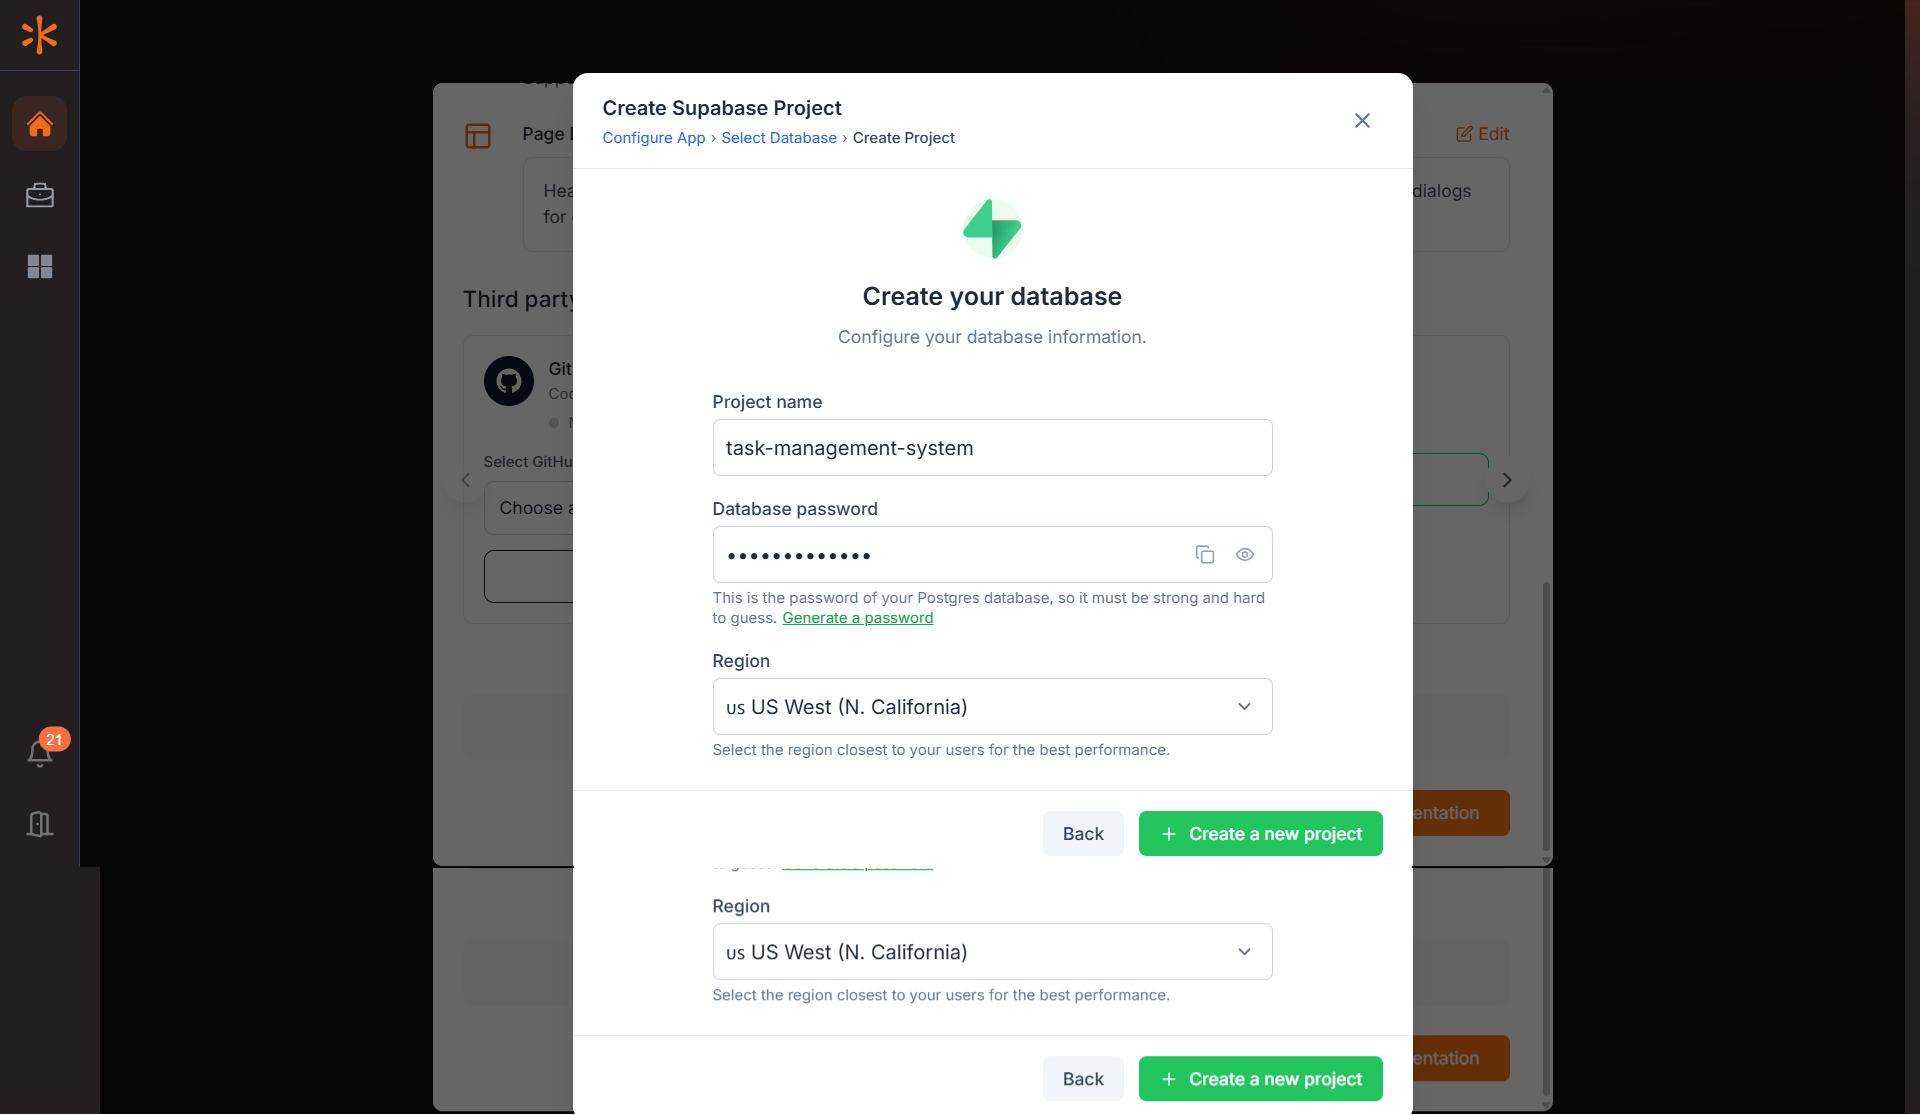
- Once connected, create a Supabase project by assigning a name and password.
6. Start Implementation
After connecting both your GitHub and Supabase accounts, click Start Implementation to begin building your application with Kavia.
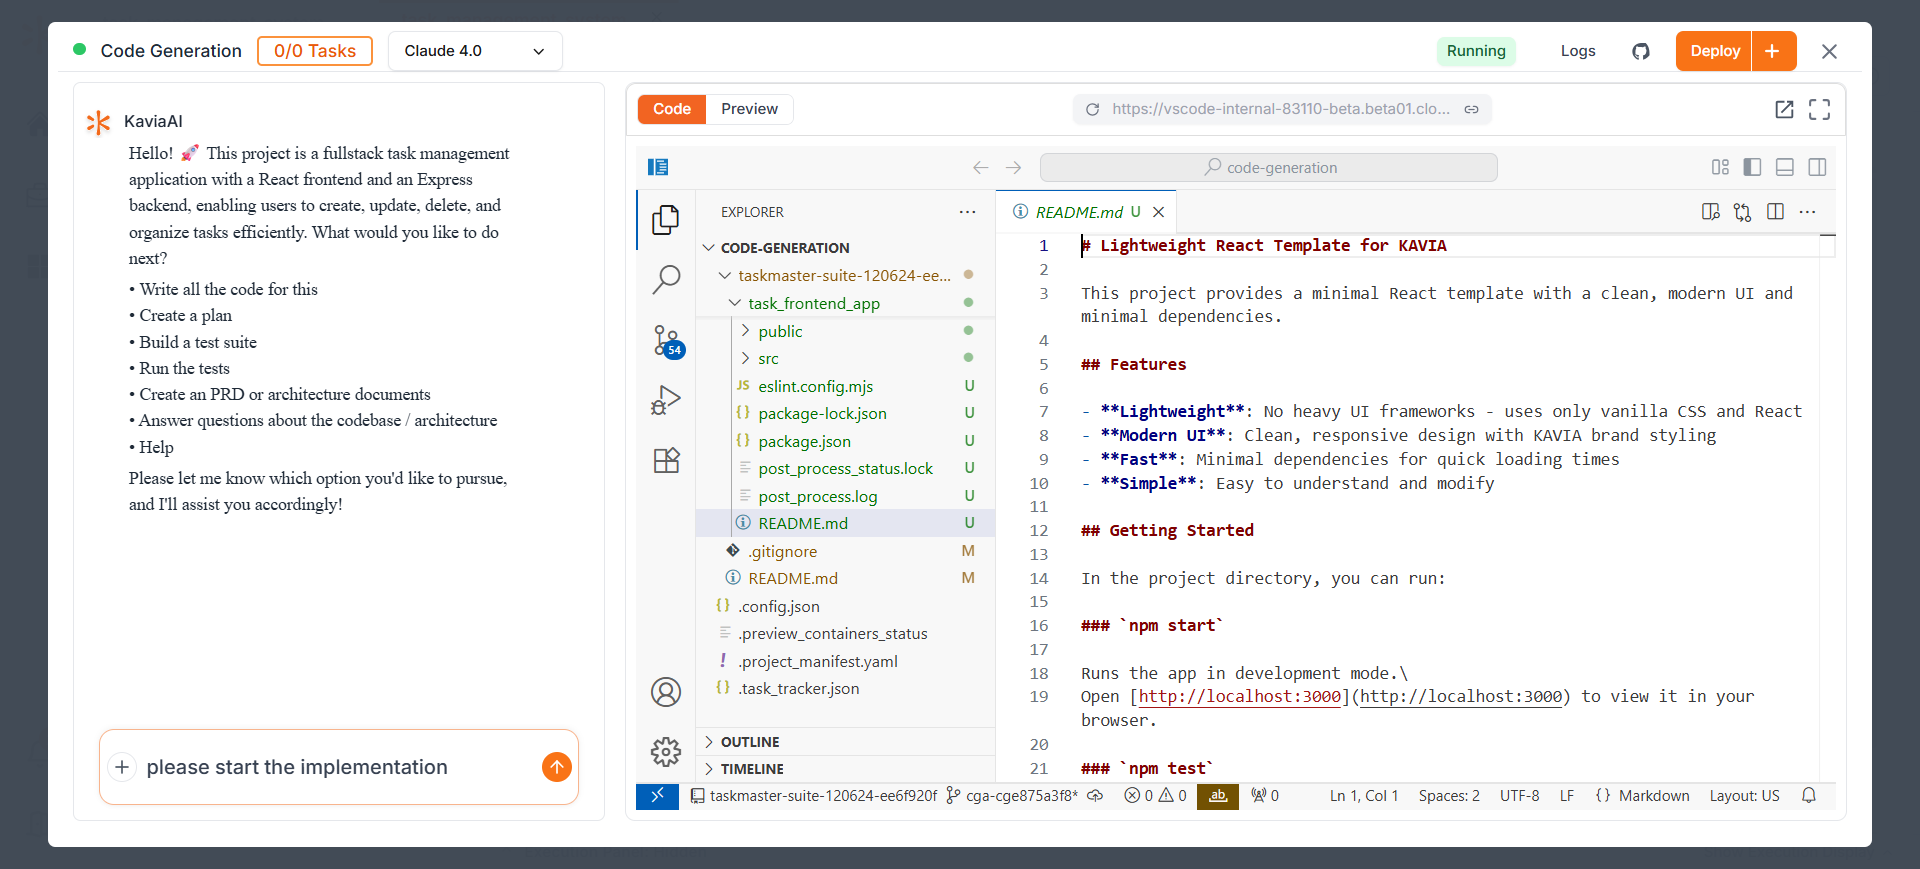
Step 4: Let Kavia Prepare the Workspace
Once you've clicked "Start Implementation", Kavia will begin preparing your Code Generation environment. This may take a few moments. Once setup is complete, you will see the following interface:
- Left side: A chat panel where Kavia communicates with you.
- Right side: A VS Code-style editor where your application code is generated and organized.
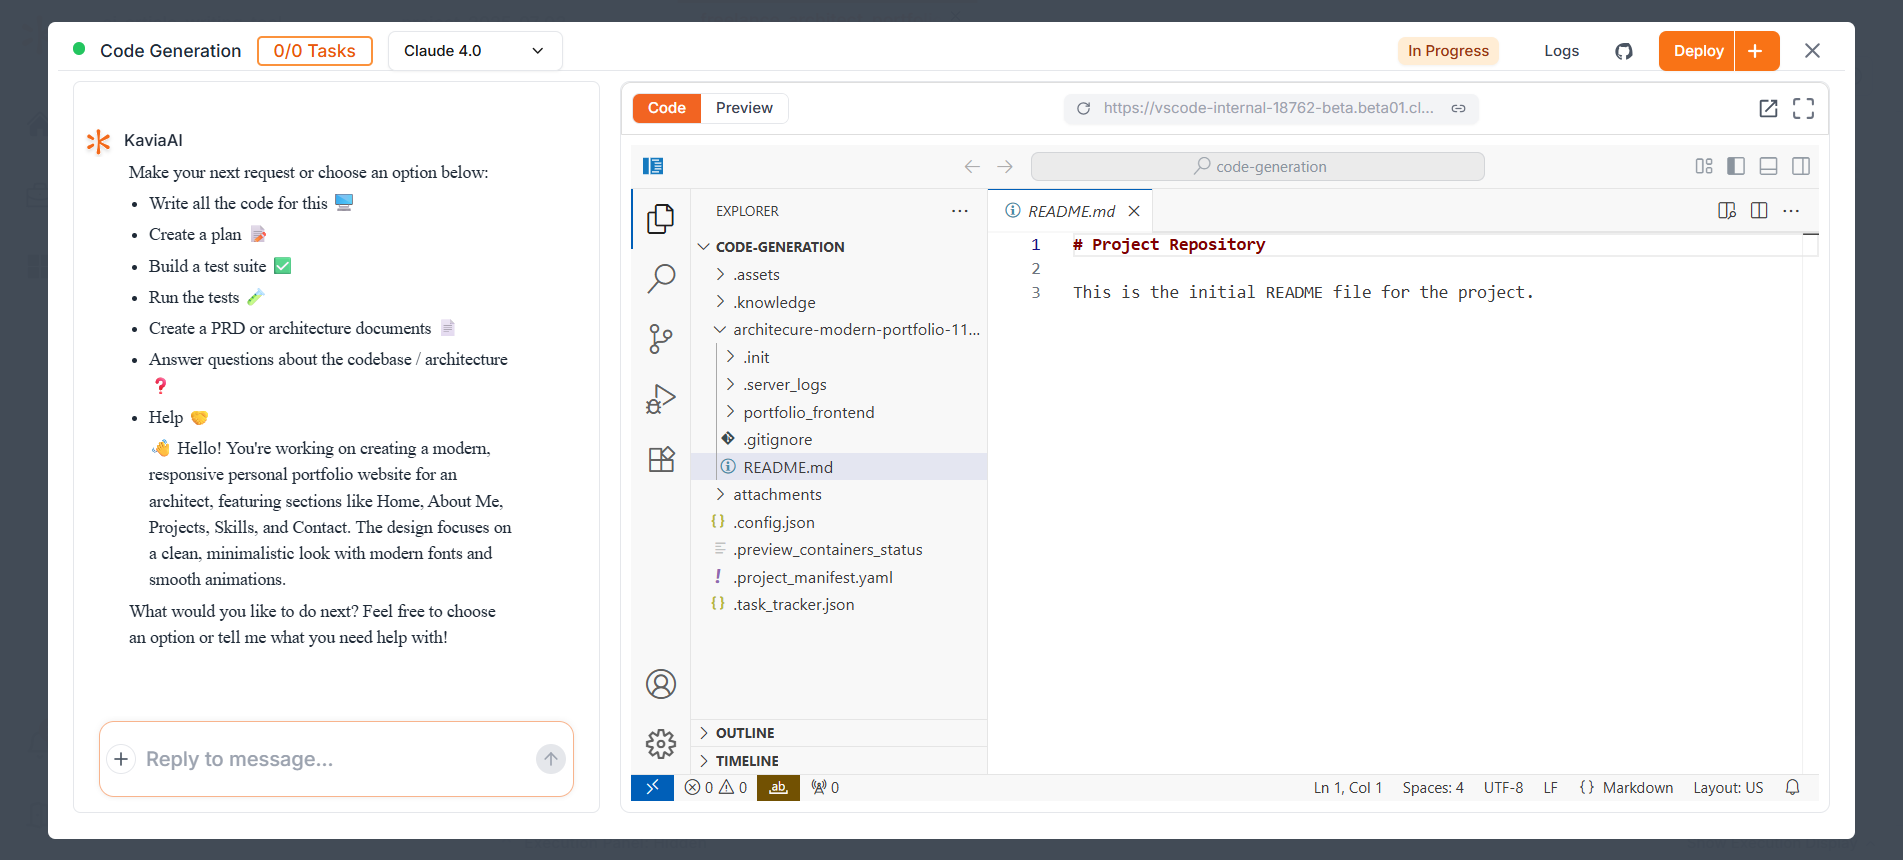
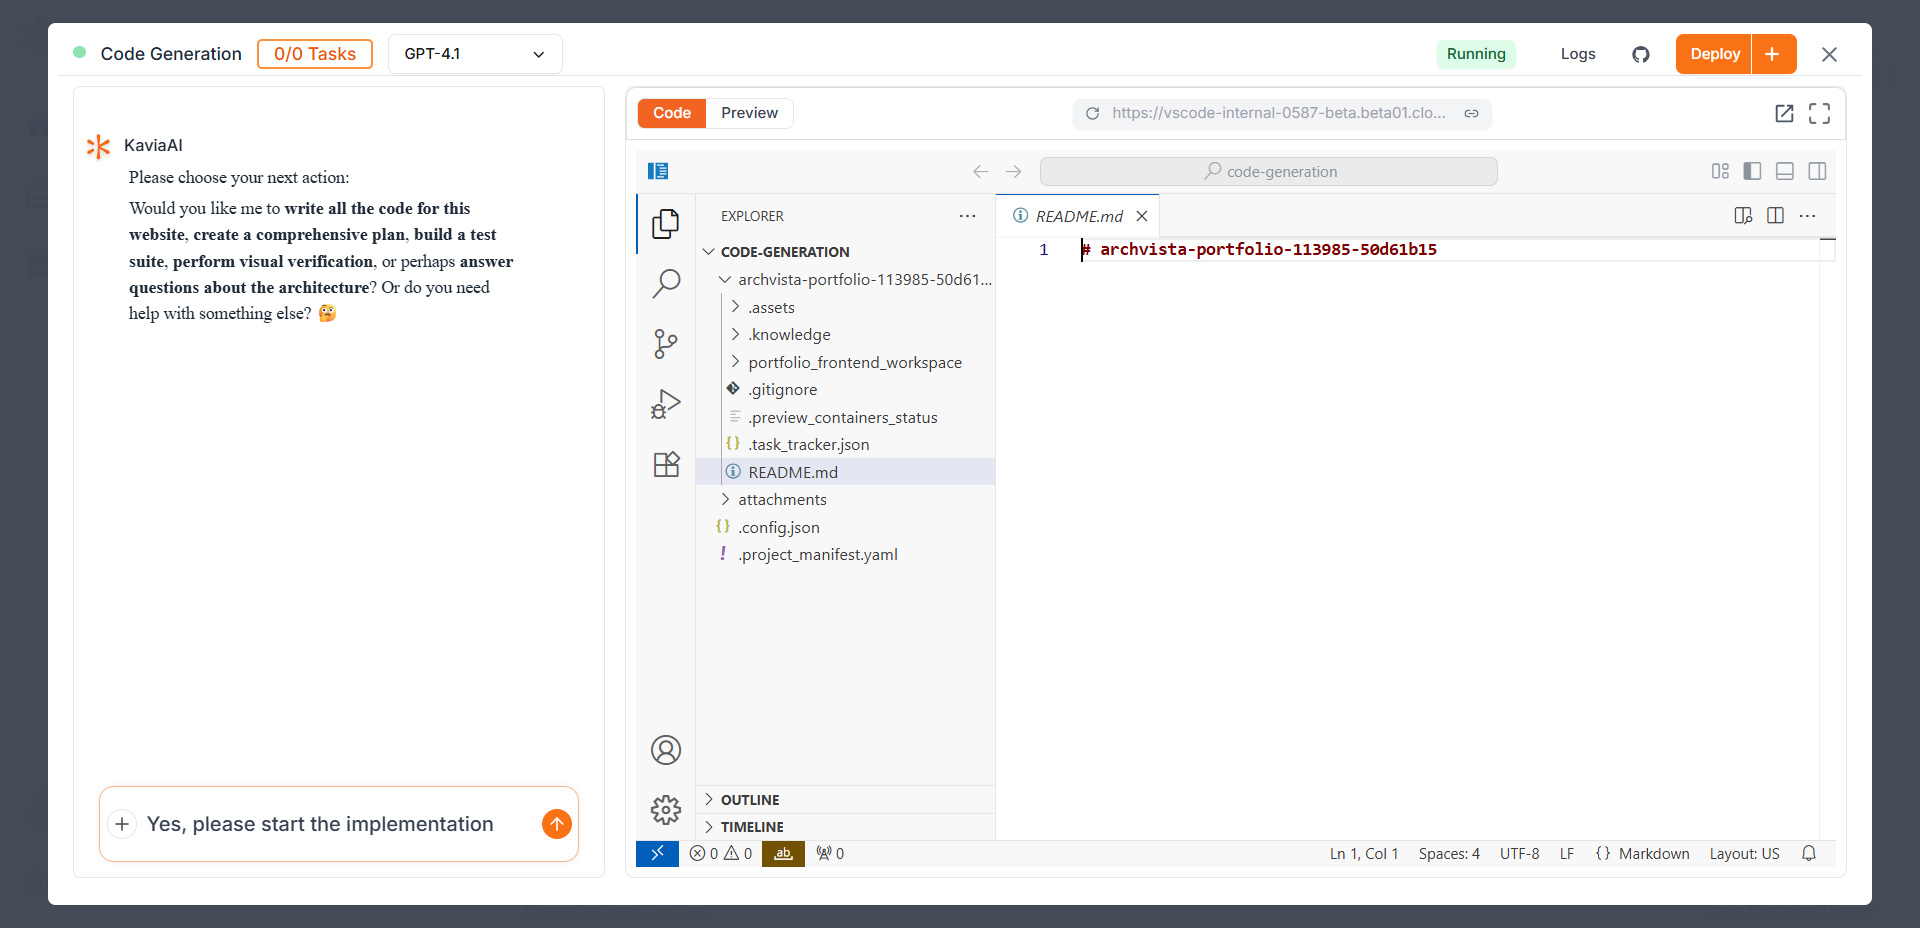
Step 5: Collaborate with Kavia via Chat
In the chat panel, Kavia will typically begin with a system-generated message. For example:
Would you like me to write all the code for this website, create a comprehensive plan, build a test suite, perform visual verification, or perhaps answer questions about the architecture? Or do you need help with something else?
Once you review the plan, reply:
Yes, please start the implementation
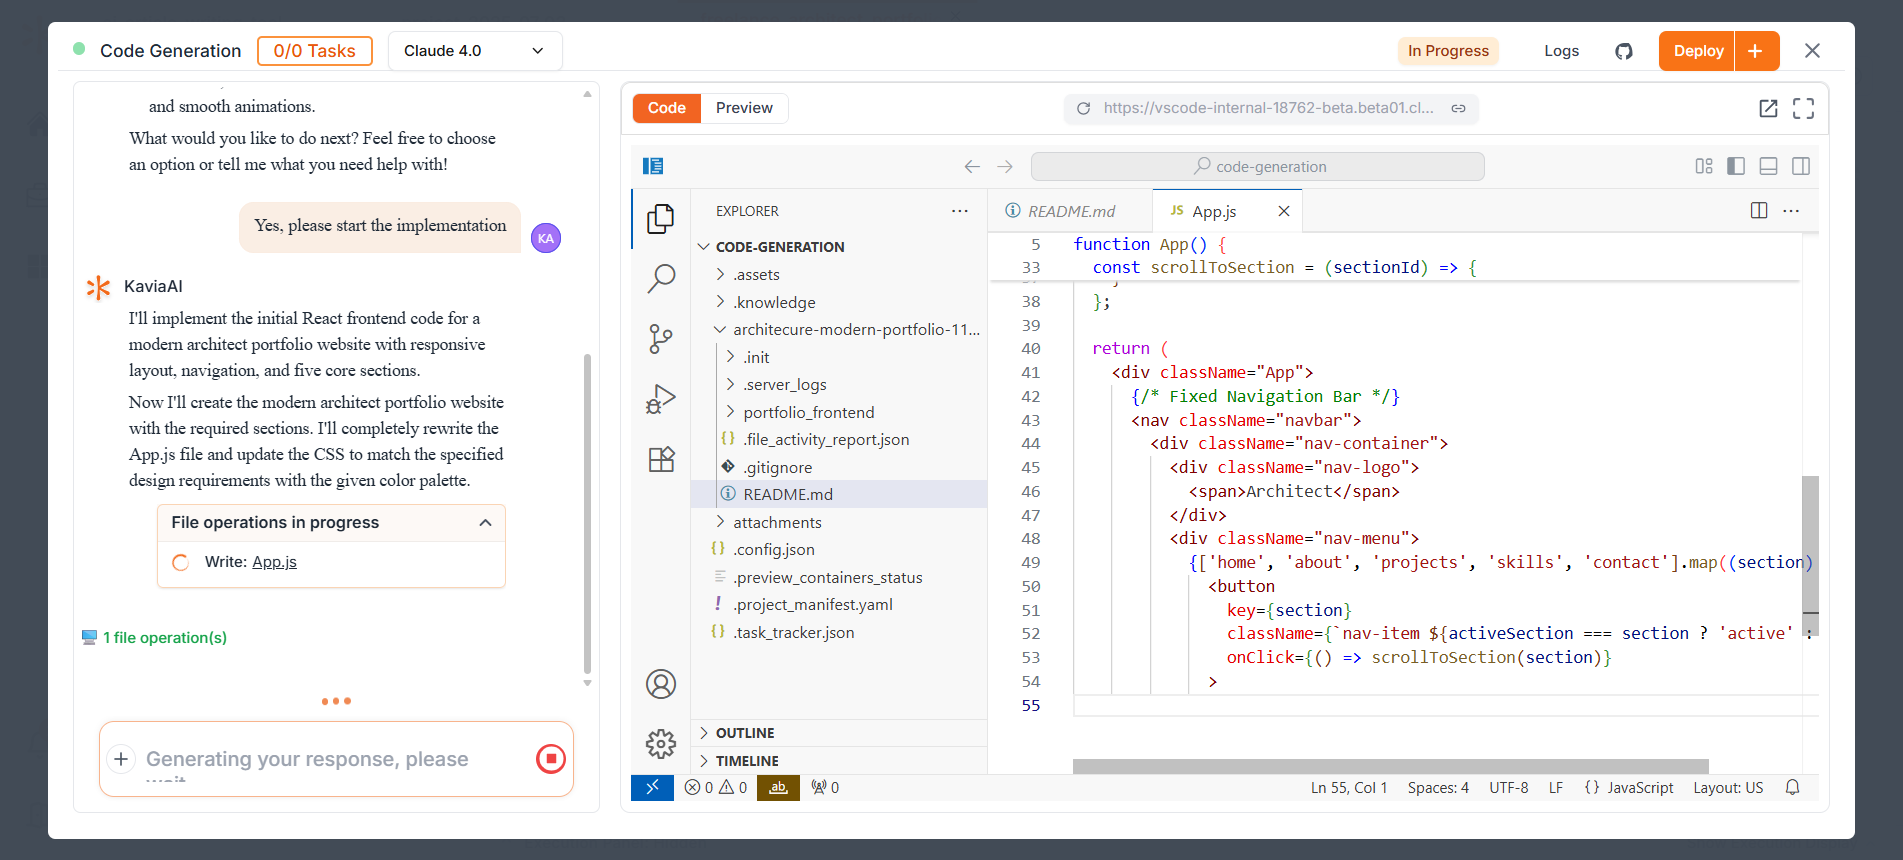
Kavia will proceed step-by-step. When it asks if it should move on to the next development stage (e.g., Step Two and Step Three), respond accordingly:
Please proceed to step two Yes, please proceed (for the next step)
This step-by-step chat guidance helps you stay in control of the development process while letting Kavia handle the heavy lifting.
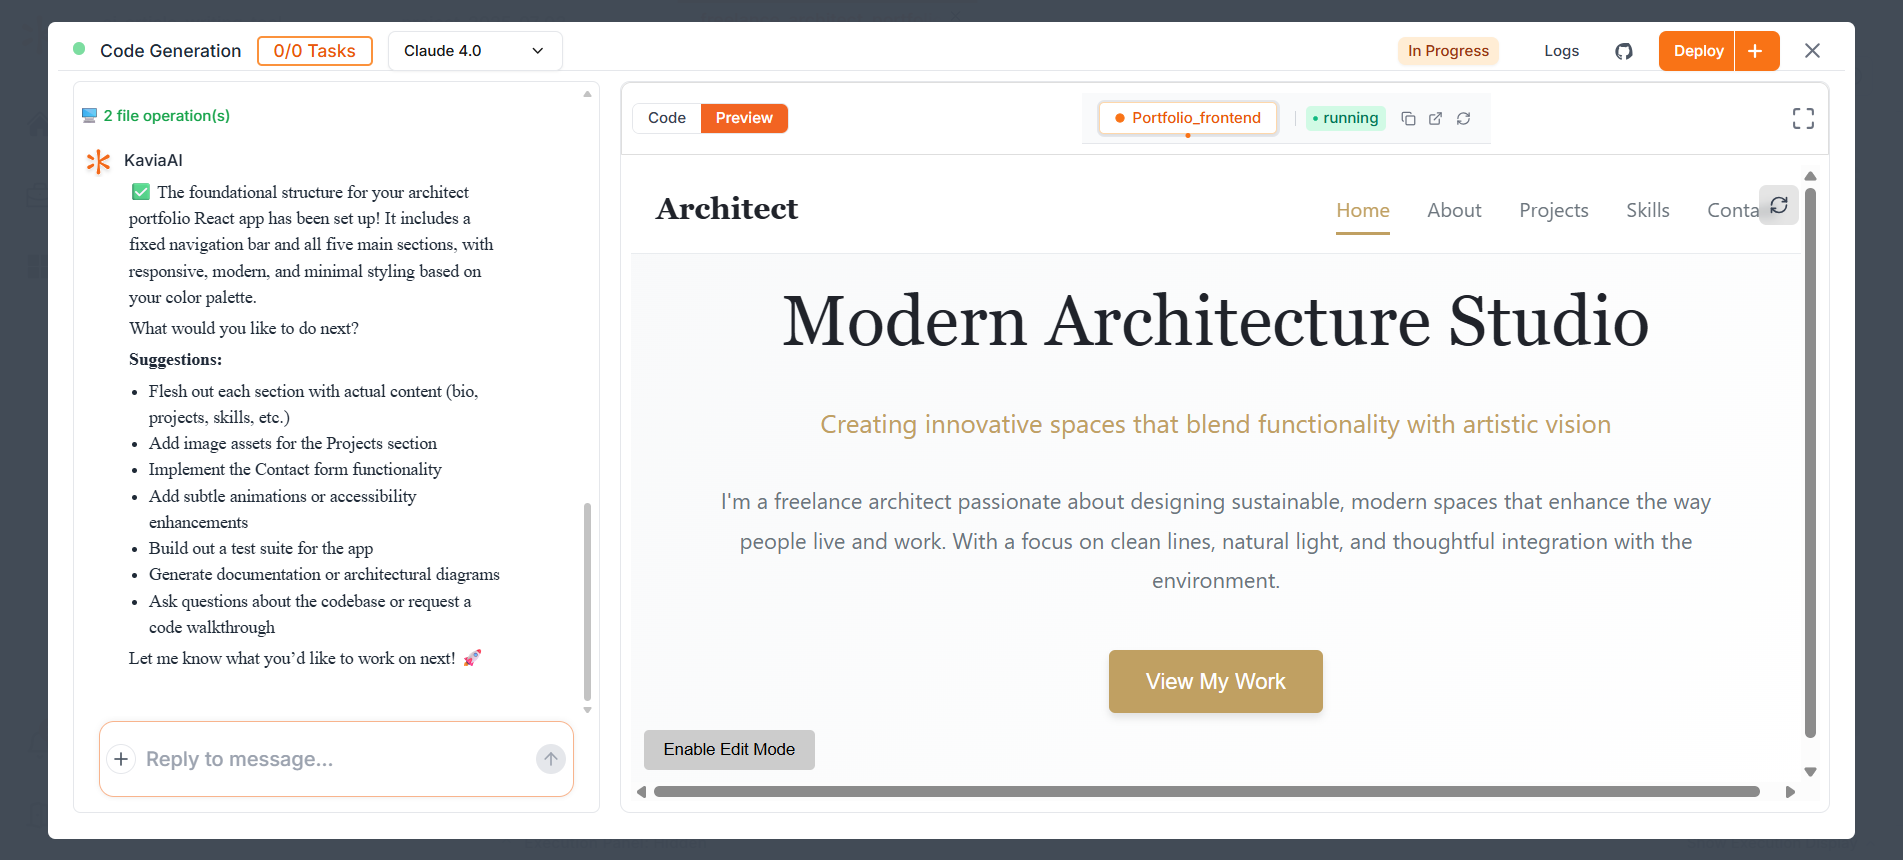
Step 6: Preview
To preview the app you're building, simply click the Preview button located at the top-left corner of the right panel. This will open a live preview of your application so you can see the current state of your build.
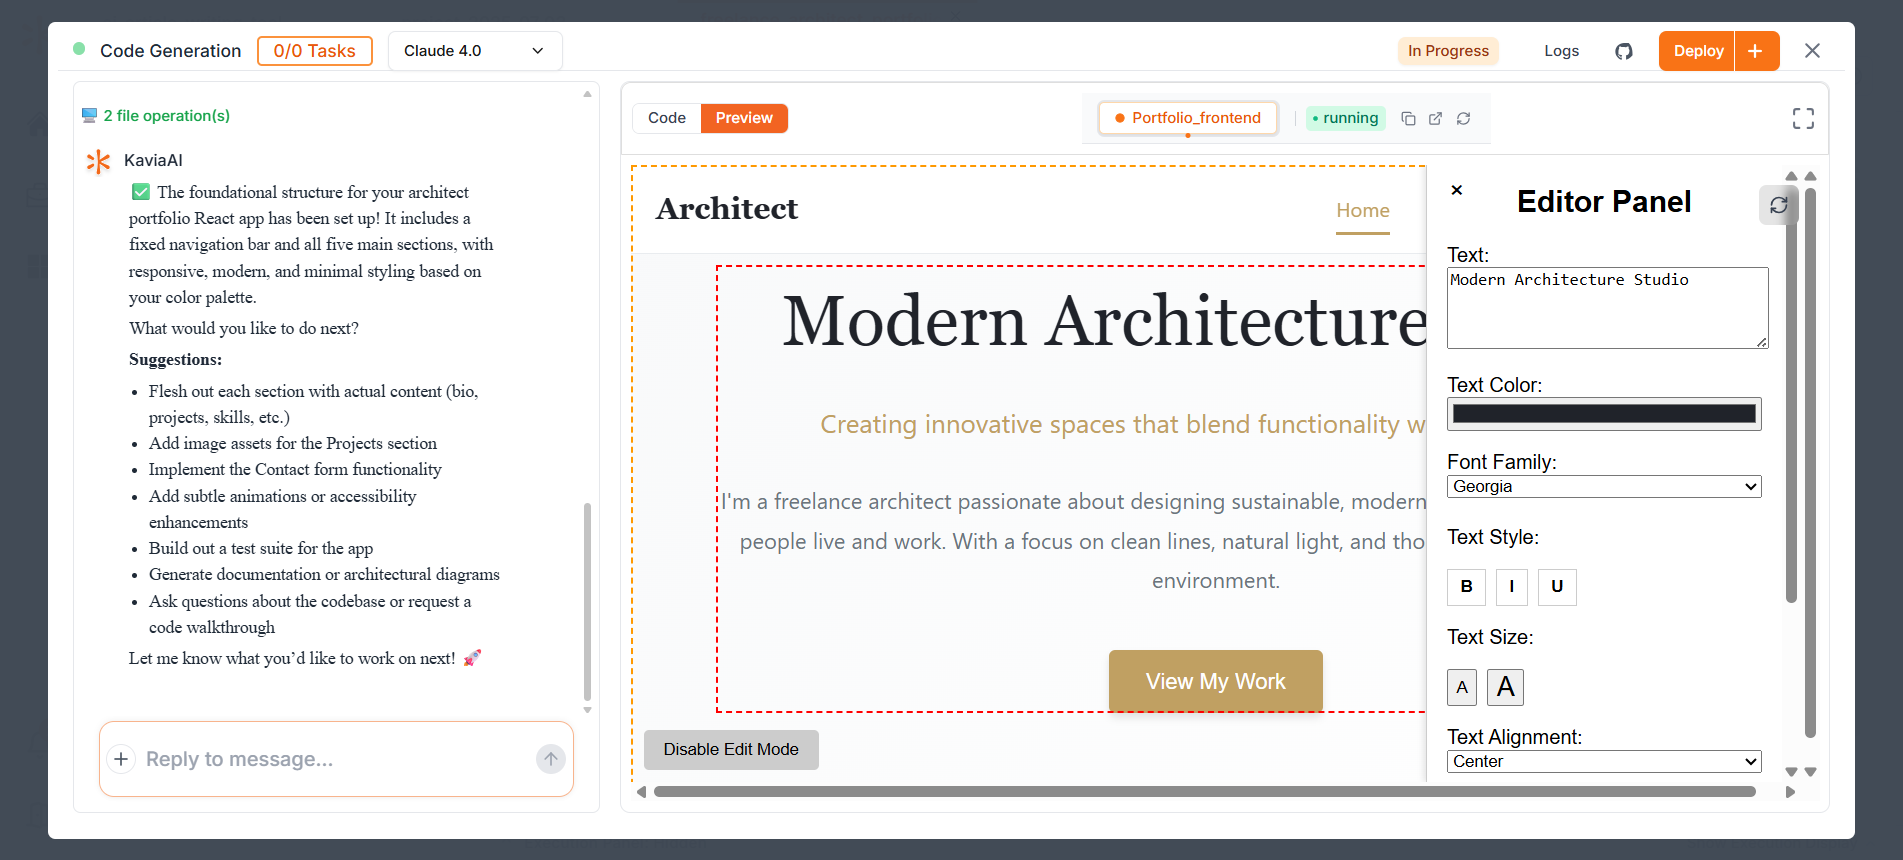
Step 7: Enabling the Edit Mode
Enabling Edit Mode allows you to directly select and modify components within the preview, without needing to give instructions through the Kavia chat. This feature helps you fine-tune the design and functionality to match your exact vision. Once you've made changes in the preview using Edit Mode, make sure to save them. After completing all your edits, click the Disable Edit Mode button to continue working on the project.
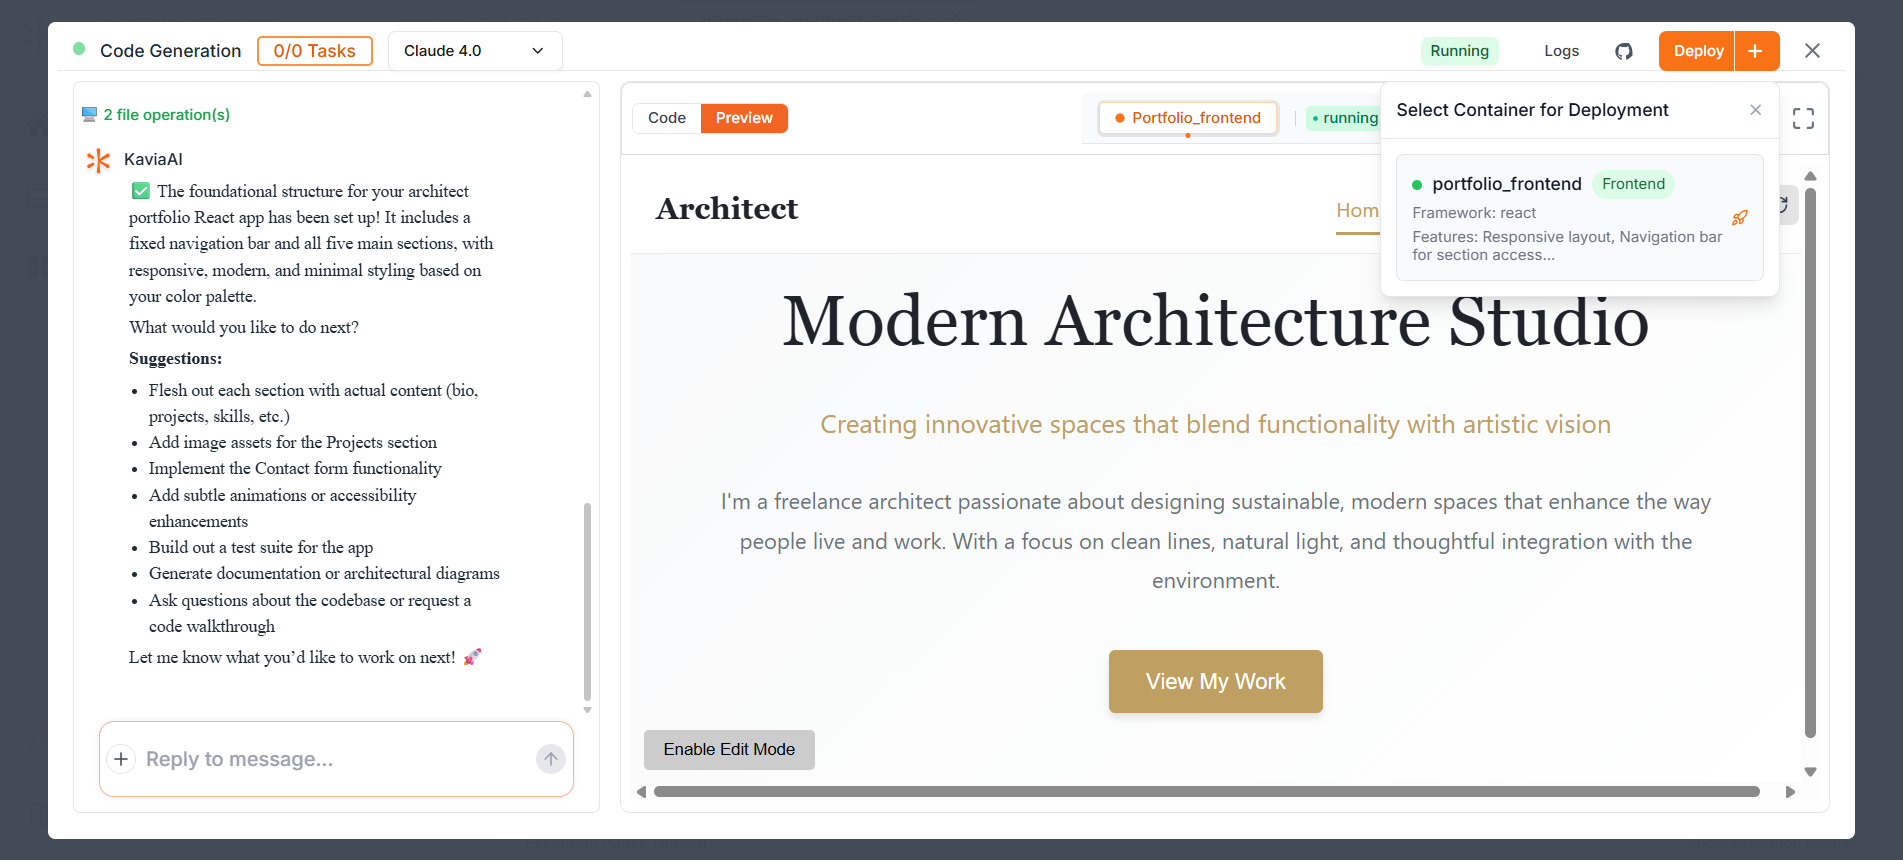
Step 8: Deployment
Click the + button located next to the Deploy button, then select the container from the dropdown. If you are working on a multi container project it will show them as well. In here we only see the one container and now we need to select it and then configure the settings and click Create Frontend Deployment. Kavia will automatically deploy the app for you.
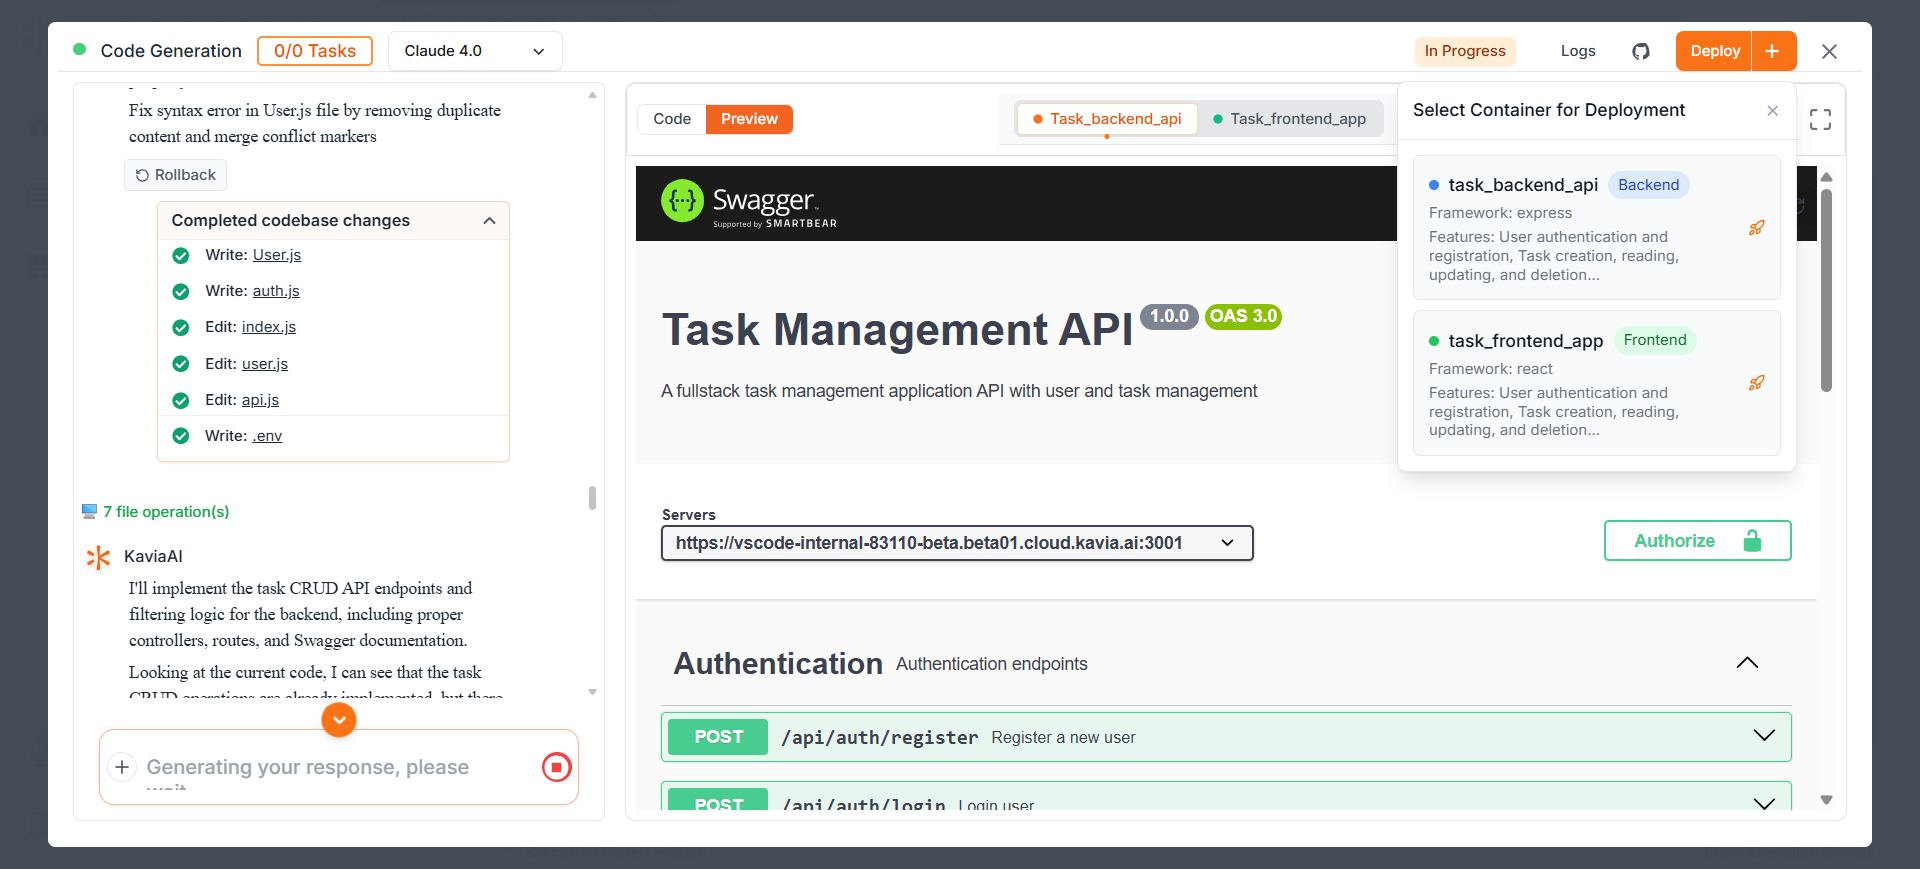
For a Full Stack application Deployment you need to Deploy both front end and backend. You just need to select what you want to deploy and then you can easily deploy in one click.
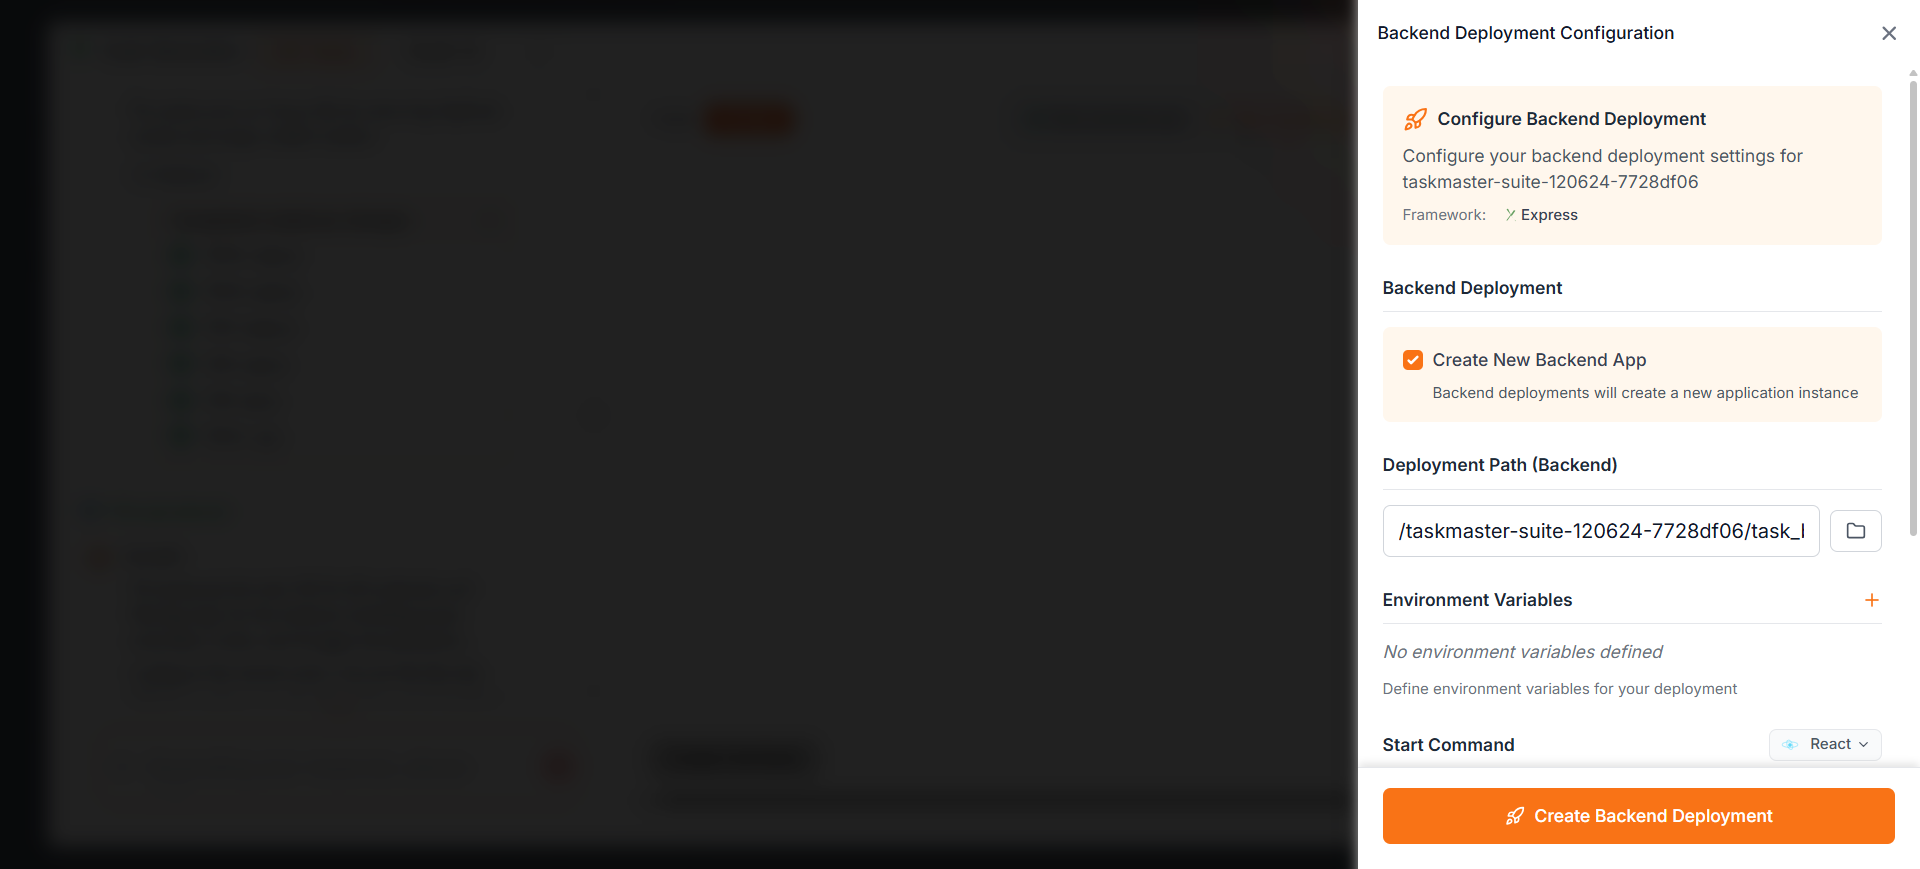
Back End Deployment
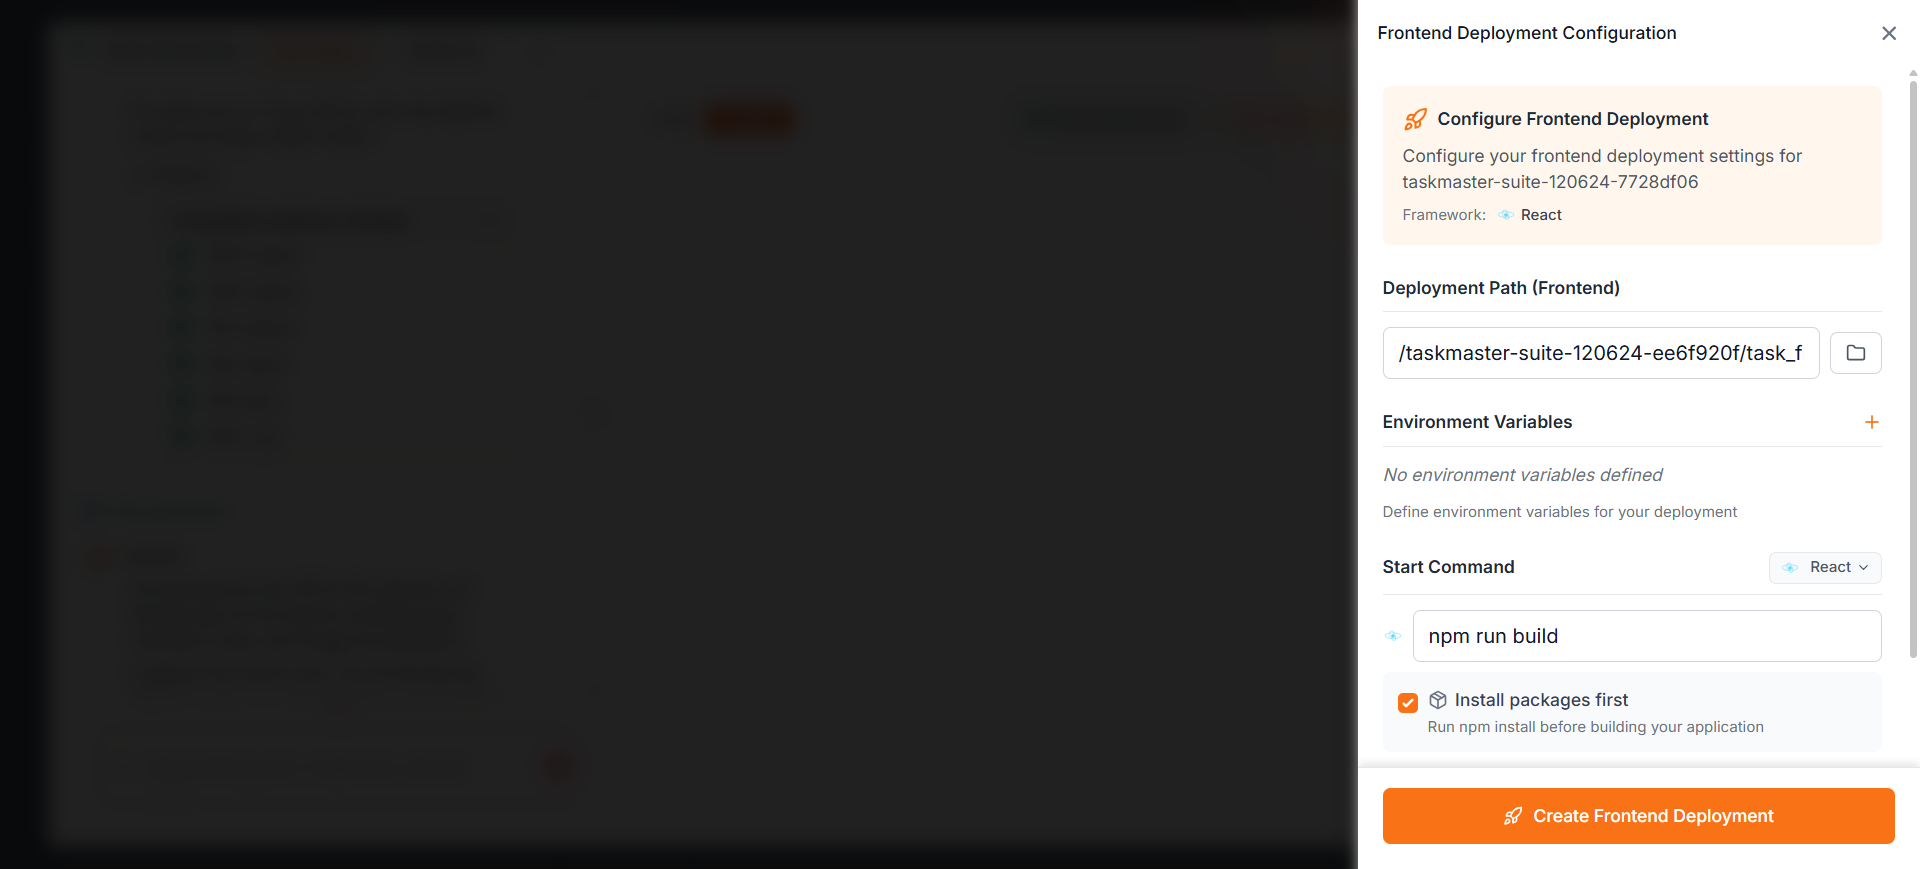
Front End Deployment
5.2 Full Stack App
Step 1: Start from the Home Screen
1. Navigate to the Home section on the left sidebar.
2. At the center of the screen, you'll see a prompt that asks:
"What do you want to build today?"
3. Below that, you'll see two options: Apps and Projects.
Make sure Full Stack is selected.
4. At the bottom you will be able to select what type of an application that you are going to build. So for this tutorial we need to select Full Stack and as for the front end framework we need to select React and for the backend framework I choose Express.js.
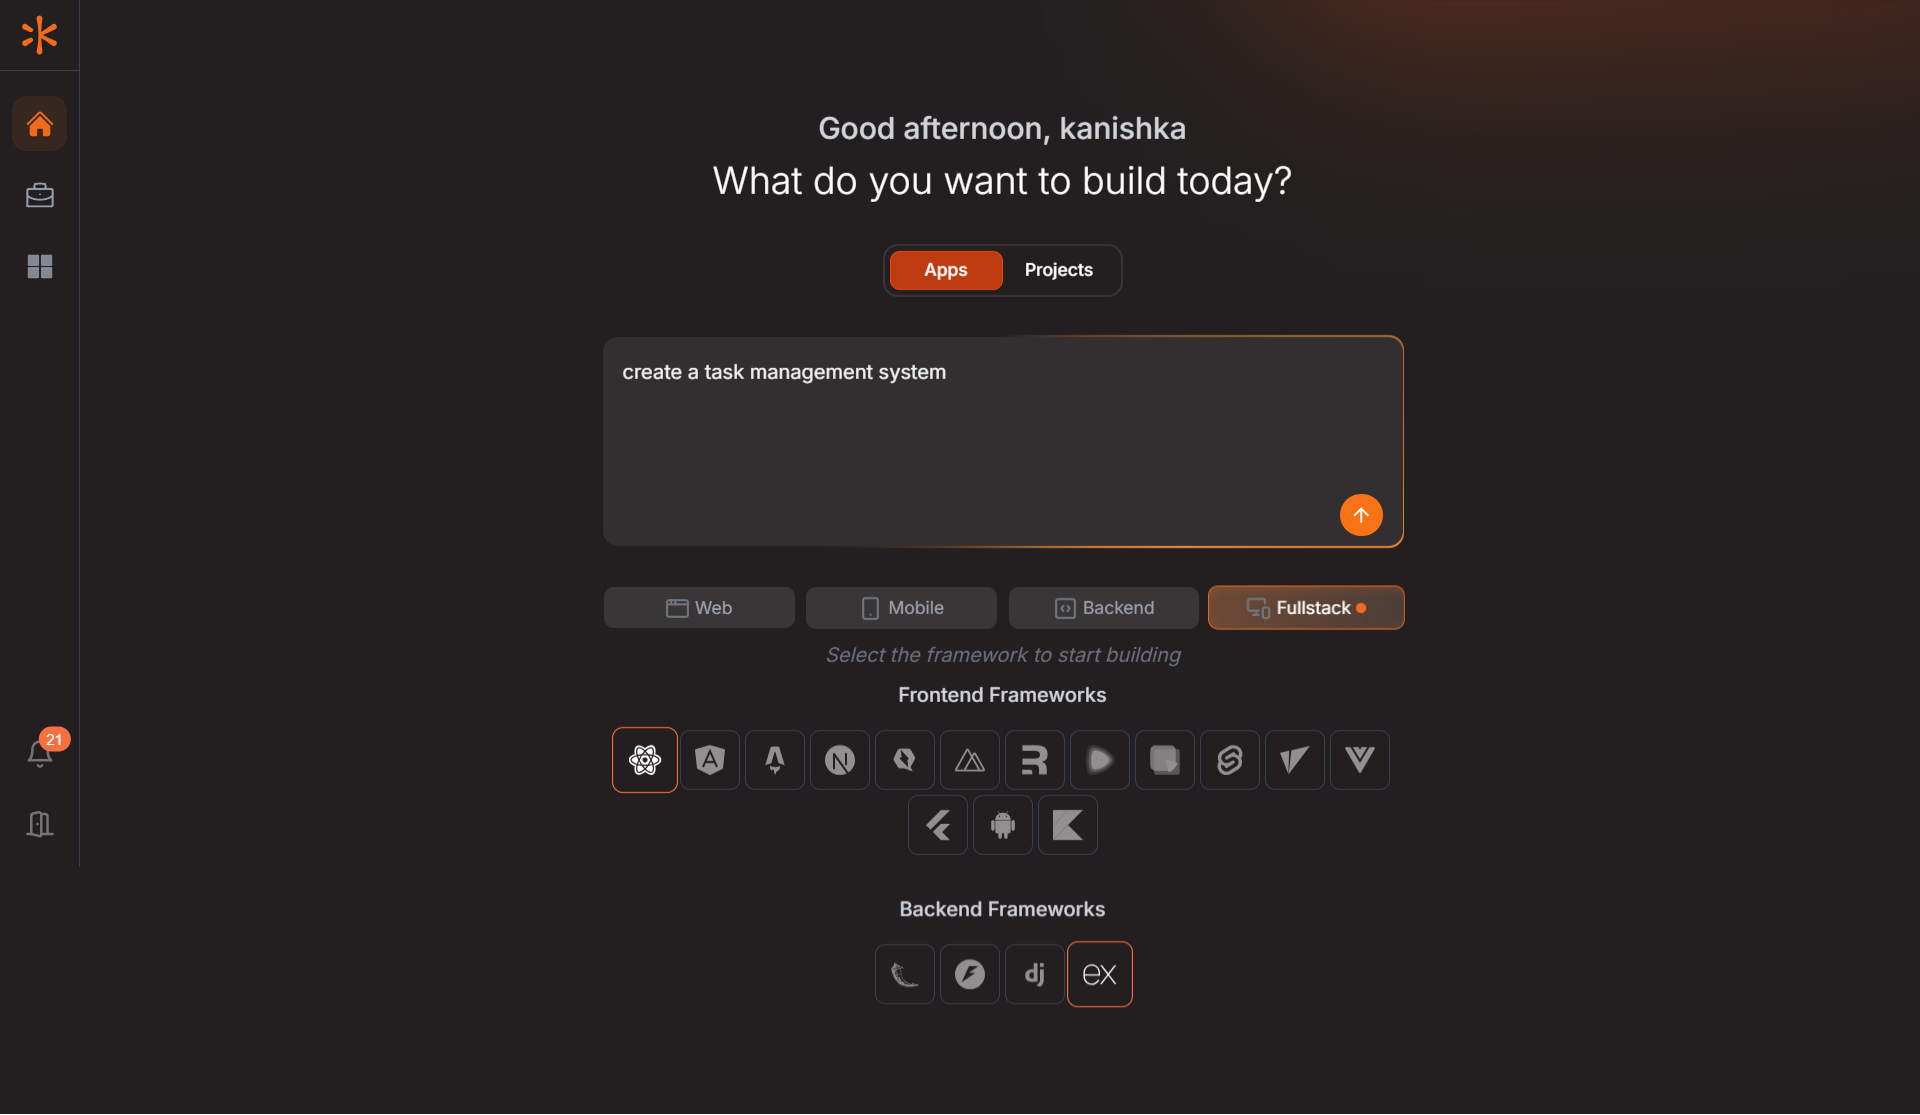
Step 2: Enter Your Prompt
In the input box, describe the app you want to create and Click the Arrow Icon after selecting the Frameworks:
"create a task management system"
Kavia will process your request and begin building the application automatically, complete with frontend and backend code (if required), UI layout, and logic.
Step 3: Confirm Project Overview and Core features.
Once you've submitted your app prompt, Kavia will generate a project overview page containing all the details it extracted from your input. Review each feature carefully—you can add, edit, or delete features as needed. You can also modify your tech stack, apply custom styles, and integrate third-party services like Supabase, Stripe & GitHub. You have to select the relevant GitHub account for the project. Once you're satisfied with all the settings and configurations, click Start Implementation to begin building your app.
1. Review the Project Overview
In the Project Overview section, Kavia provides a brief summary of the project, automatically extracted from your initial prompt.
- Carefully review this summary to ensure it aligns with your goals.
- If any information is missing or needs correction, use the Edit option to make changes.
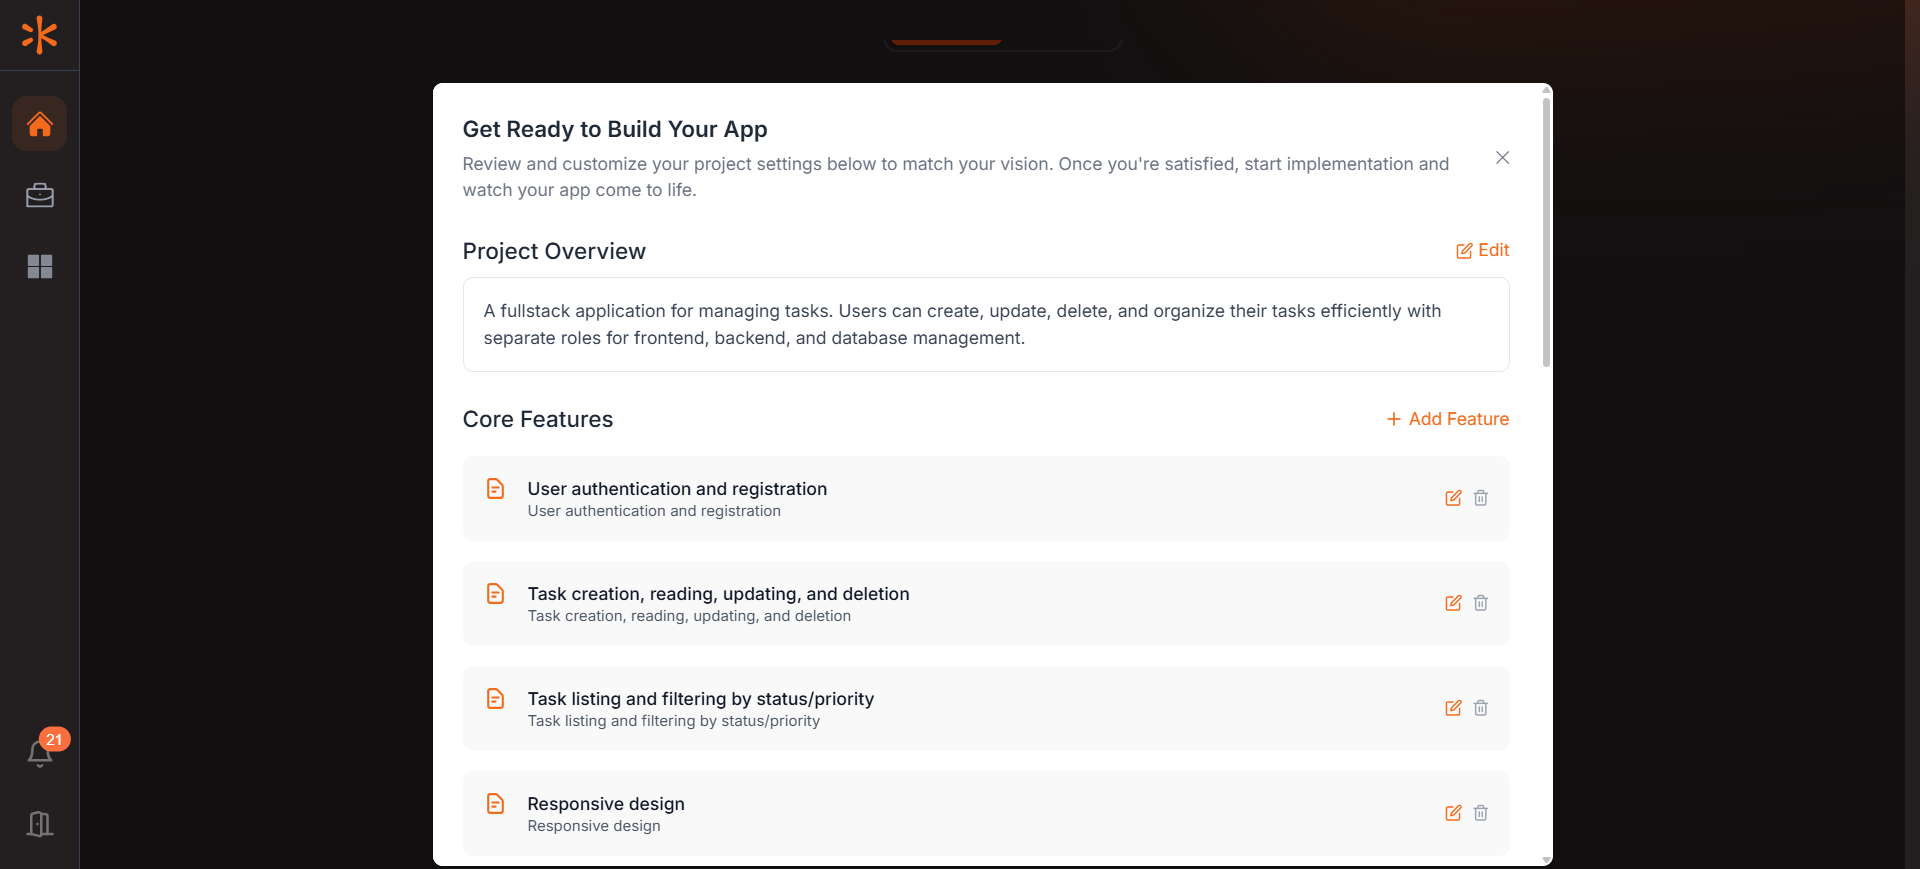
2. Configure Core Features
In the Core Features section, Kavia breaks down your requirements into individual features.
- Review all the listed features thoroughly.
- You can edit, delete, or add new features using the provided controls.
Note: It is highly recommended to validate and finalize your feature list at this stage. Later development relies on prompt-based commands. Ensuring your requirements are clear now helps Kavia build a more accurate and complete application.
3. Select Your Tech Stack and Style
In the Tech Stack section, you can customize the technologies Kavia will use to build your app.
- Choose your preferred frameworks and libraries.
- Under Style Guidelines, define your app's primary colors, theme, and page layout to match your brand or design preferences.
4. Connect Your GitHub Account
In the Third-Party Integrations section:
- Select your GitHub account from the dropdown.
- If your account is not listed, click "Add Account" to connect it.
- Once connected, select the account before proceeding with project implementation.
5. Connect Your Supabase Account
Supabase will be used to provision the database for your application.
To connect Supabase:
- Click "Connect" in the Supabase section.

- A popup will appear—click "Continue to Supabase" and complete the authentication process.

- Once connected, create a Supabase project by assigning a name and password.

6. Start Implementation
After connecting both your GitHub and Supabase accounts, click Start Implementation to begin building your application with Kavia.
Step 4: Let Kavia Prepare the Workspace
Once you've clicked "Start Implementation", Kavia will begin preparing your Code Generation environment. This may take a few moments. Once setup is complete, you will see the following interface:
- Left side: A chat panel where Kavia communicates with you.
- Right side: A VS Code-style editor where your application code is generated and organized and preview of the application.
- In full Stack applications only difference is you get two previews for the front end and backend API.
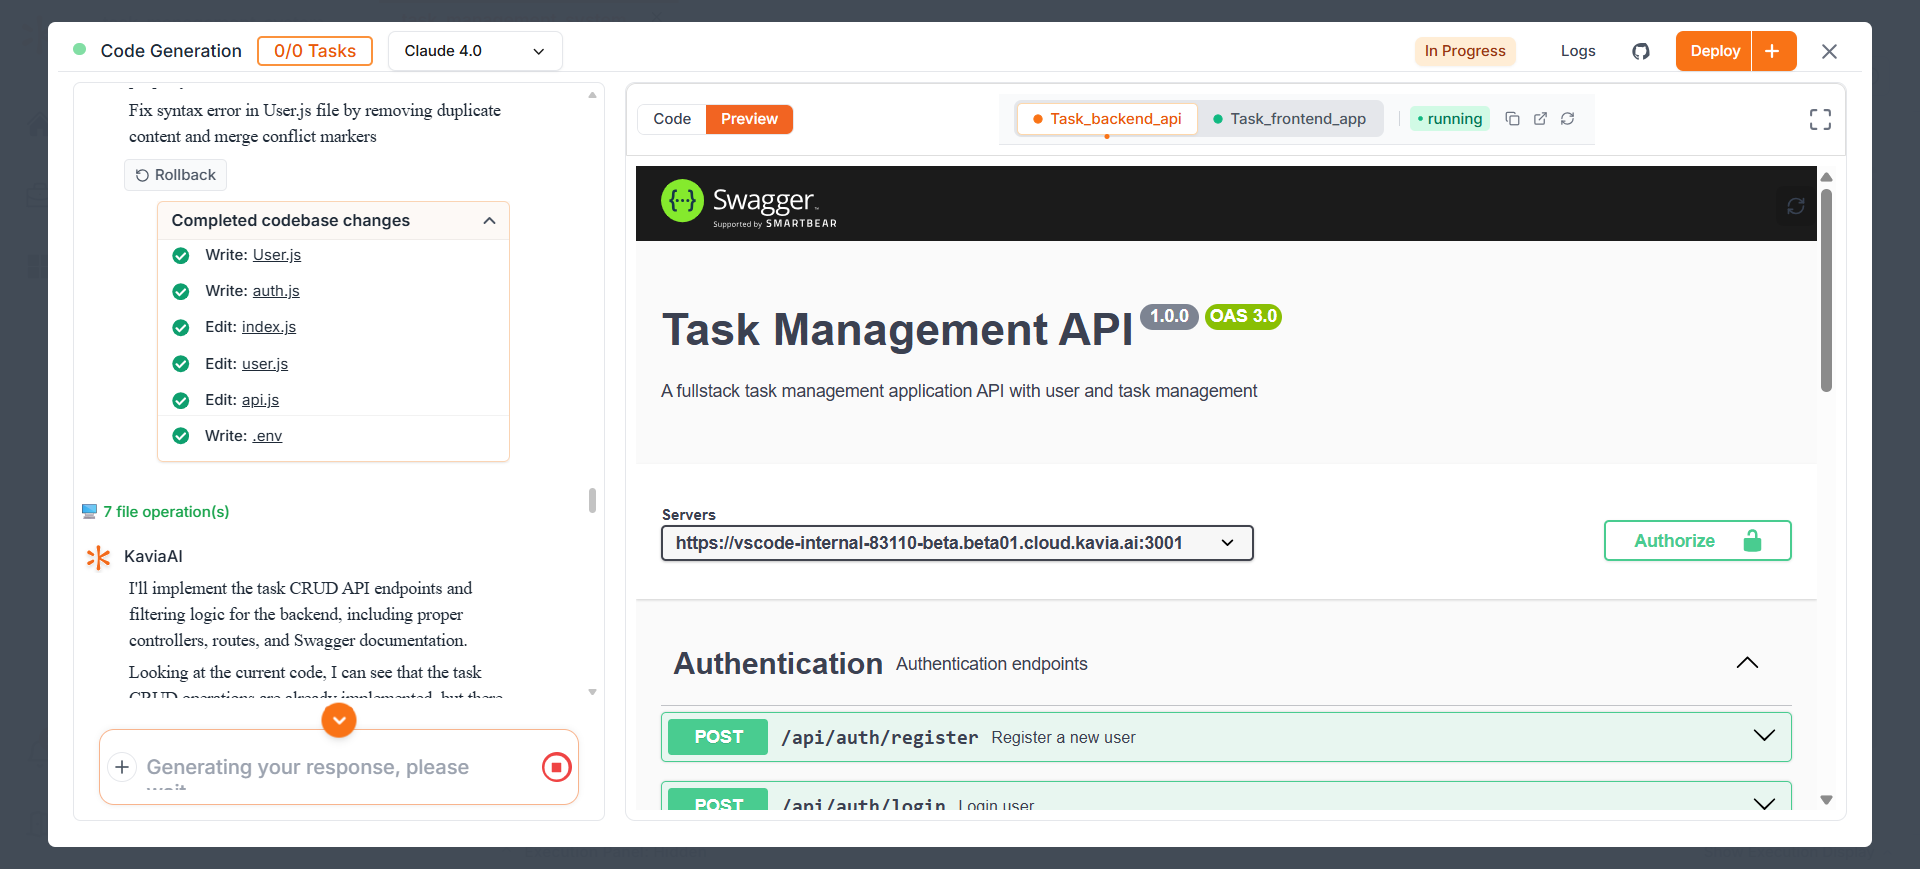
Backend API Preview
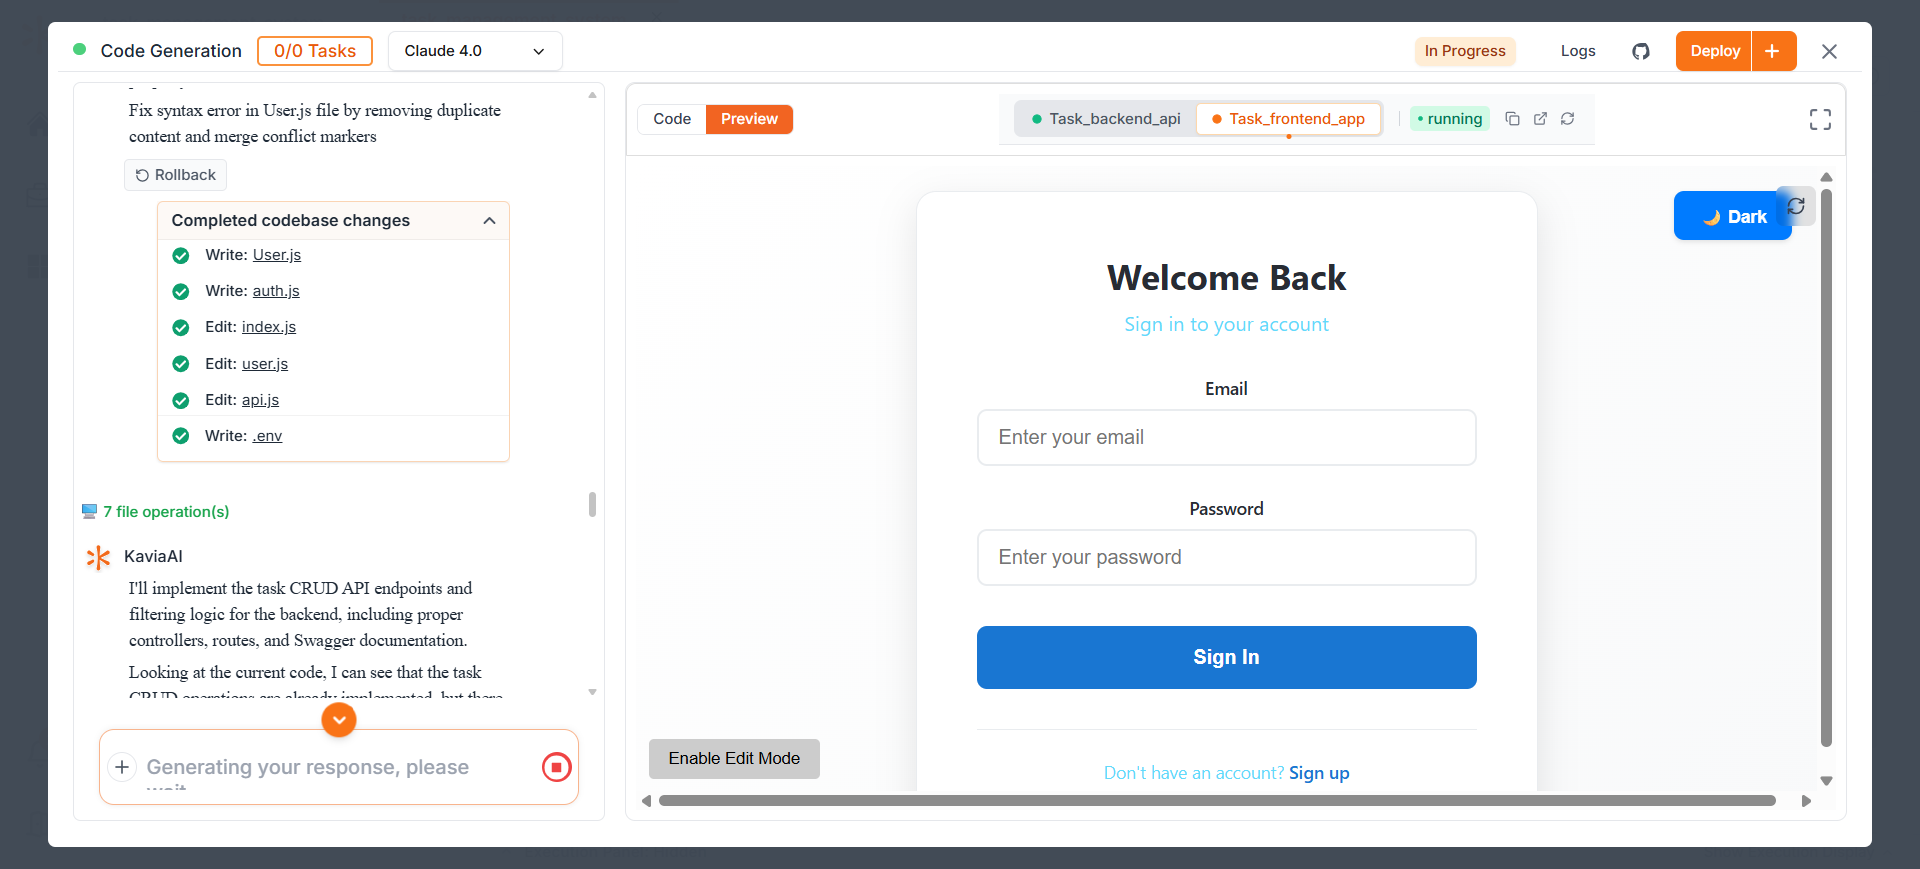
Front End Preview
From here onwards you can follow starting from the Step 5 of the Topic 5.1 Web based App.
6.0 Exploring the Project Dashboard
Kavia's Project Dashboard serves as the central hub for all aspects of your application development lifecycle. It seamlessly integrates key components—development, analysis, collaboration, and deployment—into a single intuitive interface. Whether you are managing a single developer task or coordinating a large cross-functional team, the dashboard gives you deep visibility, actionable insights, and powerful tools to streamline workflows from ideation to delivery.
6.1 Timeline
From the Timeline, you can track which stage of the project you're currently in.
6.2 Chat Section ( This section will be included in the next documentation version after the development)
An AI-driven chat assistant is embedded to support real-time development queries and ideation.
6.2.1 Chat Functions
- Code Assistance: Generate functions, components, or full classes based on your descriptions.
- Architecture Guidance: Get structural recommendations tailored to your tech stack.
- Debugging Support: Troubleshoot errors by pasting logs or stack traces directly into the chat.
- Best Practices: Ask about industry standards for naming, structuring, or testing.
- Documentation Help: Draft READMEs, API docs, or inline comments collaboratively.
6.2.2 Chat History
- Searchable Logs: Quickly find past conversations or outputs.
- Saved Snippets: Automatically bookmark code suggestions for reuse.
- Decision Tracking: Keep a log of architectural or design decisions made with the assistant.
- Key Discussions: Highlight and pin critical messages for future reference.
6.2.3 New Chat
- Custom Contexts: Start chats in the context of a specific feature, bug, or epic.
- Development Topics: Choose from frontend, backend, testing, DevOps, and more.
- Scoped Conversations: Limit responses to specific folders, files, or tech domains.
- Feedback Cycles: Request iterative improvements on previously generated code.
6.3 Overview
6.3.1 Introduction to Overview
The Overview section provides a high-level snapshot of the entire project's current state. It acts as the central hub where users can quickly assess progress, understand project structure, and navigate into detailed areas such as Requirements, Architecture, Code, and Deployment. This section is especially useful for tracking status, spotting bottlenecks, and making informed decisions without diving deep into each module.
6.3.2 Key Elements
- Project Status Panel
- At the top, you'll find essential indicators like overall project completion percentage, the number of active nodes, and credit usage. This gives users an immediate sense of how far along the project is and how many resources are in use.
- Action Buttons
- Update Project: Triggers an AI-powered refresh that evaluates progress and integrates any new changes or configurations.
- Auto Configure: Automatically adjusts the setup based on current project conditions, updating task alignment, architecture strategy, and deployment path if needed.
- Module Progress Trackers
- Requirements: Displays the percentage complete, along with counts of completed epics, user stories, and tasks.
- Architecture: Shows the completion rate and a visual count of completed versus pending architectural nodes.
- Code: Indicates the readiness of the implementation layer, highlighting unit test coverage and code review status.
- Deployment: Tracks whether the app has been packaged and deployed, and includes hooks into CI/CD configurations if set up.
A breakdown of each major project component:
- Navigation Links
- Each module summary includes a "Go to" button that takes users directly into the relevant workspace—Requirements, Architecture, Code, or Deployment—providing seamless transitions from summary to detail.
- Persistent Description & Scope
- The Overview also displays the project's core description, scope, and objectives. This ensures that the vision remains visible at all times and helps all collaborators stay aligned with the original intent.
- Team & Strategy Details
- Below the status and module trackers, users can review the selected architectural pattern, deployment strategy, and team composition. This section helps clarify how the project is structured and which AI agents are involved in its execution.
6.3.3 Update Project
The Update Project button launches a dedicated chat interface, allowing users to engage directly with Kavia AI to update or re-evaluate the project's structure, content, or direction. This feature is particularly useful when:
- New requirements have been added manually and need to be processed.
- You've completed steps outside the AI workflow and want them synced.
- You want the AI to reassess the current state and suggest improvements.
Once clicked, the user is taken to a conversational interface where they can discuss changes, request updates, or prompt Kavia to analyze recent progress. This keeps your project dynamically aligned with evolving goals.
6.3.4 Auto Configure
When a user clicks Auto Configure from the Overview page,, it opens a panel where users can choose which elements they want Kavia to generate. By selecting "Select All", Kavia will autonomously configure the project's requirements, architecture, interfaces, test cases, and documentation. This automated setup ensures that foundational elements are intelligently generated and aligned with the project's description, scope, and objectives—accelerating project initiation and maintaining structural consistency across components.
7.0 Query
7.1 Introduction to Query
The Query feature is an AI-powered analysis tool that acts as a conversation layer between you and your assets—whether it's your codebase or project documentation. It allows you to explore both using natural language questions and receive intelligent, contextual responses. Whether you're trying to understand complex logic, trace a function's flow, summarize a module, or clarify requirements, Query enables this with ease. It's especially valuable during onboarding, audits, debugging, and documentation reviews.
7.2 Adding the GitHub Repositories
Before using Query for code-level analysis, make sure your GitHub repositories are connected. You can follow the steps outlined in the Adding GitHub Repositories section to complete this setup.
7.3 Basic Query
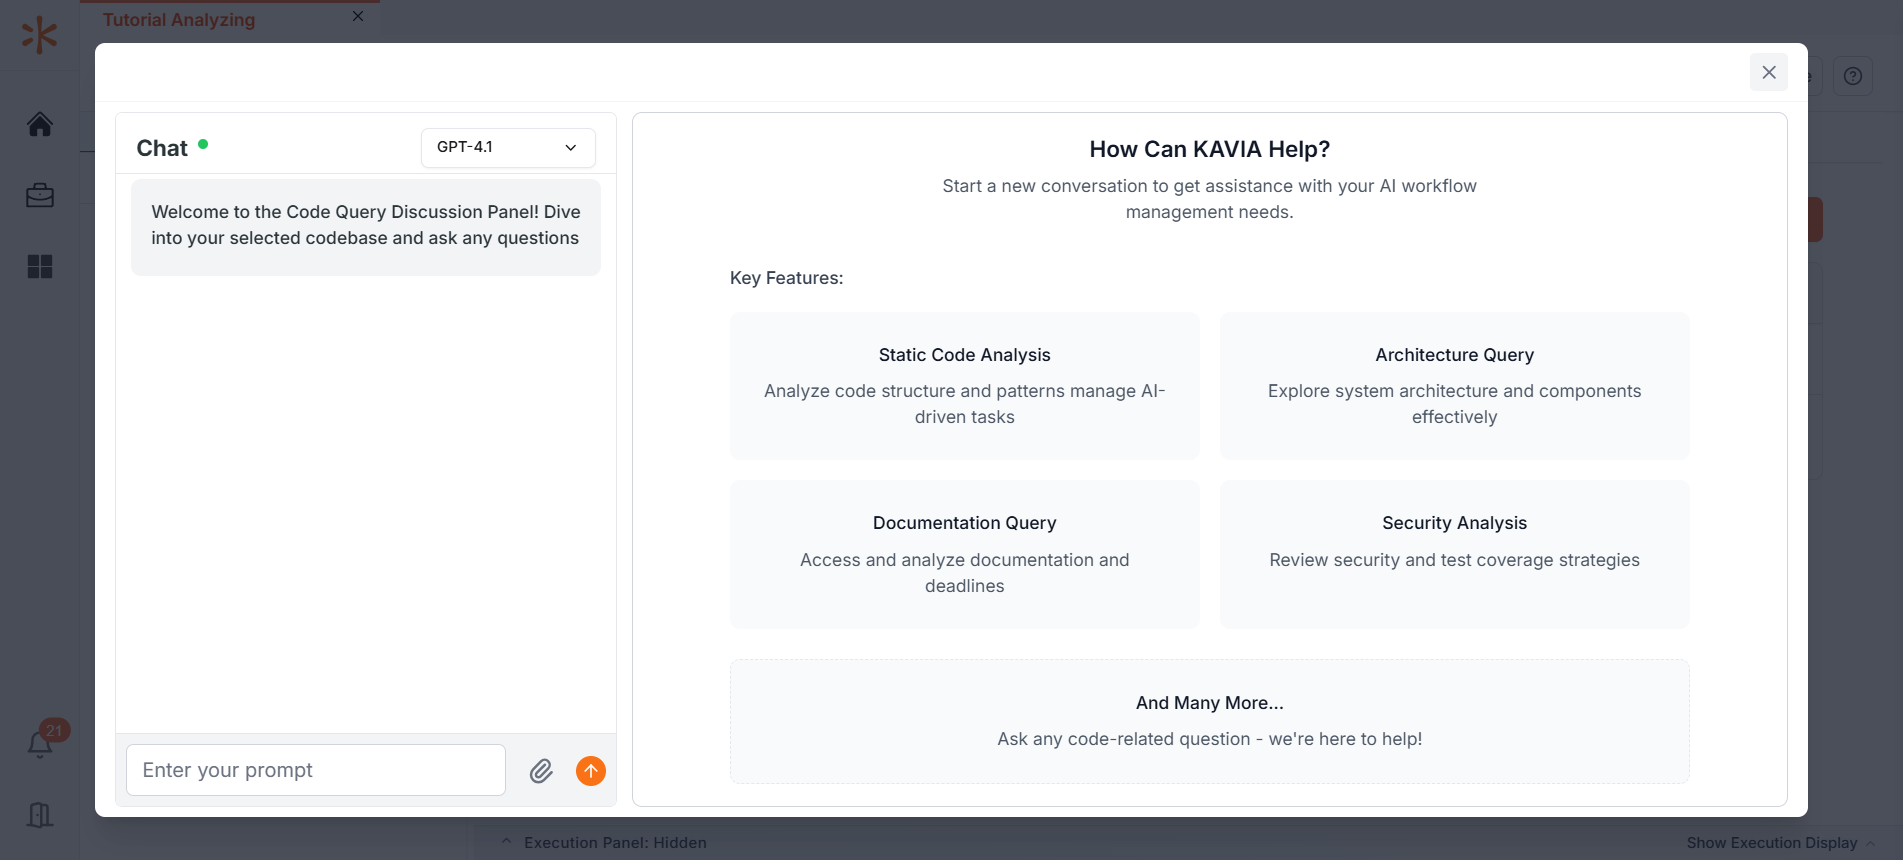
The Basic Query view offers an intuitive starting point for analyzing your selected GitHub repository. The left-side chat panel allows you to ask natural language questions about your code, architecture, or documentation, while the right side introduces key areas you can explore with Query. This layout is designed to help users quickly understand how to engage with their project using AI-driven insights.
Key Features:
- Static Code Analysis – Understand code structure, logic, and patterns
- Architecture Query – Inspect system architecture and its components
- Documentation Query – Navigate and analyze internal documentation
- Security Analysis – Review code security and test coverage
- Natural Language Interaction – Ask questions without needing complex search syntax
7.4 Deep Analysis
Deep Analysis Query is Kavia's advanced AI-powered engine for in-depth analysis of your codebase and documents. Unlike basic query functions, it goes beyond surface-level information to perform a comprehensive examination using machine learning, static analysis, and context-aware techniques. This feature is ideal for identifying hidden issues, optimizing performance, and ensuring long-term maintainability across all critical areas of your project.
It analyzes the architecture, code quality, performance, security, documentation, and more—not just in isolation, but also considering their interdependencies and overall impact. Whether you're conducting audits, preparing for scaling, or improving code health, Deep Analysis delivers precise, actionable insights.
7.4.1 Key Features of Deep Analysis Query
- Architectural Analysis
- Detects architectural patterns and anti-patterns, maps service communication, and offers scalability recommendations.
- Code Quality Assessment
- Identifies complex or duplicated code, evaluates modularity, and highlights maintainability concerns.
- Security Vulnerability Detection
- Scans for injection points, evaluates auth mechanisms, and checks for sensitive data exposure or outdated practices.
- Performance Analysis
- Pinpoints bottlenecks, analyzes database queries, memory usage, and concurrency issues.
- Technical Debt Assessment
- Quantifies and prioritizes technical debt, highlighting high-impact areas needing refactoring.
- Dependency Analysis
- Maps full dependency trees, flags outdated or vulnerable packages, and identifies circular dependencies.
- API Analysis
- Reviews API design and versioning, checks RESTful compliance, and provides security and optimization suggestions.
- Testing Coverage Analysis
- Evaluates test depth and coverage, highlighting gaps and suggesting improvements in quality and scope.
- Documentation Assessment
- Analyzes the completeness and relevance of documentation, identifying outdated areas and missing context.
- Compliance and Standards
- Ensures adherence to internal coding standards, licensing, accessibility, and regulatory compliance.
8.0 Code
8.1 Introduction to Code
The Code section in Kavia acts as a centralized workspace for all development activities. It's more than just an editor—it's an intelligent development environment combining traditional coding tools with AI-powered capabilities. Developers can write, generate, review, and maintain code while receiving real-time support from Kavia's advanced analysis and suggestion systems.
This section is designed to streamline the entire coding lifecycle, from creation to optimization. It integrates seamlessly with version control, supports collaborative workflows, and enhances productivity with built-in tools for code quality, performance, and security.
Key Features of the Code Section
- AI-assisted integrated development environment
- Real-time code suggestions and static analysis
- Automated code quality enforcement
- Version control system integration
- Collaboration and review tools
- Built-in documentation and testing support
- Performance and security monitoring
8.2 Code Generation
Code Generation in Kavia uses powerful AI models to convert project requirements into fully functional, production-ready code. Whether it's implementing features, generating APIs, or creating test cases, this feature dramatically reduces development time while upholding quality standards.
The generated code follows best practices for security, maintainability, and performance—and can be tailored to your project's structure, conventions, and technology stack.
Code Generation Capabilities Include:
- Feature and module implementation
- API endpoint and CRUD generation
- Database model creation
- Authentication and error handling
- Test case generation
- Documentation and comment automation
- UI component scaffolding
- Security and validation logic
- Logging and performance enhancements
8.3 Code Maintenance
Code Maintenance ensures your codebase remains clean, secure, and efficient over time. With proactive scanning and intelligent recommendations, Kavia helps manage technical debt, apply upgrades, maintain style consistency, and prevent long-term degradation of code quality.
This feature supports both scheduled and real-time maintenance workflows, offering deep insights into areas that need refactoring, optimization, or documentation updates.
Maintenance Capabilities Cover:
- Automated Analysis & Refactoring
- Detects code smells, anti-patterns, and refactoring opportunities
- Maintains consistent style and structure across the codebase
- Update & Dependency Management
- Applies framework upgrades, security patches, and API version updates
- Ensures compatibility and reliability through systematic checks
- Performance Optimization
- Identifies memory leaks, slow queries, and inefficient resource usage
- Recommends and applies performance improvements
- Security & QA
- Scans for vulnerabilities and enforces compliance with security standards
- Supports testing coverage, bug tracking, and cross-platform compatibility
- Documentation & Change Management
- Keeps documentation in sync with code changes
- Tracks updates through version control, changelogs, and rollback support
8.4 Configuring Repository
9.0 Requirements
9.1 Introduction to Requirements
Kavia's Requirements module is designed to simplify complex project planning through smart structuring of needs and expectations. You can define functional and non-functional requirements, assign priorities, and establish dependencies between different work items. Kavia leverages AI to assist in the creation, refinement, and validation of your inputs—ensuring clarity, consistency, and alignment with industry standards. This section helps bridge the gap between business goals and technical execution, while maintaining full traceability throughout the lifecycle.
9.2 What is an Epic & a Story
9.2.1 Epic
In Kavia, an Epic represents a major piece of functionality or a broad objective that can be broken down into smaller deliverables. Epics help project managers and teams group related stories under a common business goal, allowing for better planning, tracking, and visibility at a higher level.
9.2.2 Story
Stories are smaller, user-centered work items that stem from Epics. They describe a specific feature, task, or outcome from the perspective of the end user. Stories are actionable and are typically designed to be completed within a single sprint or iteration.
This hierarchy makes it easier to plan, estimate, and monitor work, while maintaining a clear structure that aligns business objectives with technical execution.
9.3 Updating Requirements
Kavia provides a structured, traceable, and version-controlled approach for updating requirements. When changes are needed—whether due to evolving client needs, stakeholder feedback, or internal discoveries—teams can update individual requirements through a controlled interface. Each update is logged with a history of who made the change, why, and when. Kavia also performs automated impact analysis, alerting users to how the change might affect related requirements, stories, or timelines. These updates ensure that project scope evolves in a managed and informed way, reducing the risk of misalignment and scope creep.
9.4 Auto Configure & Reconfigure
The Auto Configure feature in Requirements enables teams to set up and refine project requirements with minimal manual effort. With the click of a button, Kavia uses its AI engine to analyze your current project status and generate or optimize all relevant requirement components—including high-level requirements, architectural elements, and documentation outlines.
When users click Auto Configure and select "Select All" from the Overview page, Kavia automatically handles the setup of essential project parts such as Requirements, Architecture, and Documentation. This intelligent automation accelerates initial project configuration and helps reconfigure existing structures based on updated inputs or new insights—saving time, improving consistency, and aligning all components with best practices.
History
The History tab in the Requirements section offers a detailed log of all activity related to project requirements. Every change, from minor text edits to full restructures, is time-stamped and attributed to specific users. This audit trail not only ensures accountability but also makes it easy to review the evolution of requirements over time. Whether you're conducting a compliance check, analyzing change patterns, or preparing for a stakeholder review, the History view gives you a transparent record of decisions and progress, supported by filters and exportable logs for reporting purposes.
10.0 Architecture
10.1 Introduction to Architecture
Kavia's Architecture module offers a comprehensive environment for capturing, designing, and evolving system architecture. From high-level context diagrams to detailed component designs, this section allows teams to visualize the entire architecture stack in a single, collaborative interface. AI capabilities assist in identifying architectural patterns, mapping dependencies, assessing risks, and recommending design improvements. Whether you're setting up a new project or evolving an existing one, Kavia ensures architectural decisions are well-documented, traceable, and aligned with business and technical requirements.
Key Capabilities:
- AI-assisted architectural analysis and design
- Visual modeling tools
- Support for modern architecture patterns (e.g., microservices, APIs)
- Centralized architecture documentation
- Integrated change tracking and version control
- Seamless collaboration between stakeholders
10.2 Architecture Components
Kavia organizes system architecture into modular, focused components—each targeting a specific architectural concern. These components work together to provide full system visibility, improve maintainability, and streamline development.
10.2.1 Requirements
The Requirements architecture component transforms business needs into technical design specifications. It provides traceability between user stories, features, and architecture decisions—ensuring all requirements are feasible and aligned with constraints like scalability, security, and compliance.
Highlights:
- Business and technical requirement mapping
- AI-powered feasibility analysis
- Performance and scalability requirements
- Security and compliance tracing
- Architecture-to-requirement linkage
10.2.2 System
The System view defines the macro-level structure of your application. It captures the architectural boundaries, identifies the main system components, and outlines their core responsibilities and relationships.
Highlights:
- System overview diagrams
- Component boundaries and roles
- Primary integration points
- Scalability and availability considerations
- Environment and infrastructure mapping
10.2.3 Context
The Context component provides a high-level view of how the system interacts with users, external systems, and services. It helps clarify system boundaries and dependencies, enabling better integration and risk planning.
Highlights:
- System boundary definition
- External systems and data sources
- User roles and interaction points
- Security perimeter visualization
- Integration impact mapping
10.2.4 Container
The Container component focuses on decomposing the system into applications, services, and data stores. It helps teams make informed technology choices, plan deployment strategies, and manage communication between components.
Highlights:
- Technology stack definition
- Microservices and container mapping
- Communication protocols (e.g., REST, gRPC)
- Resource and scaling planning
- Container orchestration strategy
10.2.5 Design
The Design component captures the detailed internal design of each system element. It provides developers with implementation-ready specifications that promote code quality and maintainability.
Highlights:
- Component and module designs
- Class diagrams and object modeling
- Database schemas
- Security controls
- Performance optimizations and patterns
10.2.6 Interfaces
The Interfaces component documents all internal and external APIs, services, and data exchanges. It ensures clear, consistent communication across system components and supports reliable integration.
Highlights:
- API definitions and endpoints
- Input/output data formats
- Authentication and encryption methods
- Service interface documentation
- Versioning and compatibility tracking
10.2.7 SAD (System Architecture Document)
The System Architecture Document provides an authoritative, structured record of all architectural decisions. It serves as the primary reference for development, compliance, and change management.
Highlights:
- Architecture overviews and rationales
- Design decisions and trade-offs
- Performance and scalability plans
- Security architecture summary
- Implementation guidelines and dependencies
10.2.8 PRD (Product Requirements Document)
The PRD links product features and business needs to technical architecture. It ensures that system design directly supports end-user goals and market objectives.
Highlights:
- Product specs and functional requirements
- Technical limitations and constraints
- Performance and usability goals
- Traceability to architectural components
- Impact analysis for changes
10.2.9 API Docs
The API Docs component provides interactive, real-time documentation of your system's APIs. It allows internal and external developers to quickly understand, test, and integrate with your platform.
Highlights:
- REST/gRPC endpoint specifications
- Request/response formats
- Authentication and rate limits
- Error handling conventions
- Testing tools and code samples
11.0 UI/UX Section
11.1 Introduction to UI/UX
The UI/UX section in Kavia provides a comprehensive environment for managing user interface design and user experience planning. It integrates design systems, prototyping tools, accessibility features, and collaboration capabilities—all in one place. Whether using automated generation or manual design uploads, this section ensures that projects maintain consistent branding, usability, and performance standards across devices and platforms.
This workspace supports the entire UI/UX lifecycle—from initial mockups to implementation and testing—making it easy for both designers and developers to collaborate in real time and manage design quality at scale.
Key Features
- Design system and style guide management
- Component library integration and version control
- Accessibility compliance and responsive design tools
- User flow and interaction mapping
- Visual testing and performance monitoring
- Real-time collaboration and documentation sync
11.2 Adding UI/UX Manually
Kavia provides a flexible manual design interface for integrating custom UI/UX components. Whether you're uploading image-based designs or linking from Figma, this feature allows teams to document, track, and evolve user interface elements without compromising on design system alignment.
11.2.1 Steps to Add a New UI/UX Design
To manually add a design to your project:
1. Go to the UI/UX Section
From the left-hand project menu, click on UI/UX.
2. Click "Add"
In the top-right corner, click the Add button.
3. Enter Design Details
- Provide a Design Name
- Choose one of the following input types:
- Upload Images (PNG, JPG, etc.)
- Enter Figma URL to sync a live design file
4. Click "Add Design"
Once your file or link is entered, click Add Design to upload it to the workspace.
12.0 Documents Section
12.1 Introduction to Documents
The Documents section in Kavia acts as the centralized repository for all documentation associated with your software project. It provides a powerful, organized workspace where teams can create, manage, and collaborate on technical, user, and process documents throughout the project lifecycle.
Designed for flexibility and control, this section supports multiple file types and editing formats, including rich text, markdown, and PDF exports. With robust versioning, collaborative editing tools, search functionality, and intelligent document categorization, Kavia ensures your project stays thoroughly documented, auditable, and aligned with development progress.
Key Features:
- Centralized document management system
- Intelligent version control and change tracking
- Real-time collaborative editing and commenting
- Automated documentation generation and syncing
- Advanced search and discovery tools
- Secure access control and permission management
- Support for document templates, categories, and tags
- Integrated review workflows and publishing control
- Toolchain and platform integration (e.g., GitHub, testing systems)
Supported Document Categories:
Technical Documentation
- Architecture diagrams
- API documentation
- Implementation details
- Technical specifications and developer guides
Project Documentation
- Requirement documents
- Design briefs
- Planning reports
- Meeting notes and status updates
User Documentation
- End-user manuals
- Installation and configuration guides
- Troubleshooting documentation
- Product release notes
Process Documentation
- SOPs (Standard Operating Procedures)
- Best practice documents
- Company policies
- Workflow diagrams and operational guidelines
12.2 Updating & Uploading Documents
The Updating & Uploading feature in Kavia provides complete lifecycle control over your project documentation. Whether you're adding new documents, revising existing ones, or collaborating in real time, this section ensures that your documentation stays current, consistent, and easily accessible.
12.2.1 Steps to Upload or Update a Document
To upload or update documents in the Kavia workspace:
Uploading a New Document
1. Navigate to the Documents Section
- From the left-hand navigation, go to the Documents tab in your project workspace.
2. Click the Upload Button
- Click Upload at the top-left corner of the Documents section.
3. Select or Drag-and-Drop Files
- You can either choose a file from your device or drag and drop the document into the upload window.
4. Enter Document Details
- Provide a short description
- Specify the document version
5. Click Upload
- Once all fields are complete, click Upload to submit the document to your project.
Updating an Existing Document
1. Select the Document You Want to Update
- Click on the document from your list.
2. Click the Update Button
- This allows you to upload a new version of the document.
3. Modify as Needed
- Replace the file or update the metadata (description, version, etc.), then confirm the changes.
13.0 Test Case Section
(Not functioning generated this from kavia knowledgebase)
13.1 Introduction to Test Case
The Test Case section in Kavia delivers a robust and intelligent testing management environment, enabling teams to systematically validate the functionality, performance, and security of their applications. This section supports the creation, execution, and maintenance of both automated and manual test cases—ensuring complete test coverage across all critical components of your software.
14.0 Test Execution
(Not functioning generated this from kavia knowledgebase)
14.1 Introduction to Test Execution
The Test Execution section in Kavia is a powerful platform for running and managing both automated and manual test cases across diverse environments and configurations. This module enables real-time monitoring, efficient test coordination, and detailed result analysis to ensure every feature is verified under the right conditions before release.
It supports multiple execution modes, including integration with CI/CD pipelines, user-triggered runs, and exploratory manual testing. With intelligent reporting and extensive integration support, Kavia's Test Execution panel ensures software reliability, performance, and compliance.
Key Features:
- Automated and manual test execution
- Real-time monitoring and control tools
- Parallel and sequential execution flows
- Environment management and configuration
- Cross-platform and cross-browser support
- Performance and security test execution
- Detailed result reporting and trend analysis
- Integration with CI/CD, version control, and issue tracking systems
14.2 Test Execution Components
14.2.1 Execution Environment
Environment Setup
- Configuration files and environment variables
- Dependency and resource management
- Database and service initialization
- Network and access configuration
Environment Types
- Development, Testing, Staging, and Production
- Custom and isolated environments
- Cloud-hosted and containerized test beds
14.2.2 Execution Modes
Automated Execution
- Scheduled test runs
- Trigger-based execution (on commit, deploy, or ticket update)
- CI/CD pipeline support
- Batch and parallel execution
- Dependency-aware test orchestration
Manual Execution
- Step-by-step and interactive testing
- Exploratory testing for new features
- User acceptance testing (UAT)
- Bug fix verification and regression validation
14.2.3 Monitoring and Control
Real-Time Monitoring
- Live test status updates
- Failure notifications and progress bars
- Resource and system usage tracking
- Log stream viewing and metric analysis
Execution Control
- Start, pause, and stop control
- Test prioritization and resource throttling
- Load balancing and timeout management
- Error handling and automatic retries
- Recovery workflows for interrupted runs
14.2.4 Result Management
Result Collection
- Capturing test outcomes (pass/fail/skipped)
- Error logs, screenshots, and screen recordings
- Performance metrics and resource usage reports
- Code coverage and system log snapshots
Result Analysis
- Categorized error breakdown
- Pass/fail trends over time
- Coverage and impact heatmaps
- Quality scoring and release readiness indicators
14.2.5 Reporting Features
Report Generation
- Detailed execution reports with steps and logs
- Summary dashboards and trend visualizations
- Test coverage and performance analysis reports
- Error-specific and security reports
- Custom report templates and configurations
Report Distribution
- Auto-distribution to stakeholders
- Real-time dashboard updates
- Notifications via email or webhooks
- Export as PDF, CSV, or JSON
- Report archiving and retention management
14.2.6 Integration Capabilities
Tool Integration
- CI/CD platforms (e.g., Jenkins, GitHub Actions, GitLab CI)
- Version control (Git, Bitbucket)
- Issue tracking (Jira, Linear, ClickUp)
- Monitoring tools and analytics dashboards
- Notification platforms (Slack, Teams, Email)
- Documentation tools (Confluence, Notion)
Framework Support
- Unit testing (Jest, Mocha, NUnit, etc.)
- End-to-end testing (Cypress, Selenium, Playwright)
- Performance testing (JMeter, k6)
- Security scanners (OWASP ZAP, Snyk)
- API testing tools (Postman, Newman)
- Mobile testing frameworks (Appium, Detox)
14.2.7 Quality Assurance
Execution Quality
- Reliability and stability checks
- Test repeatability validation
- Error pattern analysis and handling
- Smart retry logic for transient failures
- Intelligent test prioritization
Maintenance Tools
- Environment cleanup after test runs
- Configuration update workflows
- System health audits and test cleanup
- Resetting test data and dependencies
- Log and backup management
Benefits of Kavia's Test Execution:
- Reliable and consistent test execution across platforms
- Intelligent monitoring and real-time control
- In-depth result analysis and error traceability
- Efficient resource usage and execution scalability
- Performance optimization and security validation
- Full integration with CI/CD and issue tracking tools
- Automated reporting and audit-ready logs
- Support for exploratory and compliance testing
Best Practices Supported:
- Continuous testing and quality monitoring
- Test automation and intelligent execution flows
- Performance and load testing in real environments
- Security scanning as part of test pipelines
- Test result traceability and stakeholder reporting
- Compliance validation and SLA alignment
Additional Features:
- Smart test selection based on recent code changes
- Dynamic prioritization based on feature criticality
- Failure analysis and visual diffs
- Performance profiling across environments
- Compatibility and recovery testing at scale
15.0 Deployments
(Not functioning generated this from kavia knowledgebase)
15.1 Introduction to Deployments
The Deployments section in Kavia delivers a full-featured environment for managing application deployments across all stages—from development to production. It facilitates automation, security, and visibility throughout the deployment lifecycle by integrating infrastructure provisioning, configuration management, release scheduling, and system monitoring under one unified interface.
This section empowers teams to maintain control over deployment workflows while reducing risk through rollback capabilities, built-in performance tracking, and intelligent environment configuration. Whether you're deploying microservices, APIs, or monolithic apps, Kavia ensures a streamlined and resilient release process.
Key Features:
- Automated and secure deployment pipelines
- Infrastructure resource and configuration management
- Scalable environment handling and provisioning
- Rollback and disaster recovery support
- Real-time monitoring and performance metrics
- Security checks and validation
- Integration with version control and CI/CD systems
- Cost tracking and resource optimization
15.2 Infrastructure Resources
15.2.1 Resource Management
Computing Resources
- Server instances and virtual machines
- Container orchestration (e.g., Kubernetes)
- Serverless functions and task runners
- Load balancers and cache layers
- Databases and cloud storage
Network Resources
- Virtual networks and security groups
- DNS, SSL, and CDN configuration
- API gateways and firewalls
- Routing, access control, and port management
15.2.2 Resource Configuration
Infrastructure Setup
- Resource provisioning and scaling rules
- Configuration templates and environment policies
- Monitoring, alerting, and logging setup
- Backup scheduling and disaster recovery policies
Resource Optimization
- Cost and performance metrics
- Usage analytics and optimization suggestions
- Capacity planning and efficiency monitoring
15.3 User Input
15.3.1 Deployment Configuration
Basic Settings
- Environment selection (Dev/Test/Staging/Prod)
- Define compute/storage/network needs
- Configure scaling, security, and backup options
- Enable monitoring and set alert thresholds
Advanced Configuration
- Define custom variables and secrets
- Service dependencies and network topology
- Integration settings for CI/CD and observability
- Fine-tuned performance and security policies
15.3.2 Deployment Options
Release Strategy
- Choose deployment type (Blue-Green, Rolling, Canary, etc.)
- Set release schedules and rollout plans
- Define success criteria and monitoring periods
- Rollback planning and versioning control
Configuration Management
- Link configuration files and environment variables
- Manage secrets and access credentials
- Apply version-controlled settings and policies
15.4 Overview
15.4.1 Deployment Dashboard
Status Monitoring
- Track deployment status and progression
- View resource health and security reports
- Monitor performance metrics and costs
- Alert history and usage statistics
Analytics
- Deployment success/failure trends
- Resource and performance utilization
- Incident history and resolution rates
- Security and optimization insights
15.4.2 Management Tools
Control Features
- Start/stop deployments
- Update configurations on the fly
- Manage alert thresholds and recovery policies
- Perform manual rollbacks and hotfix releases
Administration
- User access and permission controls
- Role-based responsibilities
- Audit logs and compliance checks
- Policy enforcement and documentation tools
15.5 Deployment Environment
15.5.1 Environment Management
Environment Types
- Development
- Testing
- Staging
- Production
- Custom/Sandbox/Disaster Recovery
Environment Configuration
- Allocate resources and define scaling limits
- Configure services, networking, and backups
- Set up health checks and recovery plans
15.5.2 Environment Features
Management Tools
- Create and clone environments
- Automate scaling and backups
- Track performance and monitor security
- Schedule maintenance and updates
Automation Features
- Auto-scaling and self-healing services
- Automated security updates and patching
- Log rotation and backup automation
- Intelligent cleanup and cost-saving strategies
15.6 Infrastructure Visualization
15.6.1 Visualization Tools
Resource Maps
- Infrastructure topology overview
- Real-time resource and service maps
- Data flow, backup paths, and security zones
Monitoring Dashboards
- Performance and resource metrics
- Security alerts and health checks
- Usage tracking and cost analysis
- Incident resolution timelines
15.6.2 Analysis Tools
Performance Analysis
- Resource utilization breakdown
- Bottleneck and latency detection
- Throughput and response time charts
Security Analysis
- Vulnerability scanning
- Access and identity audits
- Threat and risk assessments
- Compliance validation and reporting
Benefits of Kavia's Deployments Section:
- Consistent, reliable deployment workflows
- Automated infrastructure provisioning and scaling
- Seamless integration with testing and version control
- High observability across environments
- Built-in disaster recovery and rollback safeguards
- Performance and cost optimization tools
- Secure, compliant operations with full visibility
Best Practices Supported:
- Infrastructure as Code (IaC)
- Continuous Deployment (CD)
- Security-by-Design and automated validation
- Disaster recovery planning and rollback workflows
- Compliance adherence and audit readiness
- Monitoring, alerting, and documentation alignment
Additional Features:
- Blue-Green and Canary deployments
- A/B testing and feature flag support
- Rolling updates and traffic management
- Load balancing and fault tolerance
- Auto-scaling and backup automation
- Smart rollback and disaster recovery
16.0 Auto Configuring
16.1 Introduction to Auto Configuring
The Auto Configuring feature in Kavia is an AI-driven system designed to automate the setup and configuration of project environments, components, and tools. It intelligently interprets your project requirements, technology stack, and goals to apply industry-standard best practices with minimal manual effort.
This system continuously learns from user actions and project outcomes, improving the accuracy and relevance of its configuration suggestions. With built-in support for security, performance, and compliance, Auto Configure reduces human error while ensuring scalability and consistency across all environments.
Key Features:
- Intelligent configuration analysis
- Automated setup of environments and dependencies
- Security and performance tuning
- Integration with development and monitoring tools
- Real-time documentation generation
- Scalable, maintainable, and auditable configuration processes
16.2 How to Use Auto Configure Properly
16.2.1 Preparation Phase
Project Assessment
- Clearly define your project's functional and non-functional requirements
- Identify your intended technology stack (e.g., frontend/backend frameworks, databases)
- List required dependencies and external services
- Establish baseline security and compliance needs
- Set measurable performance goals and resource constraints
Configuration Planning
- Review available configuration templates
- Consider security standards and compliance policies
- Plan for integrations, backups, and monitoring
- Assess performance, scalability, and cost efficiency
- Ensure documentation and audit readiness
16.2.2 Implementation Process
Initial Setup
- Navigate to the Overview section or Settings in your project
- Click on Auto Configure
- Select a configuration template or start with a custom setup
- Specify the following:
- Project name and parameters
- Environment types (Dev, Test, Prod, etc.)
- Security and resource settings
- Integration preferences (e.g., GitHub, Jenkins, Slack)
- Monitoring and alerting options
Configuration Steps
- Automatically sets up:
- Project environments and resources
- Tool and service integrations
- Monitoring and performance trackers
- Backup systems and storage
- Deployment pipelines and CI/CD hooks
- Testing frameworks and test plans
- Documentation templates and sync
16.2.3 Configuration Management
Monitoring and Adjustment
- Use the Configuration Dashboard to monitor:
- System health and performance
- Security status and compliance indicators
- Usage patterns and efficiency scores
Maintenance Tasks
- Perform regular:
- Updates and dependency checks
- Security patching and role audits
- Performance tuning
- Integration testing and updates
- Backup validation and logs cleanup
- Documentation reviews and sync
16.2.4 Best Practices
Configuration Guidelines
- Follow secure defaults and encryption policies
- Maintain consistency using templates
- Enable alerts and logging by default
- Regularly test all configurations in sandbox environments
- Document all configuration changes for traceability
Optimization Strategies
- Adjust resources based on utilization reports
- Optimize cost and speed trade-offs
- Harden access and network rules
- Automate integration flows and data sync
- Schedule reviews for configuration drift
16.2.5 Troubleshooting
Issue Resolution
- Use validation tools to detect broken or incomplete configs
- Review logs for errors and rollback failed changes
- Re-run Auto Configure with adjusted parameters if needed
- Use diagnostic views for performance bottlenecks and permission issues
Support Resources
- Access Kavia's built-in documentation and training guides
- Explore the knowledge base for common errors and fixes
- Contact expert assistance or community support for complex cases
16.2.6 Advanced Features
Custom Configuration
- Create or clone existing configuration templates
- Define custom rules, policies, and workflows
- Set parameters for environments, monitoring, scaling, and security
Integration Management
- Connect third-party tools like:
- CI/CD: Jenkins, GitHub Actions
- Monitoring: Datadog, New Relic
- Communication: Slack, MS Teams
- Security: Snyk, OWASP, HashiCorp Vault
- Configure API keys, authentication methods, and webhook flows
- Automate deployment and alert responses with workflow triggers
Benefits of Proper Auto Configure Usage:
- Saves significant setup time and manual effort
- Ensures consistency and adherence to best practices
- Reduces security vulnerabilities and configuration drift
- Enhances performance and reliability
- Simplifies integration and scaling across teams and environments
- Generates and maintains accurate documentation automatically
- Improves deployment readiness and error prevention
Best Practices for Auto Configure:
- Conduct regular configuration reviews
- Keep security and compliance in focus
- Enable full monitoring and logging
- Document all changes and dependencies
- Test integrations before going live
- Schedule backups and verify restoration
- Train team members on system behaviors and overrides
Key Considerations:
- Project complexity and team roles
- Security and compliance requirements
- Integration scope and performance expectations
- Maintenance and documentation workflows
- Cost and resource planning
- Access control and automation policies